Building an AI Agent Made Easy Thanks to the AI SDK
Part of the series AI Agents and MCP Server: Teaming Up for the Agentic Web
Before going any further, what's an AI Agent? I think it's important to clarify this concept so we have a better understanding of what we're trying to achieve.
An AI Agent is software that uses AI to perform tasks on behalf of a user. This means you can ask it something using natural language, text or voice, and it will understand and perform the task accordingly. This is a huge step toward making our interactions with machines more natural and intuitive.
You don't need to know exactly what you're looking for or what you want to perform. The AI Agent can understand a suite of actions within the same request, which is something new. Until now, AI assistants like Siri or Google Assistant required more specific commands and could only handle one action at a time. For example, "Start a timer and add an item to the list" would previously require separate commands.
AI's Functionality
To understand this more clearly, let's review today's capabilities of AI. To be precise, we'll focus on LLMs that generate text from text input; this keeps the series readable without reducing relevance.
- Generates text based on the input provided.
- Reasons about the context to increase relevance and coherence.
- Calls tools to perform actions in the real world.
Note
Depending on the provider, there may be additional functionalities available, like built-in tools or MCP tools. Ultimately, everything is considered a tool, whether it's a built-in function, an external API via MCP, or a custom tool.
When you interact with an AI, it will use one or more of these capabilities to answer your query. However, there are some important things to note.
Reasoning always happens before the AI responds. That means if the AI reasons, it will then either generate text (capability 1) or call a tool (capability 3).
Also, the latest models can call multiple tools within a single request, and generate text before and between tool calls to update the user on progress.
This means that if the AI chooses to call tools, the user won't receive an immediate answer because the generate-text capability isn't used. If the user then has to prompt the AI again with "Could I have my answer?", the chat we wanted to build won't be viable.
Note
It's important to note that the AI does not run custom tools directly. It asks the client, via a dedicated response, to call the tool on its behalf. That's why defining tools is often just defining a JSON schema. I recommend reading the tool calling flow in the OpenAI documentation.
Looping on Herself
To solve this problem, we can implement a simple yet powerful feature: a loop.
Yes, a simple while loop makes our chat interface feasible. If the answer is a tool call, we can loop until we get a text response.
With some pseudo-code, this looks like:
while (true) {
  response = AI.ask(userInput)

  if (response.isText()) {
    break
  }

  // Call the tool and update the user
}
That's it. This simple loop combined with the three AI capabilities we defined earlier is what we call an AI Agent. While the answer isn't a direct text generation, it still involves reasoning and tool usage.
Note
To avoid an infinite loop, define a maximum number of iterations.
Our Agent
I think we're ready to start building our AI Agent.
For this series, we will use the AI SDK. We could have used an SDK from a provider like OpenAI or Anthropic, but the higher level of the AI SDK will make it easier while avoiding vendor lock.
To make sure we're all on the same page, here's a quick overview of the infrastructure we're building.
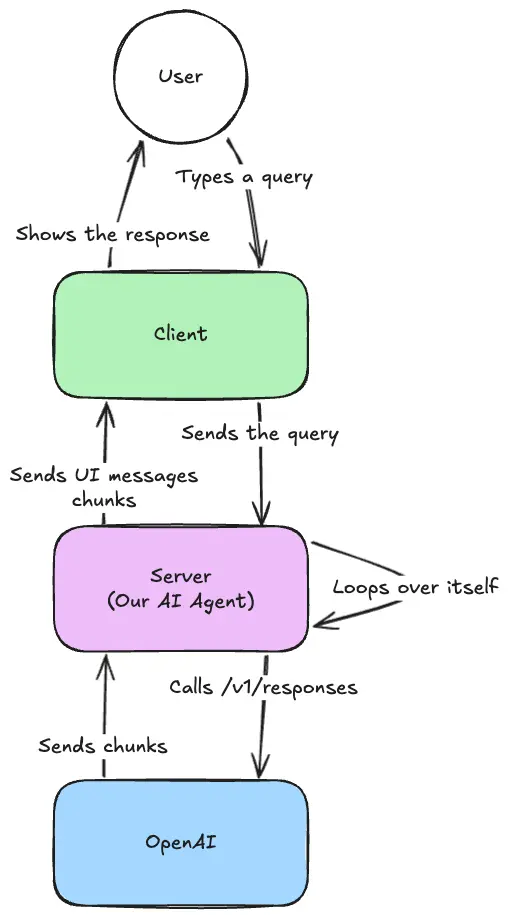
For this part, we'll focus on the server-side implementation and the communication with the provider.
To do so, we'll use Nitro, but you can use any JS backend framework of your choice.
Installation
First, create a new Nitro project:
pnpm dlx giget@latest nitro ai-agent --installThen remove the server/routes/index.ts file, which we won't need:
rm server/routes/index.tsStarting with the AI SDK
Now that our backend is set up, we can start working with the AI SDK.
Install the SDK:
pnpm add ai @ai-sdk/openaiWe also install the OpenAI adapter to communicate with the OpenAI API, but you can use any other adapter you prefer.
To communicate with OpenAI, set up an API key. You can obtain one by creating an account on the OpenAI website. Then set the OPENAI_API_KEY environment variable in your .env file:
NITRO_OPEN_AI_API_KEY=Finally, create a runtime variable within the Nitro configuration:
export default defineNuxtConfig({
  runtimeConfig: {
    openAiApiKey: '',
  },
  // ...
})
Now we're ready to start building our AI Agent.
Streaming Some Text
The first step is to make sure our AI Agent can generate text based on user input. This may be more challenging than it seems, but the AI SDK provides a simple way to achieve it.
Create a new endpoint in the Nitro server that will receive the user query and return the AI-generated response:
mkdir server/api
touch server/api/chat.ts
Then create the endpoint in server/api/chat.ts:
import { createOpenAI } from '@ai-sdk/openai'
import { convertToModelMessages, streamText } from 'ai'
import { defineEventHandler, defineLazyEventHandler, readBody } from 'h3'
import { useRuntimeConfig } from 'nitropack/runtime'

export default defineLazyEventHandler(() => {
  const runtimeConfig = useRuntimeConfig()

  const model = createOpenAI({
    apiKey: runtimeConfig.openAiApiKey,
  })

  return defineEventHandler(async (event) => {
    const { messages } = await readBody(event)

    return streamText({
      model: model('gpt-5-nano'),
      system: `You are a helpful assistant.`,
      messages: convertToModelMessages(messages),
    }).toUIMessageStreamResponse()
  })
})There are two important sections in this file.
- Creating the OpenAI Model:
const model = createOpenAI({
  apiKey: runtimeConfig.openAiApiKey,
})
This creates the adapter for the OpenAI model. If you wish to use another provider, change the adapter creation code. This is also where we use the openAiApiKey from the runtime config.
- Streaming Text Responses:
return streamText({
  model: model('gpt-5-nano'),
  system: `You are a helpful assistant.`,
  messages: convertToModelMessages(messages),
}).toUIMessageStreamResponse()
The second important section is the streaming of text responses. We use the streamText function from the AI SDK to stream the AI-generated responses back to the client. We give it the model, a system prompt, and the user messages. The toUIMessageStreamResponse function transforms the response into a format suitable for building the frontend. If you want only the text, you could use toTextStreamResponse.
All of these components are wrapped in a lazy event handler to ensure the model is only created once, on the first request. This avoids having each request create a new model instance.
You can test your AI Agent endpoint using the following curl command:
curl -X POST http://localhost:3000/api/chat \
  -H "Content-Type: application/json" \
  -d '{
    "messages": [
      {
        "role": "user",
        "parts": [
          {
            "type": "text",
            "text": "Why is the sky blue?"
          }
        ]
      }
    ]
  }'
This command sends a sample user message to your /api/chat endpoint and streams back the AI-generated response.
Isn't it beautiful in its simplicity?
Calling a Tool
Now we can add a tool to our AI Agent. As a reminder, tools are functions that the AI Agent can call to perform specific tasks; the code runs on the server, not in the AI provider.
For this example, we'll add a simple addition tool. Before going further, install Zod to create schemas:
pnpm add zodNow add the addition tool to our AI Agent:
return streamText({
  model: model('gpt-5-nano'),
  system: `You are a helpful assistant.`,
  tools: {
    addition: tool({
      description: 'Adds two numbers',
      inputSchema: z.object({
        a: z.number().describe('The first number'),
        b: z.number().describe('The second number'),
      }),
      execute: ({ a, b }) => ({
        a,
        b,
        result: a + b
      }),
    }),
  },
  messages: convertToModelMessages(messages),
}).toUIMessageStreamResponse()
Finally, update our prompt to ensure the AI will use the new tool:
return streamText({
  model: model('gpt-5-nano'),
  system: `You are a helpful assistant. You can use the tool to add two numbers together.`,
  // ...
}).toUIMessageStreamResponse()
And let's give it a try:
curl -X POST http://localhost:3000/api/chat \
  -H "Content-Type: application/json" \
  -d '{
    "messages": [
      {
        "role": "user",
        "parts": [
          {
            "type": "text",
            "text": "What is 2 + 2?"
          }
        ]
      }
    ]
}'Can you notice something in the response?
The AI performs the calculation using the addition tool:
data: {"type":"tool-output-available","toolCallId":"call_Zmi5NtcVDRFZsZHcsULlutnG","output":{"a":12,"b":24,"result":36}}But it does not provide the final answer directly. It does not say "The answer is 36." If you remember the three capabilities of the AI, this makes sense. The AI used the tool-calling capability, so it cannot provide the final answer directly. We need to call the AI again.
We need to make it an AI Agent!
Making It an Agent
Thanks to the AI SDK, it's trivial to create an AI Agent. We just need to tell streamText the maximum steps it can take to produce a final answer.
import { stepCountIs, streamText } from 'ai'

return streamText({
  model: model('gpt-5-nano'),
  system: `You are a helpful assistant. You can use the tool to add two numbers together.`,
  stopWhen: stepCountIs(2),
  // ...
}).toUIMessageStreamResponse()
The stopWhen: stepCountIs(2) option tells the AI SDK to stop the interaction when the AI has taken two steps, or when the latest step is a text response. With that, our AI Agent should perform the tool call and then generate an answer based on the tool's output.
Note
I recommend reading the Loop Control page in the documentation to understand what happens under the hood.
Let's give it a try:
curl -X POST http://localhost:3000/api/chat \
  -H "Content-Type: application/json" \
  -d '{
    "messages": [
      {
        "role": "user",
        "parts": [
          {
            "type": "text",
            "text": "What is 2 + 2?"
          }
        ]
      }
    ]
}'Yeah, it works! Our AI is now an Agent capable of using tools and generating responses based on their output. Perfect!

Thanks for reading! My name is Estéban, and I love to write about web development and the human journey around it.
I've been coding for several years now, and I'm still learning new things every day. I enjoy sharing my knowledge with others, as I would have appreciated having access to such clear and complete resources when I first started learning programming.
If you have any questions or want to chat, feel free to comment below or reach out to me on Bluesky, X, and LinkedIn.
I hope you enjoyed this article and learned something new. Please consider sharing it with your friends or on social media, and feel free to leave a comment or a reaction below, it would mean a lot to me! If you'd like to support my work, you can sponsor me on GitHub!
Discussions
Add a Comment
You need to be logged in to access this feature.