MCP to Provide Additional Capabilities to the AI Agent
Part of the series AI Agents and MCP Server: Teaming Up for the Agentic Web
We built our first AI Agent with an addition tool. That was an amazing start. Today, we will build a MCP server that contains the tools we need to enhance our AI Agent's capabilities.
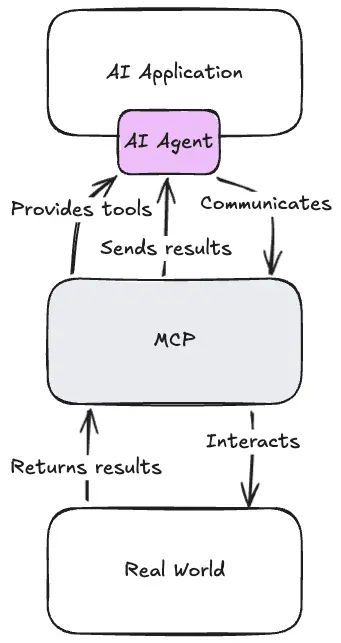
A quick reminder about MCP: MCP is an open-source standard to connect AI applications to external systems. The AI applications contain an AI Agent that can interact with the MCP server through tool calls to access the external world. Visually, it looks like this:
You might wonder why we need an MCP server. For this specific example, we don't strictly need it. But most of the time, knowing how to connect an AI Agent to an MCP server is crucial.
- Use any AI Agent: By providing MCP to your users, you allow them to use any AI Agent that supports the MCP standard. Imagine you're building MCP for a component library, like Nuxt UI, having the ability to use MCP within your code editor is a requirement.
- Use external MCP server: In some cases, you might want to connect your AI Agent to an external MCP server, an MCP you didn't create but want to leverage. This can be useful to integrate with existing systems or take advantage of third-party tools.
- Decoupling: By using an MCP server, you can decouple your AI Agent from the underlying systems it interacts with.
Honestly, I don't see any reason not to use an MCP server.
Building the MCP Server
Within our Nitro application, we can create a new route for the MCP server.
mkdir -p server/routes
touch server/routes/mcp.ts
Then, we have to install the MCP SDK:
pnpm add @modelcontextprotocol/sdkThis is the official MCP SDK for building Model Context Protocols using TypeScript.
Now, we can create our MCP server within the server/routes/mcp.ts file:
import { McpServer } from '@modelcontextprotocol/sdk/server/mcp.js'
import { defineEventHandler } from 'h3'

export default defineEventHandler(async (event) => {
  const server = new McpServer({
    name: 'ai-agent',
    version: '1.0.0'
  })
})
And here we go, our first MCP server!
But as it stands, this MCP server is completely useless. The MCP standard separates the server and the transport layer. In our case, we want an HTTP transport layer to interact with the MCP server.
Note
At first, only STDOUT transport was supported, which made remote MCP impossible.
Fortunately, the MCP SDK provides everything we need to add an HTTP transport layer.
import { McpServer } from '@modelcontextprotocol/sdk/server/mcp.js'
import { StreamableHTTPServerTransport } from '@modelcontextprotocol/sdk/server/streamableHttp.js'
import { defineEventHandler, readBody } from 'h3'
export default defineEventHandler(async (event) => {
const server = new McpServer({
name: 'ai-agent',
version: '1.0.0'
})
const transport: StreamableHTTPServerTransport = new StreamableHTTPServerTransport({
sessionIdGenerator: undefined
})
With server.connect(transport), we instruct the MCP server to use the HTTP transport layer for communication. With transport.handleRequest(event.node.req, event.node.res, body), we handle incoming HTTP requests and route them to the MCP server for processing. The transport uses the Node response to send the result to the client. When the response ends, or terminates prematurely, we need to clean up the transport and server instances to free resources.
The request body is important because tools can have input parameters.
With this setup, we can now try the MCP.
Trying the MCP
To try the MCP, we can use the official MCP Inspector:
npx @modelcontextprotocol/inspector@latestNote
When building an MCP server, use the inspector to try to connect an AI application to the MCP server. The AI application's system prompt can make it very difficult to trigger desired tools.
Then, we can enter the MCP URL and ping the server to make sure it's working.
And it's working!
Adding a Tool
Now that we have a working MCP server, we can move our addition tool from the AI Agent to the MCP server.
Within the server/api/chat.ts file, remove the addition tool registration:
import { createOpenAI } from '@ai-sdk/openai'
import { convertToModelMessages, stepCountIs, streamText, tool } from 'ai'
import { defineEventHandler, defineLazyEventHandler, readBody } from 'h3'
import { useRuntimeConfig } from 'nitropack/runtime'
import { z } from 'zod'

export default defineLazyEventHandler(() => {
  const runtimeConfig = useRuntimeConfig()

  const model = createOpenAI({
    apiKey: runtimeConfig.openAiApiKey,
  })

  return defineEventHandler(async (event) => {
    const { messages } = await readBody(event)

    return streamText({
      model: model('gpt-5-nano'),
      system: `You are a helpful assistant. You can use the tool to add two numbers together.`,
      tools: {
        addition: tool({
          description: 'Adds two numbers',
          inputSchema: z.object({
            a: z.number().describe('The first number'),
            b: z.number().describe('The second number'),
          }),
          execute: ({ a, b }) => ({
            a,
            b,
            result: a + b
          }),
        }),
      },
      stopWhen: stepCountIs(2),
      messages: convertToModelMessages(messages),
    }).toUIMessageStreamResponse()
  })
})In the server/routes/mcp.ts file, register the addition tool with the MCP server.
import { McpServer } from '@modelcontextprotocol/sdk/server/mcp.js'
import { defineEventHandler } from 'h3'
import { z } from 'zod/v3'

export default defineEventHandler(async (event) => {
  const server = new McpServer({
    name: 'ai-agent',
    version: '1.0.0'
  })

  server.tool (
    'addition',
    'Adds two numbers',
    {
      a: z.number().describe('The first number'),
      b: z.number().describe('The second number')
    },
    async (params) => {
      return {
        content: [
          {
            type: 'text',
            text: String(params.a + params.b)
          }
        ]
      }
    }
  )

  // ...
})Warning
The MCP server does not support zod 4. Use zod 3 with import { z } from 'zod/v3'.
As you can see, it's not that different from tool registration in the AI Agent. The main difference is the output format, which is standardized with the MCP server.
Now we can manually use our addition tool:
We now have a working MCP server. It's time to connect the AI Agent to the MCP server.

Thanks for reading! My name is Estéban, and I love to write about web development and the human journey around it.
I've been coding for several years now, and I'm still learning new things every day. I enjoy sharing my knowledge with others, as I would have appreciated having access to such clear and complete resources when I first started learning programming.
If you have any questions or want to chat, feel free to comment below or reach out to me on Bluesky, X, and LinkedIn.
I hope you enjoyed this article and learned something new. Please consider sharing it with your friends or on social media, and feel free to leave a comment or a reaction below, it would mean a lot to me! If you'd like to support my work, you can sponsor me on GitHub!
Discussions
Add a Comment
You need to be logged in to access this feature.