Getting Started with VitePress: Project Setup and Essentials
Part of the series Create a Blog with VitePress and Vue.js from Scratch
Before embarking on creating our blog, it is essential to understand what VitePress is and its origins. Familiarity with the tools we utilize for our blog creation is crucial.
VitePress
According to the homepage:
Vite & Vue Powered Static Site Generator, Markdown to Beautiful Docs in Minutes
While the tagline's use of "docs" might suggest VitePress is exclusively for documentation websites, it can create any content-centric website.
The "What is VitePress?" section explains:
VitePress is a Static Site Generator (SSG) designed for building fast, content-centric websites. In a nutshell, VitePress takes your source content written in Markdown, applies a theme to it, and generates static HTML pages that can be easily deployed anywhere.
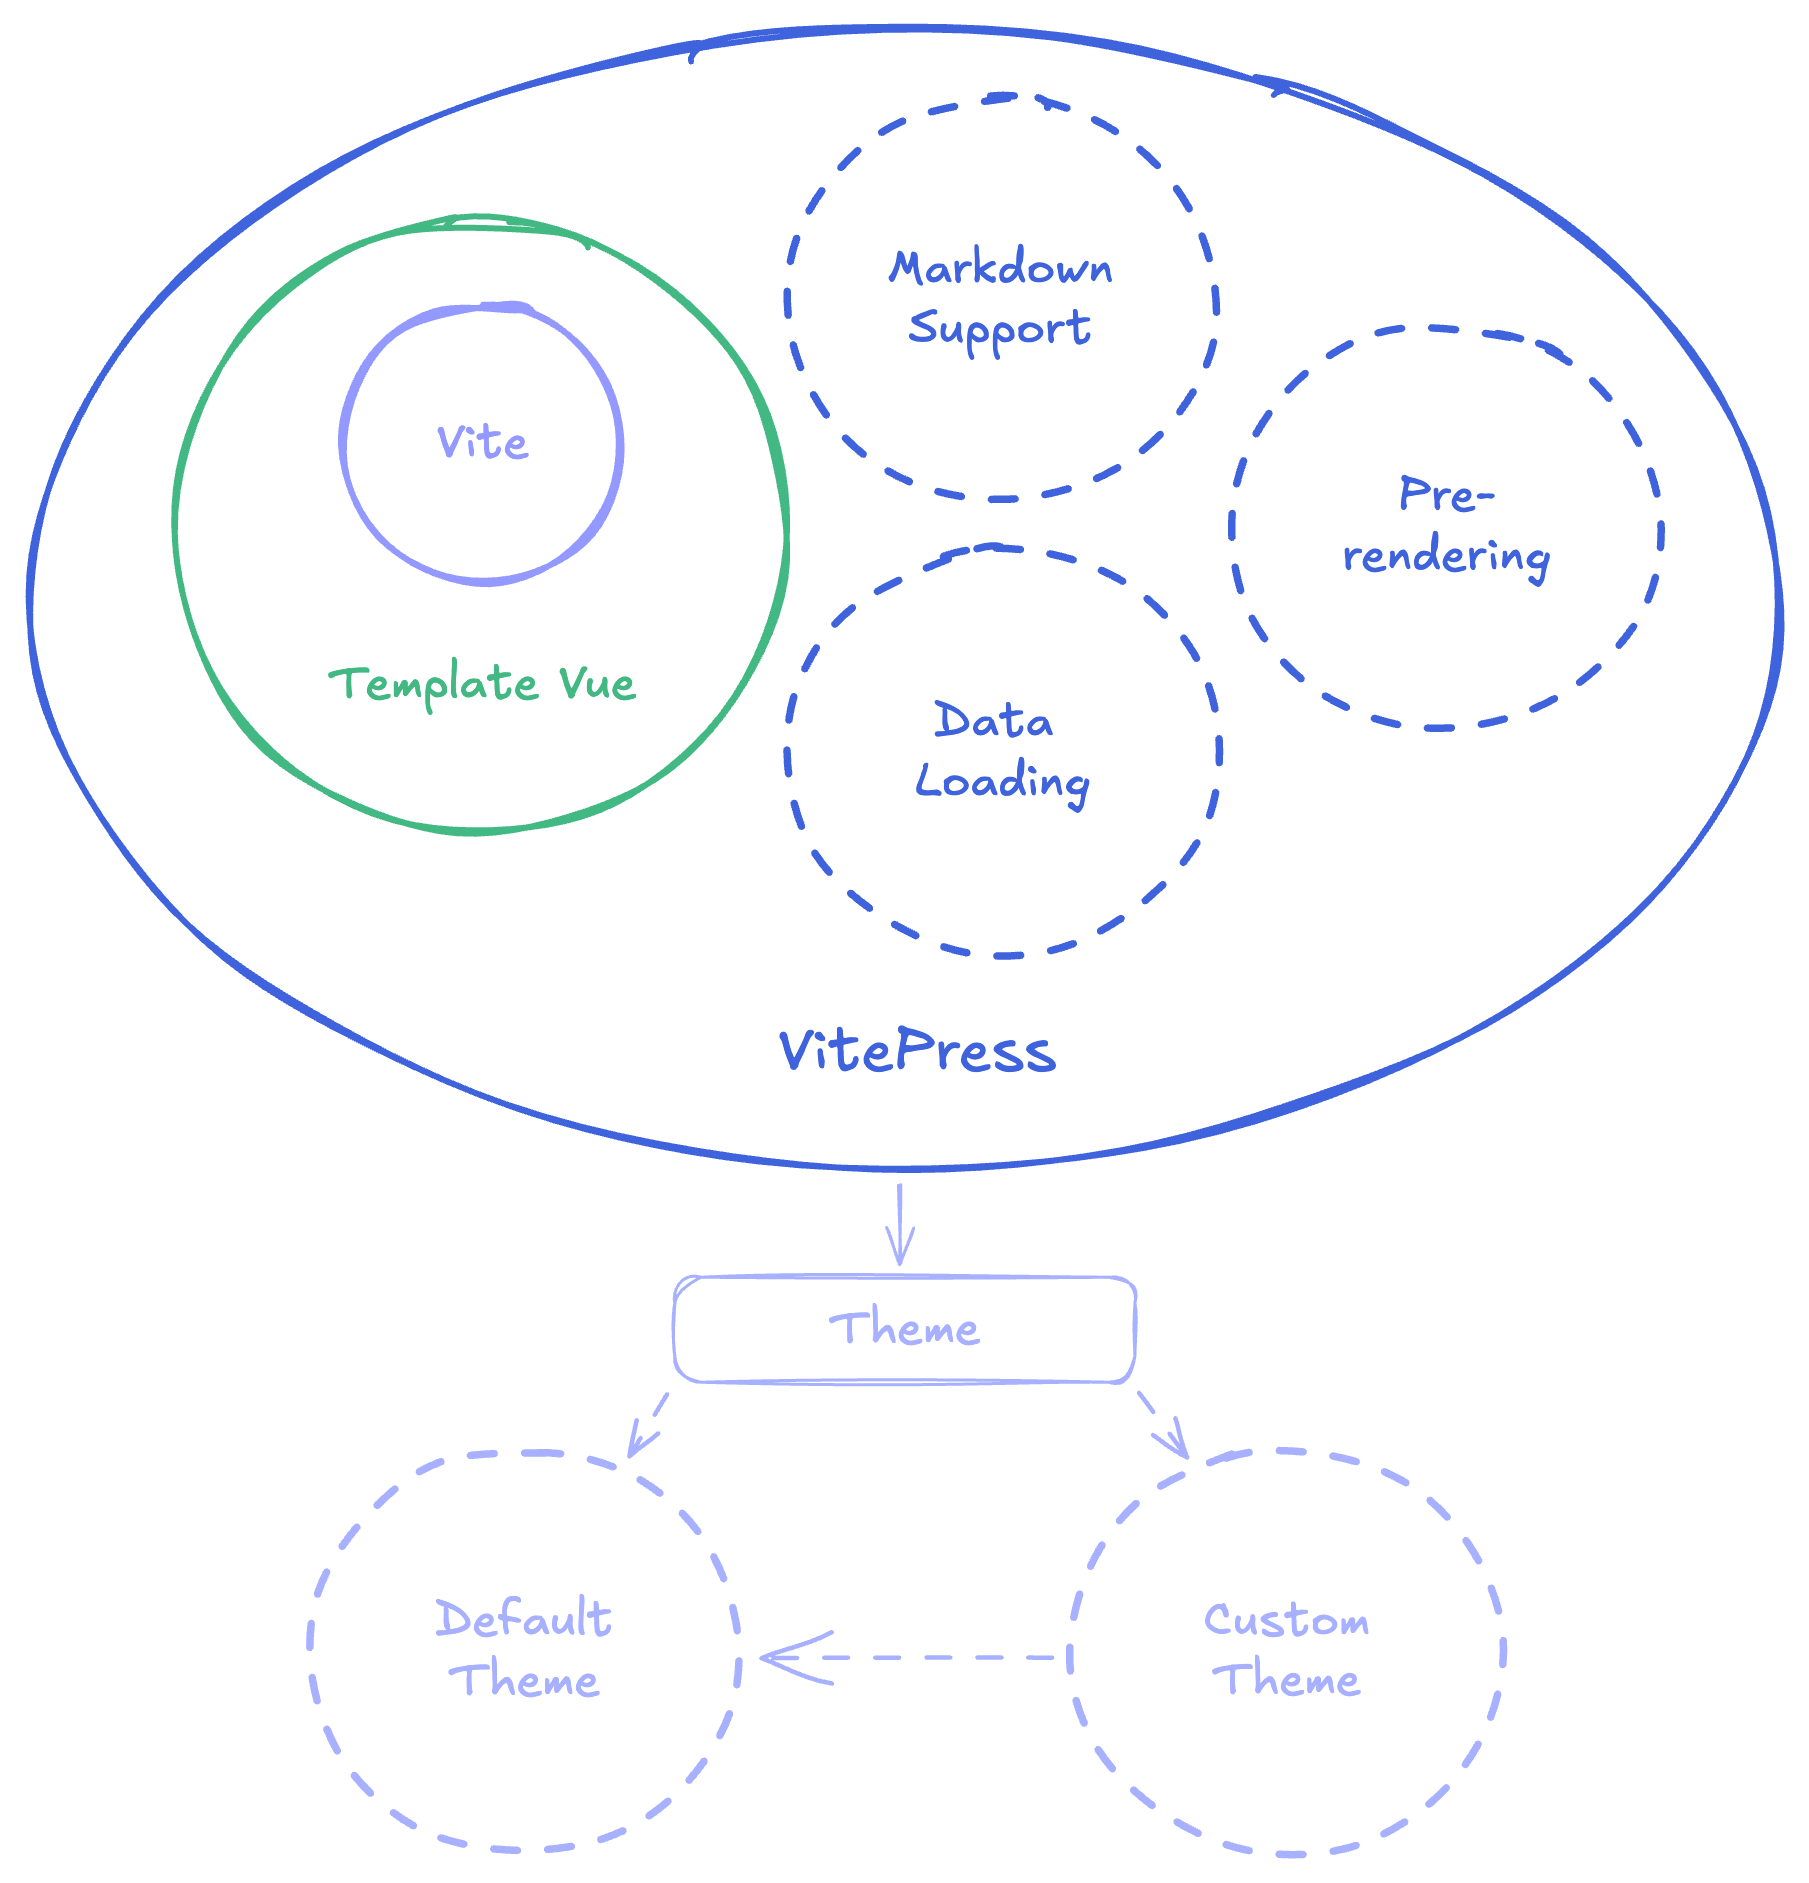
In essence, VitePress builds upon a basic Vite and Vue application, similar to what you could generate with npx create-vite --template vue. However, VitePress offers much more.
It introduces three key features to the standard Vite and Vue application:
- Markdown Support: VitePress comes with a pre-configured Markdown to HTML compiler based on markdown-it. It inherently supports frontmatter, syntax highlighting, GitHub-style alerts, emojis, Vue components, and more. It leverages a comprehensive configuration with numerous plugins. You can review the source code for more insight.
- Data Loading: VitePress enables data loading from the file system, networks, or any other sources. This potent feature facilitates the creation of dynamic websites using a static site generator.
- Pre-rendering at Build-time: VitePress operates as a Single Page Application (SPA), enhancing User Experience (UX) but challenging Search Engine Optimization (SEO). However, due to its markdown-centric static content nature, VitePress pre-renders pages during build-time, resulting in static HTML files. This approach is excellent for SEO while maintaining SPA benefits for UX. It cleverly employs Server Side Rendering (SSR) capabilities of Vue, which you can observe in the source code.
These elements constitute VitePress's foundation, making it ideal for creating blogs, documentation, and other content-focused websites. While it supports dynamic data, that aspect will be explored in another series.
Equipped with a default theme, VitePress facilitates attractive documentation websites. The default theme, available for exploration in the VitePress documentation and its source code, is simply a built-in Vue library comprising components, composables, and CSS, easy to override for creating custom themes.
Understanding the tagline's real implication clarifies why VitePress is chosen for developing a blog; it's a versatile tool for content-centric websites beyond just documentation.
Note
Attempting to utilize a custom Vite and Vue application is ill-advised. VitePress's complexity and configuration management save considerable time, both now and during future blog updates.
History
Developed by Evan You alongside Vite, VitePress tested Vite in a real-world setting, ensuring its practicality and user-friendliness. VitePress evolved from its predecessor VuePress, upgrading from Webpack and Vue 2 to Vite and Vue 3, offering significant performance and developer experience enhancements.
VitePress is popular for creating documentation sites or blogs like The Vue Point, the official Vue.js blog. Its thin layer over Vite ensures it remains highly extendable and customizable, with assurances of continued support.
Initializing the Project
Armed with a better understanding of VitePress, we can initiate a fresh project called "Garabit." You can access the source code on garabit.
Despite being initially tailored for documentation sites within existing projects, the installation process could be smoother. I have highlighted this in two pull requests on the VitePress repository: feat(cli): support custom npm scripts prefix and feat(cli): support custom srcDir.
First, create a folder for our project:
mkdir garabitThen, initialize npm inside this folder and install VitePress:
pnpm init
pnpm add -D vitepress
Note
Throughout this series, I will use pnpm as the package manager, but you can adapt the commands for your preferred package manager.
Finally, scaffold the VitePress project:
pnpm vitepress initRespond to the prompts (press enter for default values, which we will adjust later):
┌  Welcome to VitePress!
│
◇  Where should VitePress initialize the config?
│  ./
│
◇  Site title:
│  My Awesome Project
│
◇  Site description:
│  A VitePress Site
│
◇  Theme:
│  Default Theme
│
◇  Use TypeScript for config and theme files?
│  Yes
│
◇  Add VitePress npm scripts to package.json?
│  Yes
│
└ Done! Now run pnpm run docs:dev and start writing.Exploring the Project
We now have a freshly minted VitePress project. Let's examine the project structure:
.
├── .vitepress
│   └── config.mts
├── api-examples.md
├── index.md
├── markdown-examples.md
├── package.json
└── pnpm-lock.yaml
The root level contains our Markdown files, representing our blog's pages, with filenames (and directories) corresponding to page URLs. index.md serves as the homepage. Although this structure is basic, we will refine it in future articles.
Being content-focused, VitePress's configuration and theme-related elements reside within the .vitepress directory, where the config.mts file configures the theme, plugins, data loading, and more, written in TypeScript. We will delve into this in upcoming articles.
Enhancing the Developer Experience (DX)
While suitable for documentation websites, our custom blog requires additional dependencies to enhance the developer experience (DX). We will incorporate two dependencies:
- Tailwind CSS: A utility-first CSS framework for efficiently crafting custom designs.
- unplugin-vue-components: A Vite plugin for automatic Vue components import.
Tailwind CSS
We will leverage Tailwind CSS for styling our custom theme. This utility-first CSS framework offers powerful, user-friendly design capabilities.
Begin by installing Tailwind CSS:
pnpm add -D tailwindcss postcss autoprefixerCreate the configuration file for Tailwind CSS:
npx tailwindcss init -pWe'll configure Tailwind CSS as we progress.
Auto-import Vue Components
We'll use unplugin-vue-components for automatic Vue component importation, a Vite plugin enabling on-demand component importation. This automated process significantly saves time by eliminating manual importation per file. Components are not globally available, mitigating performance impact, as our files are transformed via a rollup plugin, adding an import at the file's top solely if the component is utilized, a testament to the on-demand philosophy.
First, install unplugin-vue-components:
pnpm add -D unplugin-vue-componentsThen, integrate it into the config.mts file:
import Components from 'unplugin-vue-components/vite'
import { defineConfig } from 'vitepress'

export default defineConfig({
  // ...
  vite: {
    plugins: [Components()],
  },
})
We will configure unplugin-vue-components more thoroughly later.
Ready for the Next Step
With our VitePress project now featuring Tailwind CSS and unplugin-vue-components, we are poised to begin developing our blog.
In the subsequent article, we will examine VitePress fundamentals and craft a personalized theme for our blog.

Thanks for reading! My name is Estéban, and I love to write about web development and the human journey around it.
I've been coding for several years now, and I'm still learning new things every day. I enjoy sharing my knowledge with others, as I would have appreciated having access to such clear and complete resources when I first started learning programming.
If you have any questions or want to chat, feel free to comment below or reach out to me on Bluesky, X, and LinkedIn.
I hope you enjoyed this article and learned something new. Please consider sharing it with your friends or on social media, and feel free to leave a comment or a reaction below, it would mean a lot to me! If you'd like to support my work, you can sponsor me on GitHub!
Discussions
Add a Comment
You need to be logged in to access this feature.