Deploy VitePress Blog Globally with Cloudflare Pages
Part of the series Create a Blog with VitePress and Vue.js from Scratch
Today marks the day we make our blog accessible to the world through Cloudflare Pages. This process is straightforward once you have learned the procedure. The first attempt may appear daunting, especially if you are new to web development, but with today's guide, you will be able to share the blog globally in just a few clicks.
Essential Components
Before deploying our blog, we must address a few essential components. Our blog requires a header and a homepage to be complete.
Header
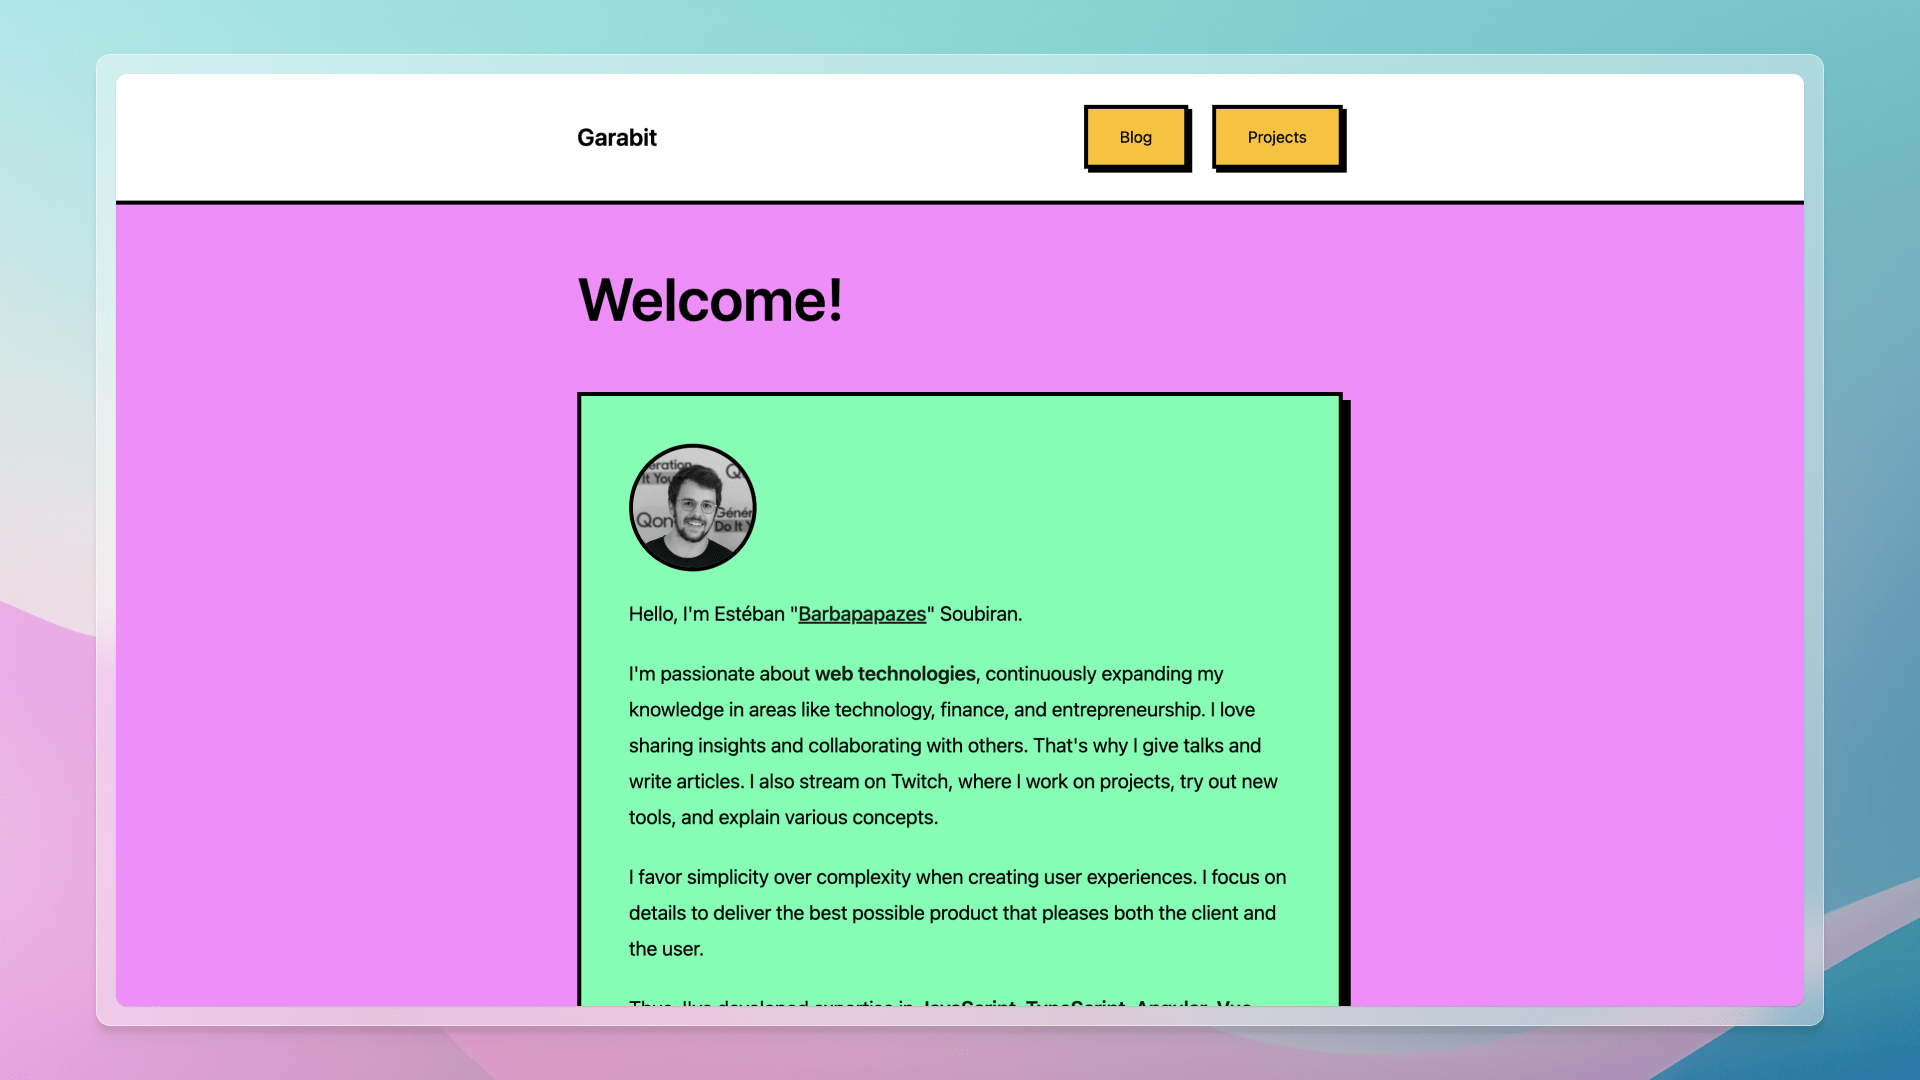
For the header, I will keep it as minimal as possible since it is not the primary focus of this series. I will create a TheHeader.vue component in the .vitepress/theme/components directory. This component will contain the title of our blog and a navigation bar with two links: Blog and Projects, which is a common pattern for blogs.
<script lang="ts" setup>
const { site } = useData()
</script>

<template>
  <header class="border-b-4 border-black bg-white p-8">
    <div
      class="mx-auto max-w-screen-md flex flex-col items-center justify-between gap-6 md:flex-row"
    >
      <span>
        <a href="/" class="text-2xl text-black font-semibold">
          {{ site.title }}
        </a>
      </span>

      <div class="flex items-center gap-6">
        <ButtonPrimary href="/blog">
          Blog
        </ButtonPrimary>

        <ButtonPrimary href="/projects">
          Projects
        </ButtonPrimary>
      </div>
    </div>
  </header>
</template>
Then, we can include it in the Layout.vue component.
<script lang="ts" setup>
// ...
</script>

<template>
  <div class="min-h-screen bg-[#FC88FF] py-16">
    <TheHeader /> // [!code ++]

    <!-- ... -->
  </div>
</template>
Home
For the homepage, we already master the process.
- Create an
index.mdfile in thesrcdirectory with the following content:
---
layout: home
title: Home
---

<img
  src="https://github.com/barbapapazes.png"
  alt="Profile Picture"
  class="h-32 w-32 my-0 border-4 border-black rounded-full"
/>

Hello, I'm Estéban "[Barbapapazes](https://gh.soubiran.dev)" Soubiran.

I'm passionate about **web technologies**, continuously expanding my knowledge
in areas like technology, finance, and entrepreneurship. I love sharing
insights and collaborating with others. That's why I give talks and write
articles. I also stream on Twitch, where I work on projects, try out new
tools, and explain various concepts.

I favor simplicity over complexity when creating user experiences. I focus
on details to deliver the best possible product that pleases both the
client and the user.

Thus, I've developed expertise in **JavaScript**, **TypeScript**, **Angular**, **Vue** ,
**Nuxt**, **Adonis**, **Laravel**, which aids me in thoroughly understanding the
client's needs and proposing the best solutions.
Note
You should personalize the content to reflect your own profile.
- Create the
Home.vuelayout component in the.vitepress/theme/pagesdirectory:
<template>
  <section>
    <h1 class="text-6xl text-black font-semibold">
      Welcome!
    </h1>

    <div
      class="mt-16 border-4 border-black bg-[#4FFFAF] p-12 shadow-[8px_8px_0_black]"
    >
      <Content
        class="prose-xl text-black prose prose-zinc [&>div>:first-child]:mt-0 [&>div>:last-child]:mb-0"
      />
    </div>
  </section>

  <section class="mt-16">
    <h2 class="text-4xl text-black font-semibold">
      Find me online
    </h2>

    <div class="mt-8 flex flex-wrap justify-center gap-8 md:justify-start">
      <ButtonSecondary href="https://x.soubiran.dev" target="_blank">
        Twitter
      </ButtonSecondary>

      <ButtonSecondary href="https://gh.soubiran.dev" target="_blank">
        GitHub
      </ButtonSecondary>

      <ButtonSecondary href="https://linkedin.soubiran.dev" target="_blank">
        LinkedIn
      </ButtonSecondary>

      <ButtonSecondary href="https://tv.soubiran.dev" target="_blank">
        Twitch
      </ButtonSecondary>
    </div>
  </section>
</template>- Create a
ButtonSecondarycomponent in the.vitepress/theme/componentsdirectory:
<script lang="ts" setup>
defineProps<{
  href: string
}>()
</script>

<template>
  <a
    :href
    class="inline-block border-4 border-black bg-[var(--color-purple)] px-8 py-4 text-white shadow-[4px_4px_0_black] transition duration-150 ease-linear hover:bg-[#828cd2] hover:shadow-[6px_6px_0_black] hover:-translate-x-[0.125rem] hover:-translate-y-[0.125rem]"
  >
    <slot />
  </a>
</template>- Update the
app.cssandalerts.cssfiles to include the new color--color-purple:
@tailwind base;
@tailwind components;
@tailwind utilities;

:root {
  --color-yellow: #ffbf00;
  --color-purple: #6c71c4;
  --color-sand: #fdf6e3;
}:root {
--color-note: #3a85ff;
--color-tip: #00ddb3;
--color-warning: var(--color-yellow);
--color-severe: #ff7002;
--color-caution: #f34720;
--color-important: var(--color-purple);
}- Route the homepage by updating the
Layout.vuecomponent:
<script lang="ts" setup>
const { frontmatter } = useData()
</script>

<template>
  <div class="min-h-screen bg-[#FC88FF] py-16">
    <main class="mx-auto max-w-screen-md">
      <Home v-if="frontmatter.layout === 'home'" /> // [!code ++]

      <BlogIndex v-else-if="frontmatter.layout === 'blog'" />
      <BlogShow v-else-if="frontmatter.layout === 'blog-show'" />

      <ProjectsIndex v-else-if="frontmatter.layout === 'projects'" />
    </main>
  </div>
</template>
Refactor ButtonPrimary
I've also refined the ButtonPrimary component to remove the default href attribute and employ a prop instead.
<script lang="ts" setup>
defineProps<{
  href: string
}>()
</script>

<template>
  <a
    :href
    class="..."
  >
    <slot />
  </a>
</template>
Basic Responsive Design
I've implemented a few classes to enhance the blog's responsiveness. In the BlogShow.vue component, I've removed the mx-4 class from the article container. Instead, the margin is managed in the Layout.vue component.
<script lang="ts" setup>
const { frontmatter } = useData()
</script>

<template>
  <div class="min-h-screen bg-[#FC88FF]">
    <TheHeader />

    <div class="px-4 py-16">
      <main class="mx-auto max-w-screen-md">
        <Home v-if="frontmatter.layout === 'home'" />

        <BlogIndex v-else-if="frontmatter.layout === 'blog'" />
        <BlogShow v-else-if="frontmatter.layout === 'blog-show'" />

        <ProjectsIndex v-else-if="frontmatter.layout === 'projects'" />
      </main>
    </div>
  </div>
</template>
On the first div, I removed the py-16 class. Around the main, I've added px-4 py-16. This ensures that the content remains clear of the screen edges on mobile devices, improving readability.
Deploy to Cloudflare Pages
Now that our blog is fully developed, we can deploy it to Cloudflare Pages.
Cloudflare is a company that provides numerous services to enhance web speed and security, such as a zero-trust solution, a WAF, CDN, DNS, DDoS protection, and more for both businesses and individuals.
Their most renowned service is the reverse proxy. Cloudflare acts as the main gateway for our traffic, subsequently routing it internally to the correct server using DNS. This allows us to mask our server's IP, cache static assets, and protect our server from DDoS attacks.
Cloudflare Pages is one of their offerings. It is a hosting platform for static and JAMstack websites, with a generous free tier perfect for personal projects.
Important
Platforms like Vercel or Netlify could have been used to deploy our blog. They are excellent platforms for static websites. I chose Cloudflare Pages as it has become my preferred platform because it combines numerous services: DNS, CDN, DDoS protection, hosting, Registrar, Workers, and more.
Using Cloudflare Pages, we have two choices for website deployment:
- CLI: Use the Cloudflare CLI to push the generated files to Cloudflare Pages, which then automatically deploys the website across their network.
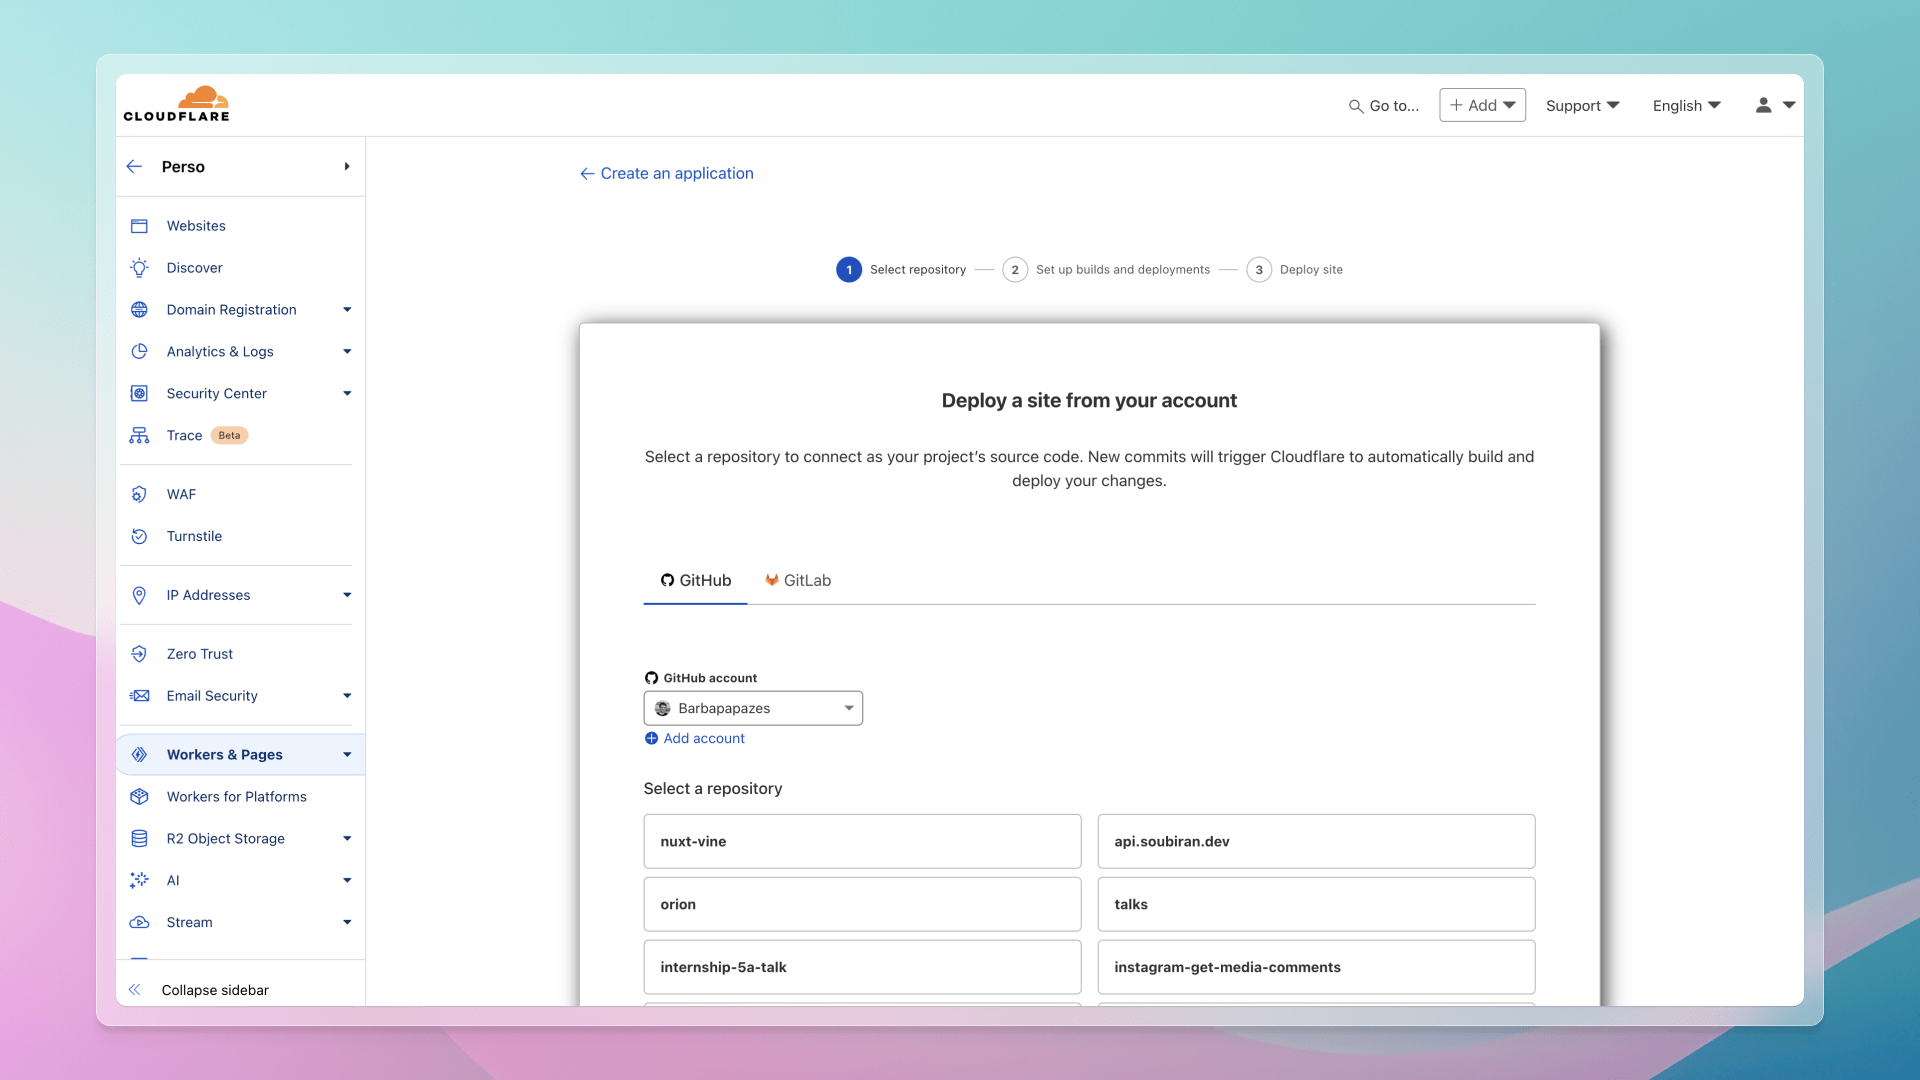
- Git Repository: Connect our GitHub or GitLab repository to Cloudflare Pages. Any commit to the
mainbranch prompts Cloudflare to automatically build and deploy the site. We will use this option because of its convenience. Simply push and the site is live. Additionally, Cloudflare deploys a preview for each pull request for verifying changes before they are merged.
Note
You need a Cloudflare account to proceed. If you do not have one, you can create a free account and log in.
In the left sidebar, click on "Workers & Pages". We will see the "Overview" dashboard. Click on the "Create" button to start a new project.
By default, the creation panel is set to "Workers". Click on the "Pages" tab to switch to the "Pages" creation panel. Then, click "Connect to Git".
Select the repository hosting the blog. Once selected, click on "Begin Setup".

The crucial part is the "Build settings." Set the Build command to npm run build and the Build output directory to .vitepress/dist. There settings are specific to VitePress projects and our blog's configuration.
Finally, click "Save and Deploy." Cloudflare will build and deploy our blog. Once deployment is complete, it will be presented with our blog's URL. Click it to see our live blog. 🚀
Share the URL with friends and family. We can also post it on social media to reach a broader audience. Enjoy the new blog! 🎉
Tip
Add a custom domain to your blog under the "Custom domains" tab. It's straightforward to set up and makes your blog appear more professional.

Conclusion
Congratulations! You have successfully created a blog with VitePress and Vue.js from scratch. You have learned how to establish a new VitePress project, set basic custom themes, design the blog's architecture, compile and read blog articles, automatically enhance SEO metadata and sitemaps, showcase GitHub projects, generate Open Graph images automatically, and share your blog globally.
Your journey has culminated in a fully operational and engaging blog, allowing you to focus solely on producing content. Simply write and publish, as the blog will autonomously manage everything else.
I genuinely hope you found this series enlightening. Should you have any questions or feedback, please feel free to share your thoughts in the comments section below each article.
Thanks for reading! My name is Estéban, and I love to write about web development and the human journey around it.
I've been coding for several years now, and I'm still learning new things every day. I enjoy sharing my knowledge with others, as I would have appreciated having access to such clear and complete resources when I first started learning programming.
If you have any questions or want to chat, feel free to comment below or reach out to me on Bluesky, X, and LinkedIn.
I hope you enjoyed this article and learned something new. Please consider sharing it with your friends or on social media, and feel free to leave a comment or a reaction below, it would mean a lot to me! If you'd like to support my work, you can sponsor me on GitHub!
Discussions
Add a Comment
You need to be logged in to access this feature.