A powerful AI application made with Nitro and Nuxt UI
Part of the series AI Agents and MCP Server: Teaming Up for the Agentic Web
Our backend is ready, and we can now focus on the frontend. Once done, we will have a full working AI application.
To build it, we will use Nuxt along with Nuxt UI, which contains a set of components specifically designed for building AI applications.
From Nitro to Nuxt
Nuxt uses Nitro as its server engine, so transitioning from Nitro to Nuxt won't be difficult.
As this part isn't the most interesting one, I created this script to simplify the process:
# Remove Nitro dependencies
pnpm remove nitropack h3

# Install Nuxt dependencies
pnpm add nuxt vue vue-router

# Update package.json scripts
jq '.scripts = {
  "build": "nuxt build",
  "dev": "nuxt dev",
  "generate": "nuxt generate",
  "preview": "nuxt preview",
  "postinstall": "nuxt prepare"
}' package.json > tmp.json && mv tmp.json package.json

# Update tsconfig.json for Nuxt
cat > tsconfig.json <<'EOF'
{
  "files": [],
  "references": [
    { "path": "./.nuxt/tsconfig.app.json" },
    { "path": "./.nuxt/tsconfig.server.json" },
    { "path": "./.nuxt/tsconfig.shared.json" },
    { "path": "./.nuxt/tsconfig.node.json" }
  ]
}
EOF

# Create Nuxt config
cat > nuxt.config.ts <<'EOF'
import { defineNuxtConfig } from "nuxt/config"

export default defineNuxtConfig({
  runtimeConfig: {
    openAiApiKey: '',
    mcpEndpoint: '',
  },
  compatibilityDate: '2025-10-05',
})
EOF

# Remove old Nitro config
rm nitro.config.ts

# Set up basic Nuxt app structure
mkdir -p app/pages
cat > app/app.vue <<'EOF'
<template>
  <div>
    <NuxtRouteAnnouncer />
    <NuxtPage />
  </div>
</template>
EOF

cat > app/pages/index.vue <<'EOF'
<template>
  <div>
    <h1>Welcome to the AI Application</h1>
  </div>
</template>
EOF

# Update .env and .gitignore
sed -i '' 's/NITRO/NUXT/g' .env
echo ".nuxt" >> .gitignore

# Prepare Nuxt
pnpm run postinstallAdding Nuxt UI
Installing Nuxt UI isn't part of this series, so you can just run this script:
# Install Nuxt UI and Tailwind CSS
pnpm add @nuxt/ui tailwindcss

# Create the main CSS file and import styles
mkdir -p app/assets/css
cat > app/assets/css/main.css <<'EOF'
@import 'tailwindcss';
@import '@nuxt/ui';
EOF

# Update Nuxt config to enable Nuxt UI and include the CSS
cat > nuxt.config.ts <<'EOF'
import { defineNuxtConfig } from "nuxt/config"

export default defineNuxtConfig({
  modules: ['@nuxt/ui'],
  css: ['~/assets/css/main.css'],
  runtimeConfig: {
    openAiApiKey: '',
    mcpEndpoint: '',
  },
  compatibilityDate: '2025-10-05',
})
EOF

# Update the main app layout to use Nuxt UI's UApp component
cat > app/app.vue <<'EOF'
<template>
  <UApp>
    <NuxtPage />
  </UApp>
</template>
EOFOnce done, we can start the development server with:
pnpm run devEverything should work as expected.
Building the Application
Now that we have a working Nuxt application with Nuxt UI, we can use its components to build the user interface. For this article, we won't go into the details of each component or build the perfect UI. Instead, we'll focus on the overall structure and functionality of the application.
Within the Nuxt documentation, there is a fully working example of a page with a chat interface that we can use. We don't need more than that for today's implementation.
Before using it, we need to install the AI SDK for Vue.
pnpm add @ai-sdk/vueWe also need to install @nuxtjs/mdc to parse and render Markdown on the fly.
pnpm dlx nuxt module add @nuxtjs/mdcThen, we can copy and paste the example code into our app/pages/index.vue file:
<script setup lang="ts">
import { Chat } from '@ai-sdk/vue'
import { getTextFromMessage } from '@nuxt/ui/utils/ai'

const input = ref('')

const chat = new Chat({
  onError(error) {
    console.error('Chat error:', error)
  }
})

function handleSubmit(e: Event) {
  e.preventDefault()
  chat.sendMessage({ text: input.value })
  input.value = ''
}
</script>

<template>
  <UDashboardPanel>
    <template #body>
      <UContainer>
        <UChatMessages :messages="chat.messages" :status="chat.status">
          <template #content="{ message }">
            <MDC :value="getTextFromMessage(message)" :cache-key="message.id" unwrap="p" />
          </template>
        </UChatMessages>
      </UContainer>
    </template>

    <template #footer>
      <UContainer>
        <UChatPrompt v-model="input" :error="chat.error" @submit="handleSubmit">
          <UChatPromptSubmit :status="chat.status" @stop="chat.stop" @reload="chat.regenerate" />
        </UChatPrompt>
      </UContainer>
    </template>
  </UDashboardPanel>
</template>And you know the best part? It works out of the box.
Type "What is 2+2" in the input field, and you should see the answer from the AI model.

You may be wondering how to be sure that the chat is effectively using the addition tool? One way to verify this is by opening the inspector and checking the Event Stream from the /api/chat endpoint. You should see something like this:
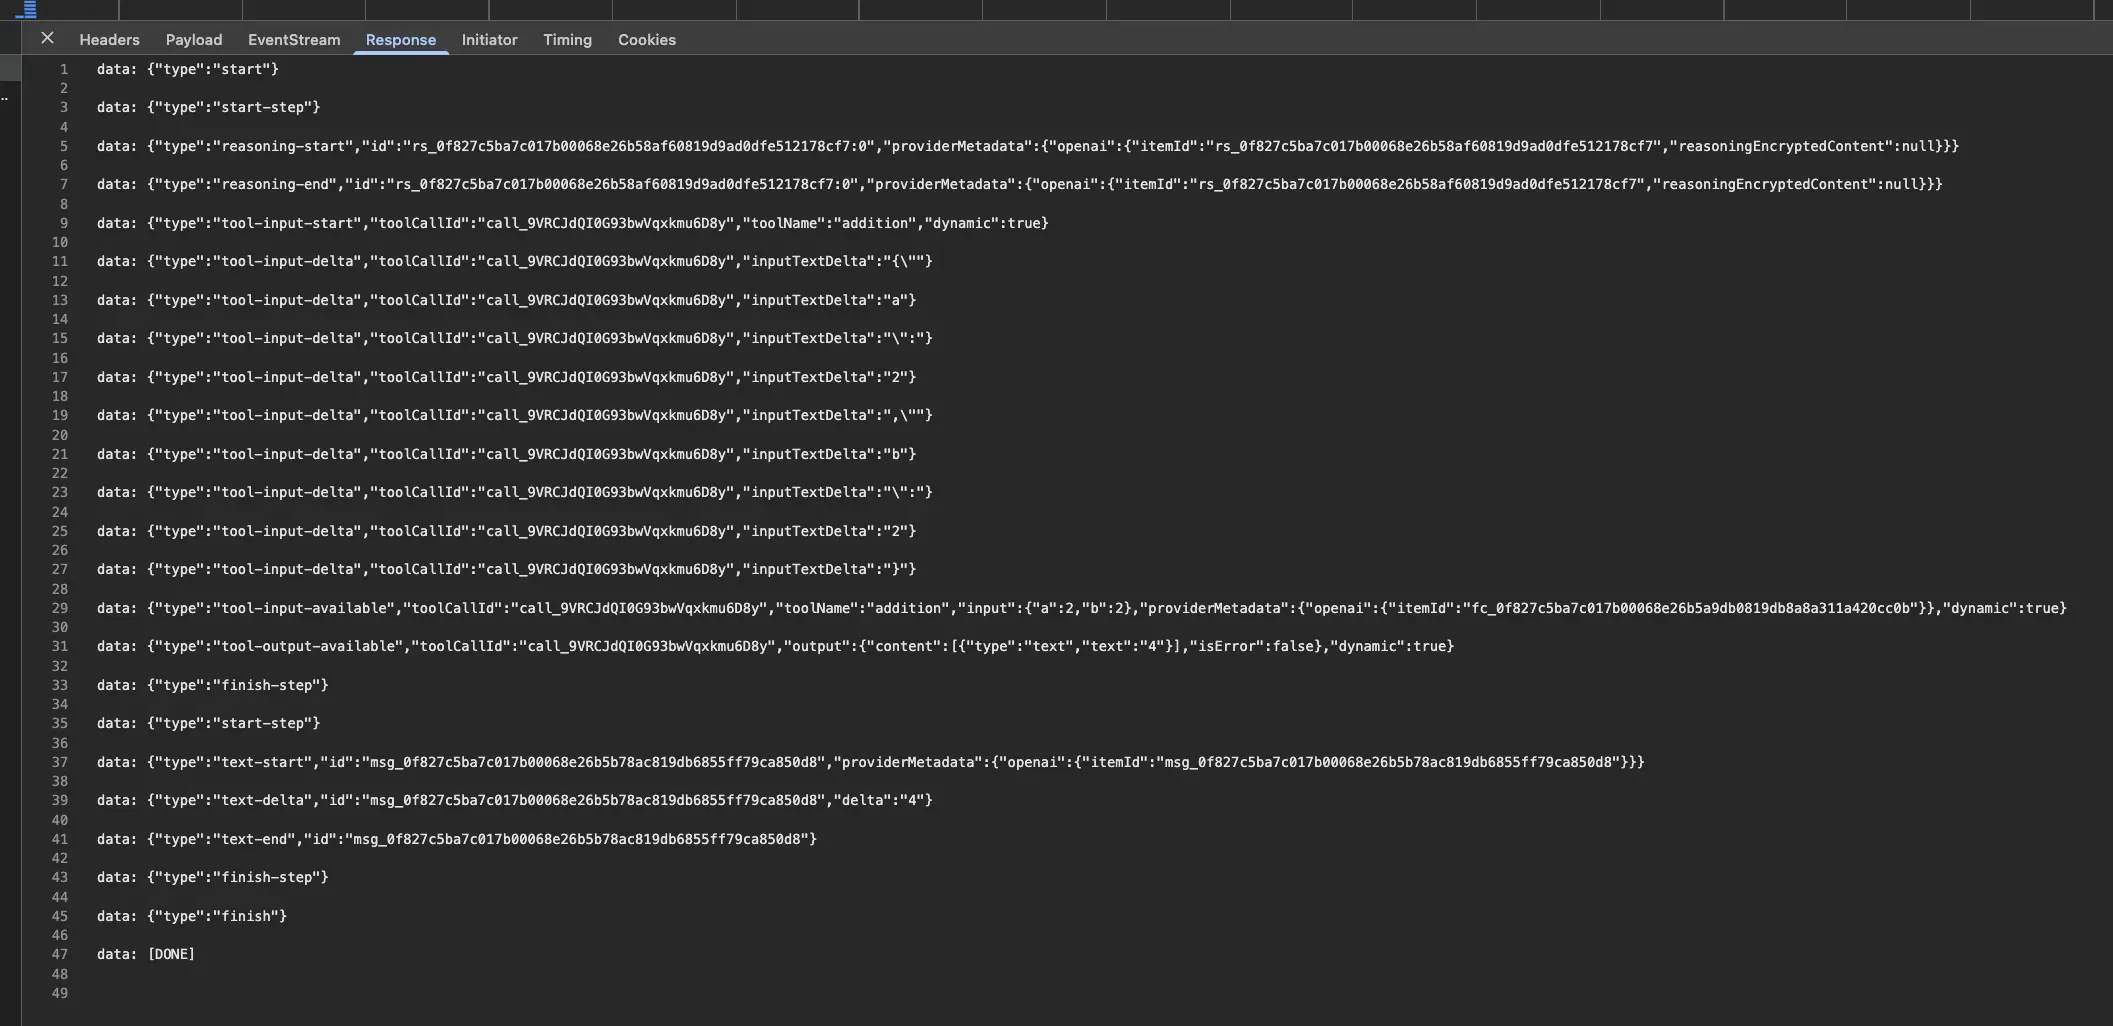
This is the same output we see when using curl in our terminal.
Explanations are Required
So yes, we've built an AI application that uses our AI Agent. But what is really happening here?
First, the output of our API /api/chat isn't the raw output of the AI model. Instead, it is a modified version to make building AI applications easier. This output is specifically tailored to work with a UI, which explains why the function is named toUIMessageStreamResponse.
UIMessage is the interface that defines the structure of a message in an AI application. The frontend does not need to transform the received stream of messages because they are already in the correct format.
Also, the AI SDK provides a class named Chat, which is designed to manage the state of the chat application. It automatically handles the message stream, appends new messages, and sends messages using the correct format with sendMessage({ text: input.value }). It also manages the chat status, such as loading and error states.
If we get rid of the Chat class and manage everything ourselves, the code would look like this:
const chat = reactive({
  messages: [] as UIMessage[],
  status: 'idle',
  error: null as Error | null
})

function sendMessage(message: UIMessage) {
  chat.messages.push(message)
  chat.status = 'loading'

  const eventSource = new EventSource('/api/chat')
  eventSource.onmessage = (event) => {
    const data = JSON.parse(event.data)
    chat.messages.push(data)
  }
  eventSource.onerror = (error) => {
    chat.error = error
  }
  eventSource.onopen = () => {
    chat.status = 'connected'
  }
}It's not that complicated, but the AI SDK does a lot more than that and not using it for your next AI application would be a missed opportunity.
For example, we can show the user the different tools used, their status, and their input in real time.
Showing Tools
Each message has the same structure, whether it comes from the user or the assistant. A message is composed of parts. For example, a user message can have text parts and file parts, while an assistant message can have text, reasoning, tool invocation, and file parts.
Under the hood, the AI SDK is responsible for managing these parts while receiving chunks from the server. The text part is received as chunks and the AI SDK automatically assembles them into a message. For capabilities, the AI SDK automatically updates the state of the message, allowing us to focus on the UI.
This means that we just need to iterate through messages to display them. So, we can tweak the rendering logic a little to display the tools used in addition to each message.
Currently, the logic looks like this:
<template #content="{ message }">
  <MDC :value="getTextFromMessage(message)" :cache-key="message.id" unwrap="p" />
</template>
Instead of only looping through the messages, we will also loop through the parts of the message to access the type, the state, and the content.
<template #content="{ message }">
  <template v-for="(part, index) in message.parts" :key="index">
    <MDC v-if="part.type === 'text'" :value="part.text" :cache-key="message.id + '-' + index" unwrap="p" />
    <div v-else-if="part.type === 'reasoning'"> {{ part.state === 'streaming' ? 'Thinking...' : 'Thinking complete' }} </div>
      <div v-else-if="part.type === 'dynamic-tool' && part.toolName === 'addition'">
      <template v-if="part.state === 'input-streaming'">
        <template v-if="part.input && (part.input as { a: number, b: number }).a !== undefined && (part.input as { a: number, b: number }).b !== undefined">
        Adding: {{ (part.input as { a: number, b: number }).a }} + {{ (part.input as { a: number, b: number }).b }}
        </template>
        <template v-else>
        Adding...
        </template>
      </template>
      <template v-else>
        Addition complete: {{ (part.input as { a: number, b: number }).a }} + {{ (part.input as { a: number, b: number }).b }}
      </template>
      </div>
  </template>
</template>
With this rendering logic, we can show the user when the model is thinking, when a tool is used, the tool's input, and, of course, the text response.
Note
This approach is flexible, allowing you to easily customize it to fit your needs.
At the end, it looks like this:
The visual feedback to the user makes the difference, beautiful!
Now it's time to push it online.

Thanks for reading! My name is Estéban, and I love to write about web development and the human journey around it.
I've been coding for several years now, and I'm still learning new things every day. I enjoy sharing my knowledge with others, as I would have appreciated having access to such clear and complete resources when I first started learning programming.
If you have any questions or want to chat, feel free to comment below or reach out to me on Bluesky, X, and LinkedIn.
I hope you enjoyed this article and learned something new. Please consider sharing it with your friends or on social media, and feel free to leave a comment or a reaction below, it would mean a lot to me! If you'd like to support my work, you can sponsor me on GitHub!
Discussions
Add a Comment
You need to be logged in to access this feature.