Create a Full-Stack Nuxt Application: A Twitch Journey
I finally did it!
After months of thinking about it, I finally started my first stream on Twitch, the 28th of April 2024. It's a very important step for me because I love sharing my knowledge and talking about what I'm doing.
When I was at school, I organized some lessons for my classmates to explain programming. I also joined a community to explain things about computers, I gave some talks, and recently, I started to write articles on my blog.
Twitch is just a new way to continue doing what I love!
For the coming weeks, I'll share with you my journey to build a full-stack Nuxt application, deployed on Cloudflare, called Orion. I'll explain how I built it, the choices I made, and the problems I encountered. My goal through this article is to give you an honest and realistic view of the pros and cons of building a full-stack application on the edge with Nuxt in May 2024 through the process of building a real-world application.
In this article, I'll share with you every step of this first series of streams. If you don't speak French (because streams are in French), if you missed a stream, or if you simply prefer to read, this article is for you!
Discovering NuxtHub and Starting the Full-Stack Nuxt Application
Orion is a full-stack application built with Nuxt and developed live on Twitch. You can see the replay on YouTube and the source code is open-source on GitHub.
This was my first stream, and to be honest, I was a bit stressed. The moment when you have to change the scene from the "Starting Soon" to the facecam is hard. But once I started to talk, everything went well. However, that doesn't mean it's the best stream you'll ever see. We're going to improve!
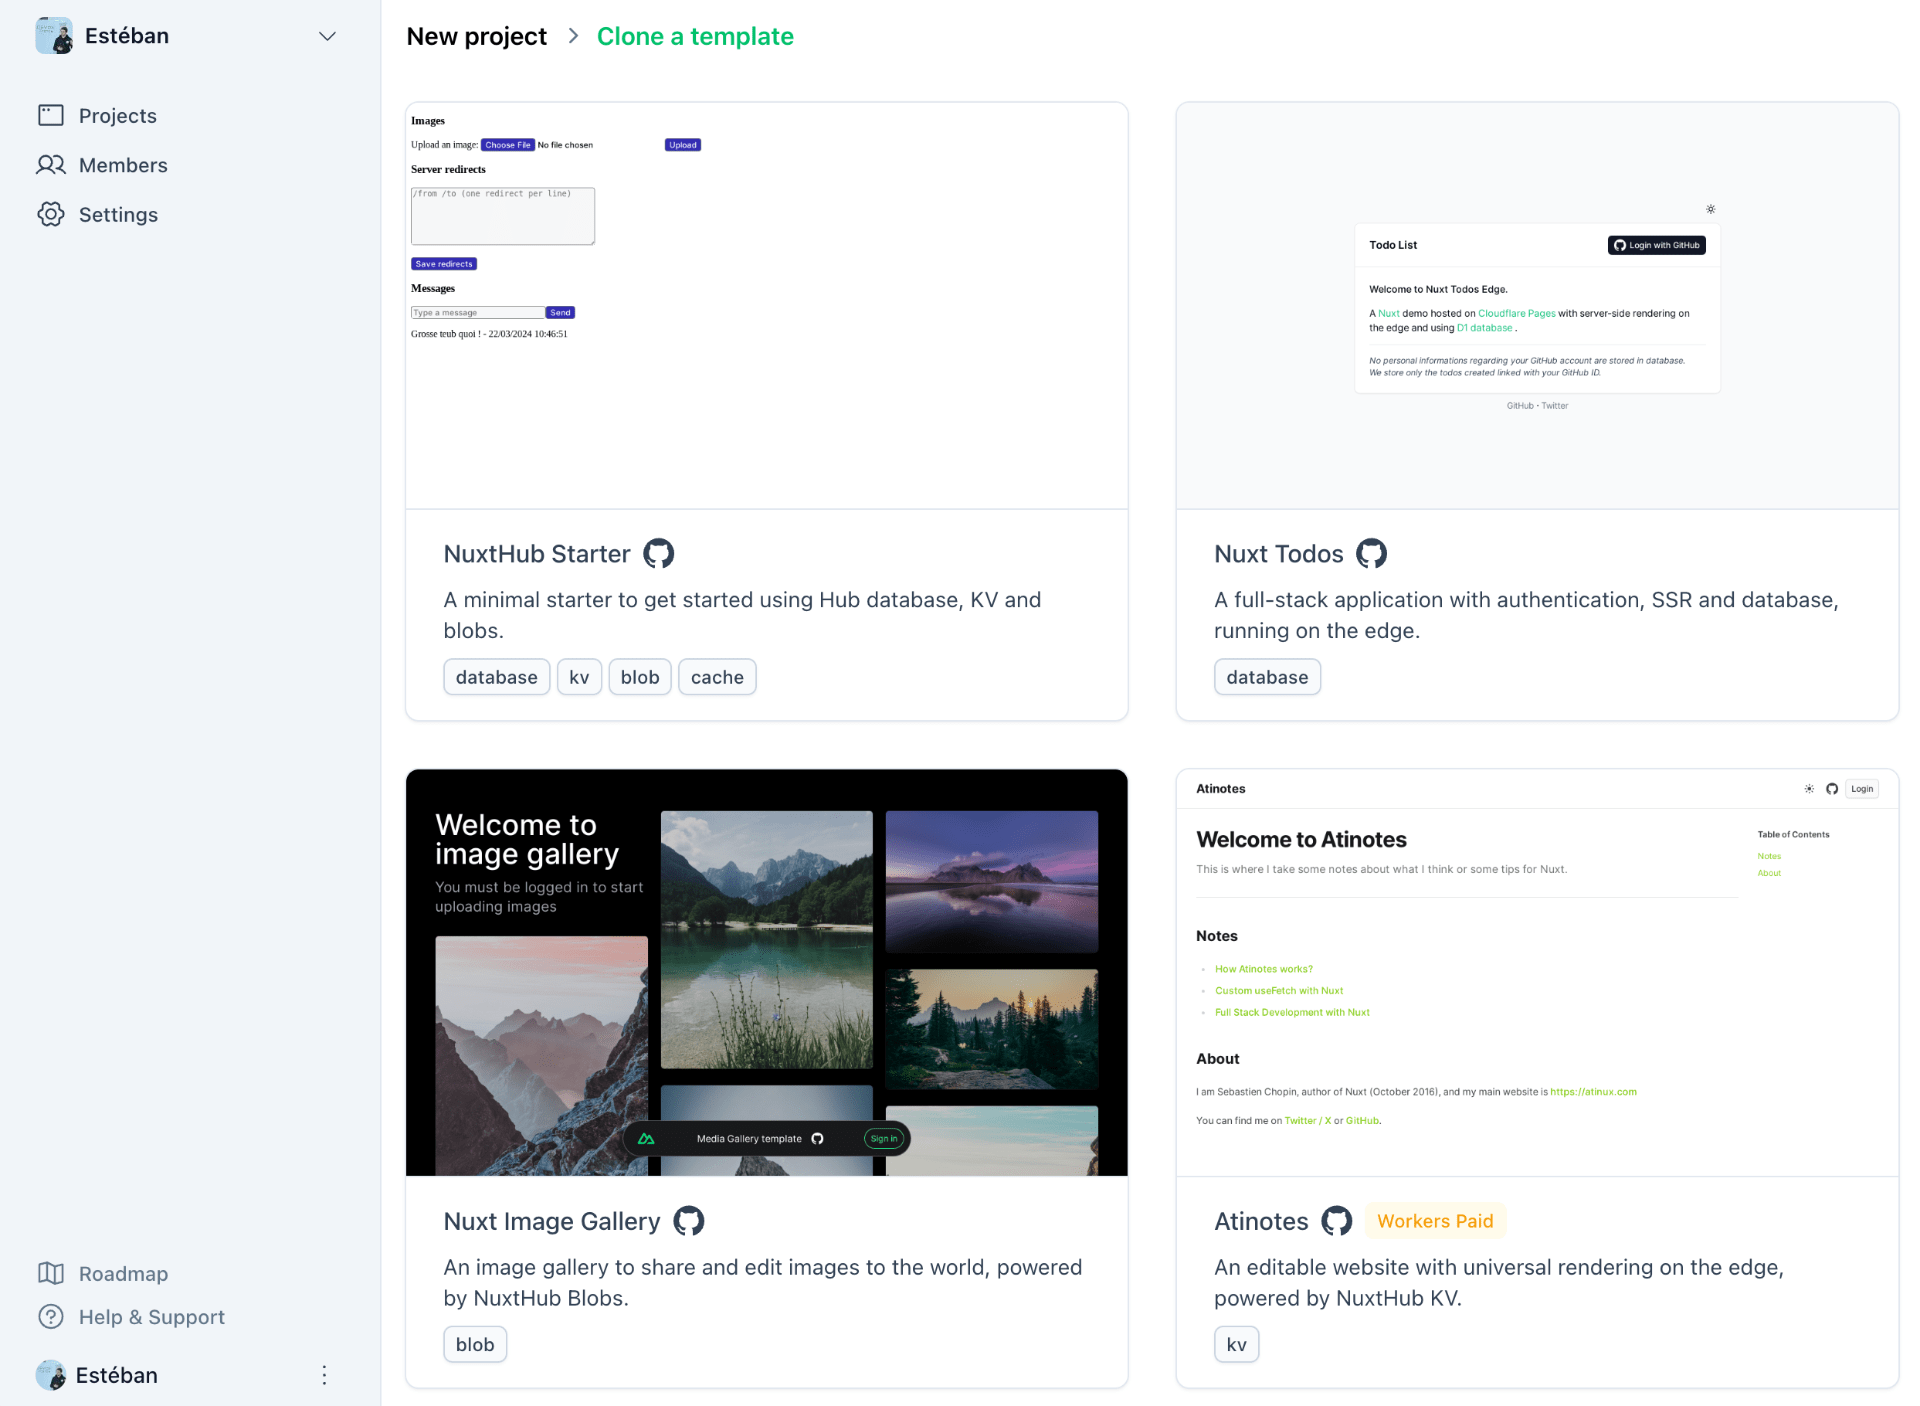
First, I introduce NuxtHub. It is a platform built by the Nuxt team to facilitate the deployment and management of Nuxt applications deployed on Cloudflare. In a few clicks, you can deploy your Nuxt application on Cloudflare. That's really magical! Thanks to a Nuxt module, you will be able to develop your application locally and then deploy it without tweaking your code. Everything, from the database to the blog storage, works seamlessly in both environments.
I tried to deploy a template from NuxtHub to show how easy it is to use the platform. I chose the Atinotes template. Unfortunately, this application produces a bundle bigger than 1MB, the limit for the free tier, so the deployment fails. Sad for a demonstration. After this fail, I was thinking about a way to prevent this and to tell users whether a template requires a paid plan or not. I raised an issue that was quickly fixed!. Demo will wait for later.
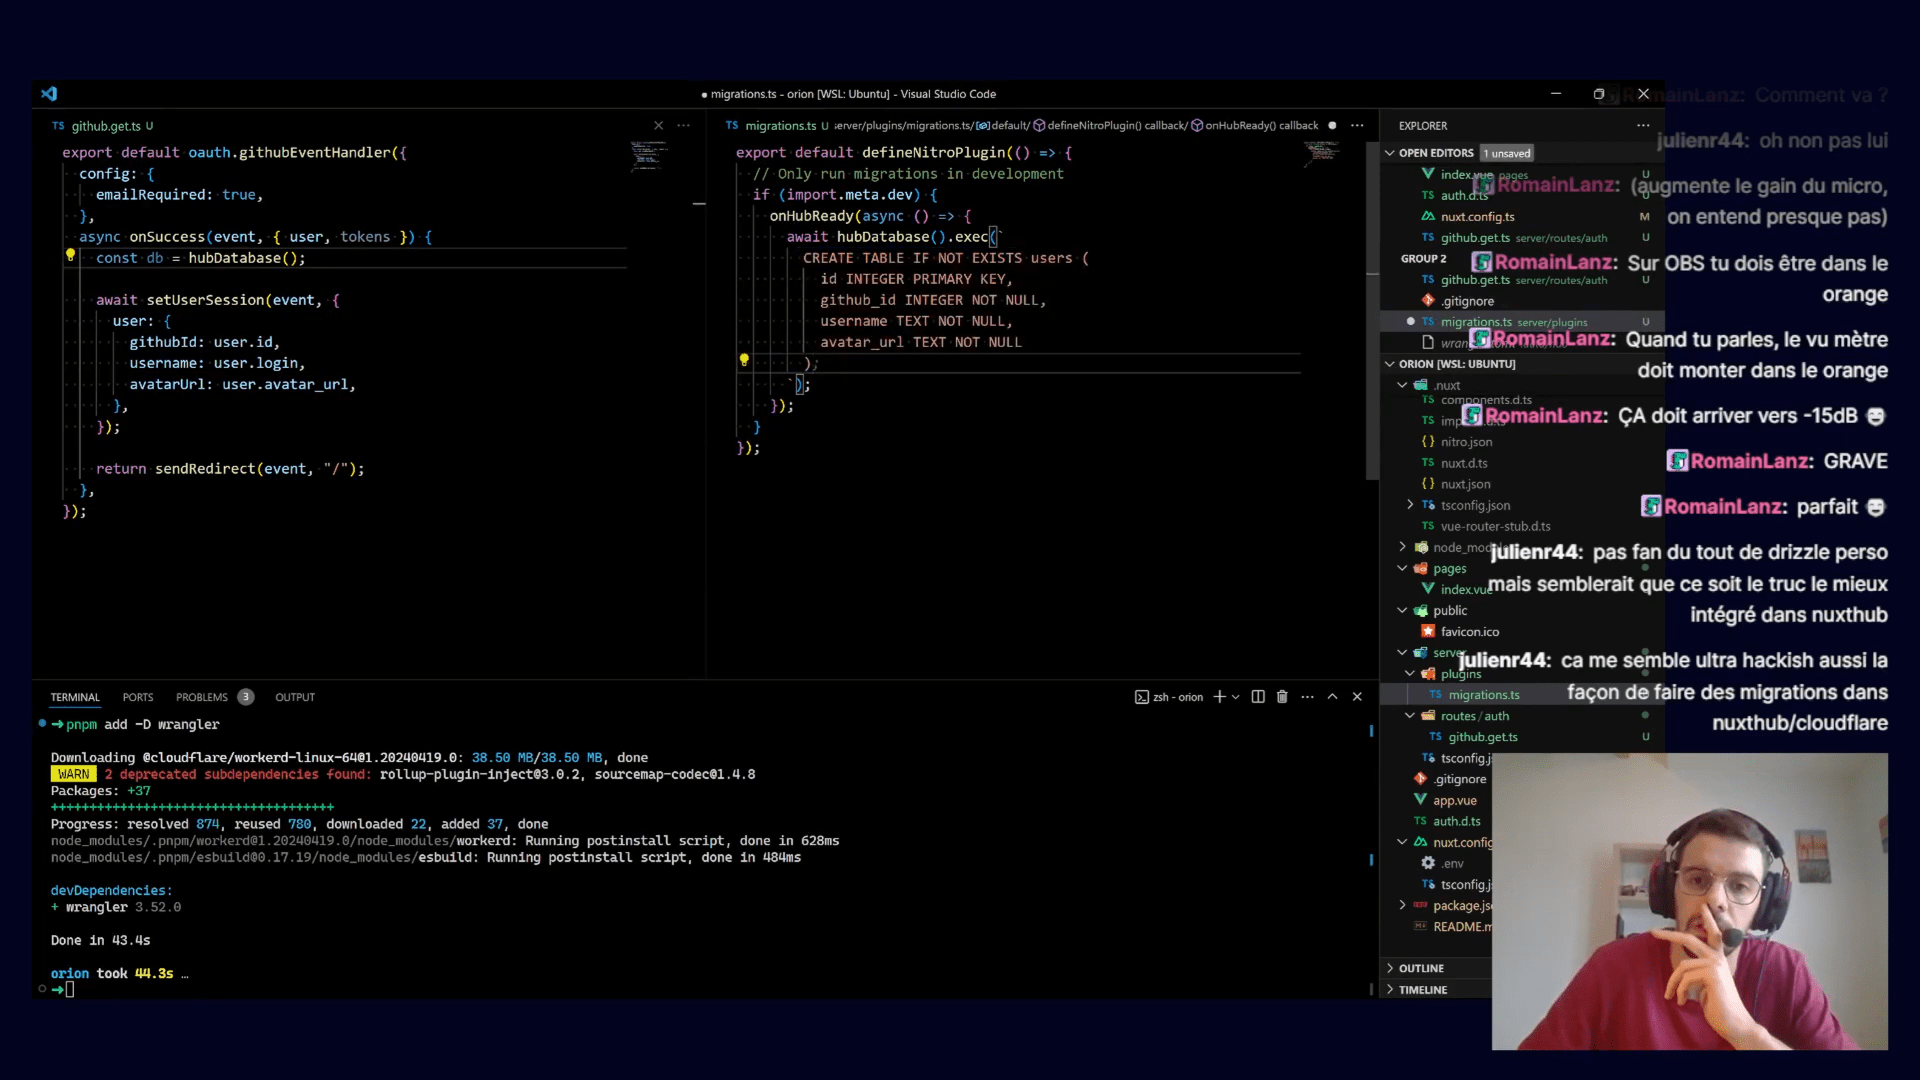
After this beautiful demo effect, we start coding the full-stack Nuxt application by adding authentication. To do so, we use the module nuxt-auth-utils from Sébastien Chopin. With a few lines of code, we add authentication. Here is the code we used:
export default oauth.githubEventHandler({
  config: {
    emailRequired: true,
  },
  async onSuccess(event, { user, tokens }) {
    await setUserSession(event, {
      user: {
        githubId: user.githubId,
      },
    })

    return sendRedirect(event, '/')
  },
})
That's really simple and it works like a charm, nicely integrated into a Nuxt application.
To finish the stream, I quickly set up NuxtHub into my application to show how easy it is to play with a database. I tried to use raw SQL, but the recipe to migrate the database was not working. I raised an issue about it and it's now fixed! After this second fail, I decided to start using Drizzle ORM, a simple but powerful ORM compatible with the workers of Cloudflare. In all cases, I should have to use Drizzle because managing everything with raw SQL is too much work.
During the live, someone asked how to apply migration to the production database. I have to admit that I didn't know the answer and nothing in the documentation was clear about it. I raised an issue about it that received an answer. You have to deploy your app and then start the local dev with a remote connection to run migrations Clearly, it's far from being good for the moment, but with the upcoming Nitro tasks, it should be easier in the near future. I really hope.
Globally, I'm so happy to have started this stream. Even if it's far from being good, but getting started is already a big step forward, and I know that future streams will only get easier to start.
I was so stressed that I went very fast in my explanations, so I decided that the next stream would be more talkative to re-explain different concepts.
The project is open-source and available on GitHub at orion! Give it a star if you like it! ⭐
Discussion on Cloudflare, NuxtHub, and GitHub OAuth

Orion is a full-stack application built with Nuxt and developed live on Twitch. You can see the replay on YouTube and the source code is open-source on GitHub.
I was frustrated by my first live stream. With the stress, I didn't explain things like what is Cloudflare, what is the edge and how NuxtHub is related to Cloudflare. But I know it's important to explain these concepts since it's new technologies and not everyone knows them.
At StrasbourgJS or Devoxx, I talked about UnJS and problems solved by the ecosystem. Many people, during or after, ask me about the edge. What is it? Why do we need it? Where does it come from?
The goal of my streams is to try this new technology, and with these feedbacks, it was a necessity to explain it.
Cloudflare at a Glance
Cloudflare is a company that provides a lot of services to make the web faster and more secure like a zero-trust solution, a WAF, a CDN, a DNS, a DDoS protection, and more for both companies and individuals.
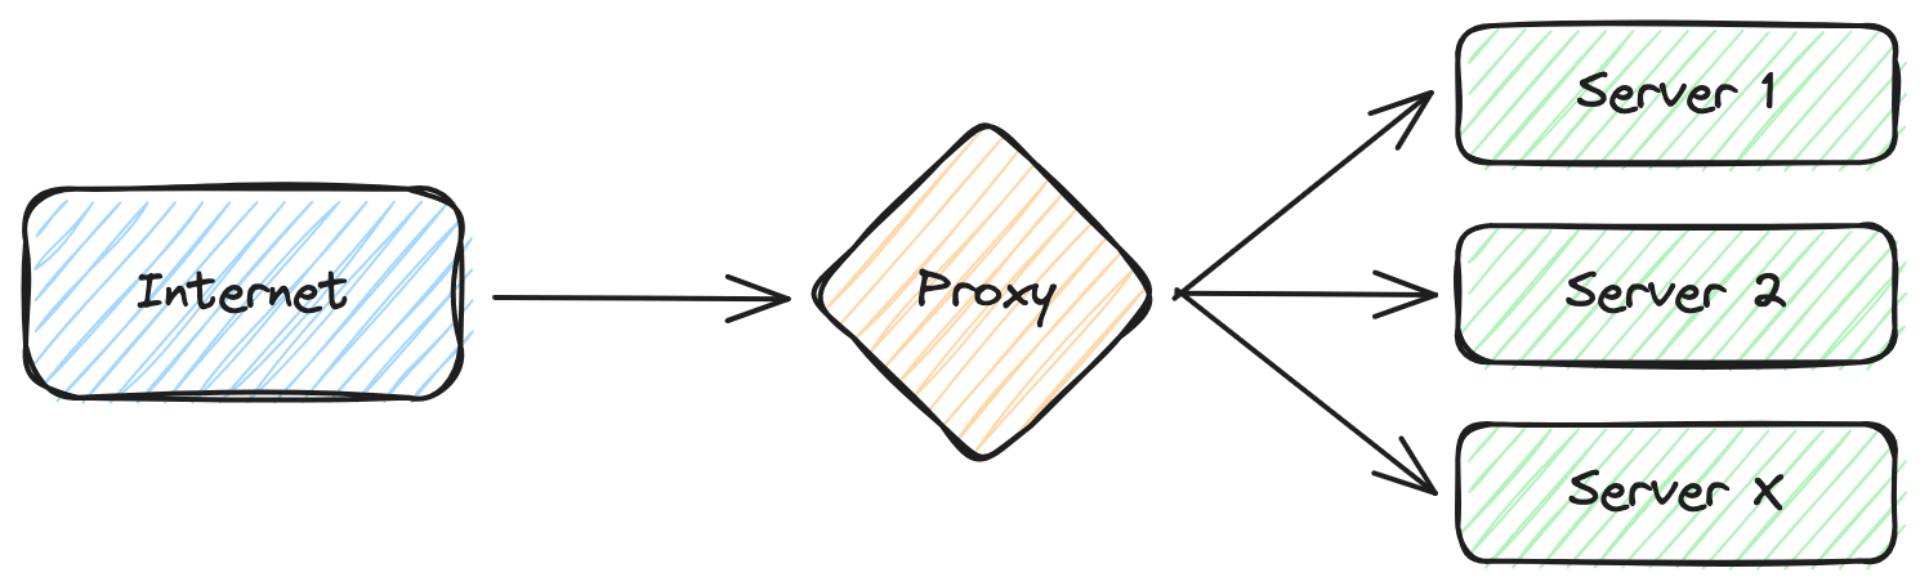
Their most known product is the reverse proxy. Cloudflare will act as the main and single entry point for your traffic. Then, it will route, internally, the traffic to the right server using the DNS. This allows you to hide your IP server, to cache static assets, and to protect your server from DDoS attacks.
In order to provide these services, they built a network of data centers around the world to be as close as possible to the users to serve cached content faster and to be able to mitigate attacks. It's called the edge network. It is at the frontier between users and the web, for which it is the gateway.
In September 2017, they announced Cloudflare Workers. To understand the objective at the time, let's quote the article:
What if you want to load balance with a custom affinity algorithm? What if standard HTTP caching rules aren't quite right, and you need some custom logic to boost your cache hit rate? What if you want to write custom WAF rules tailored for your application?
You want to write code
Workers have been released to allow developers to customize the infrastructure to their needs. The Cloudflare Workers solution is built on top of the Service Worker API, a standard in the browser to intercept and modify requests and responses.
Since then, they have built a full capabilities platform for developers around the workers:
- Workers KV, serverless key-value store
- D1, serverless SQL database
- R2, serverless blob storage
- Queues, serverless task queues
- Workers AI, serverless GPU-powered inference
With all these services, it's now (theoretically and that's the purpose of this series to answer the question) possible to build an application entirely on the Cloudflare's global network.
NuxtHub
Since the version 3 of Nuxt, the team is pushing the edge. Nitro, the server part of Nuxt, can be deployed everywhere, current and future platform, and is optimized for the edge. H3, the underlying HTTP server wakes up in less than 2ms, and the build output of Nitro is less than 1 MB, node modules included.
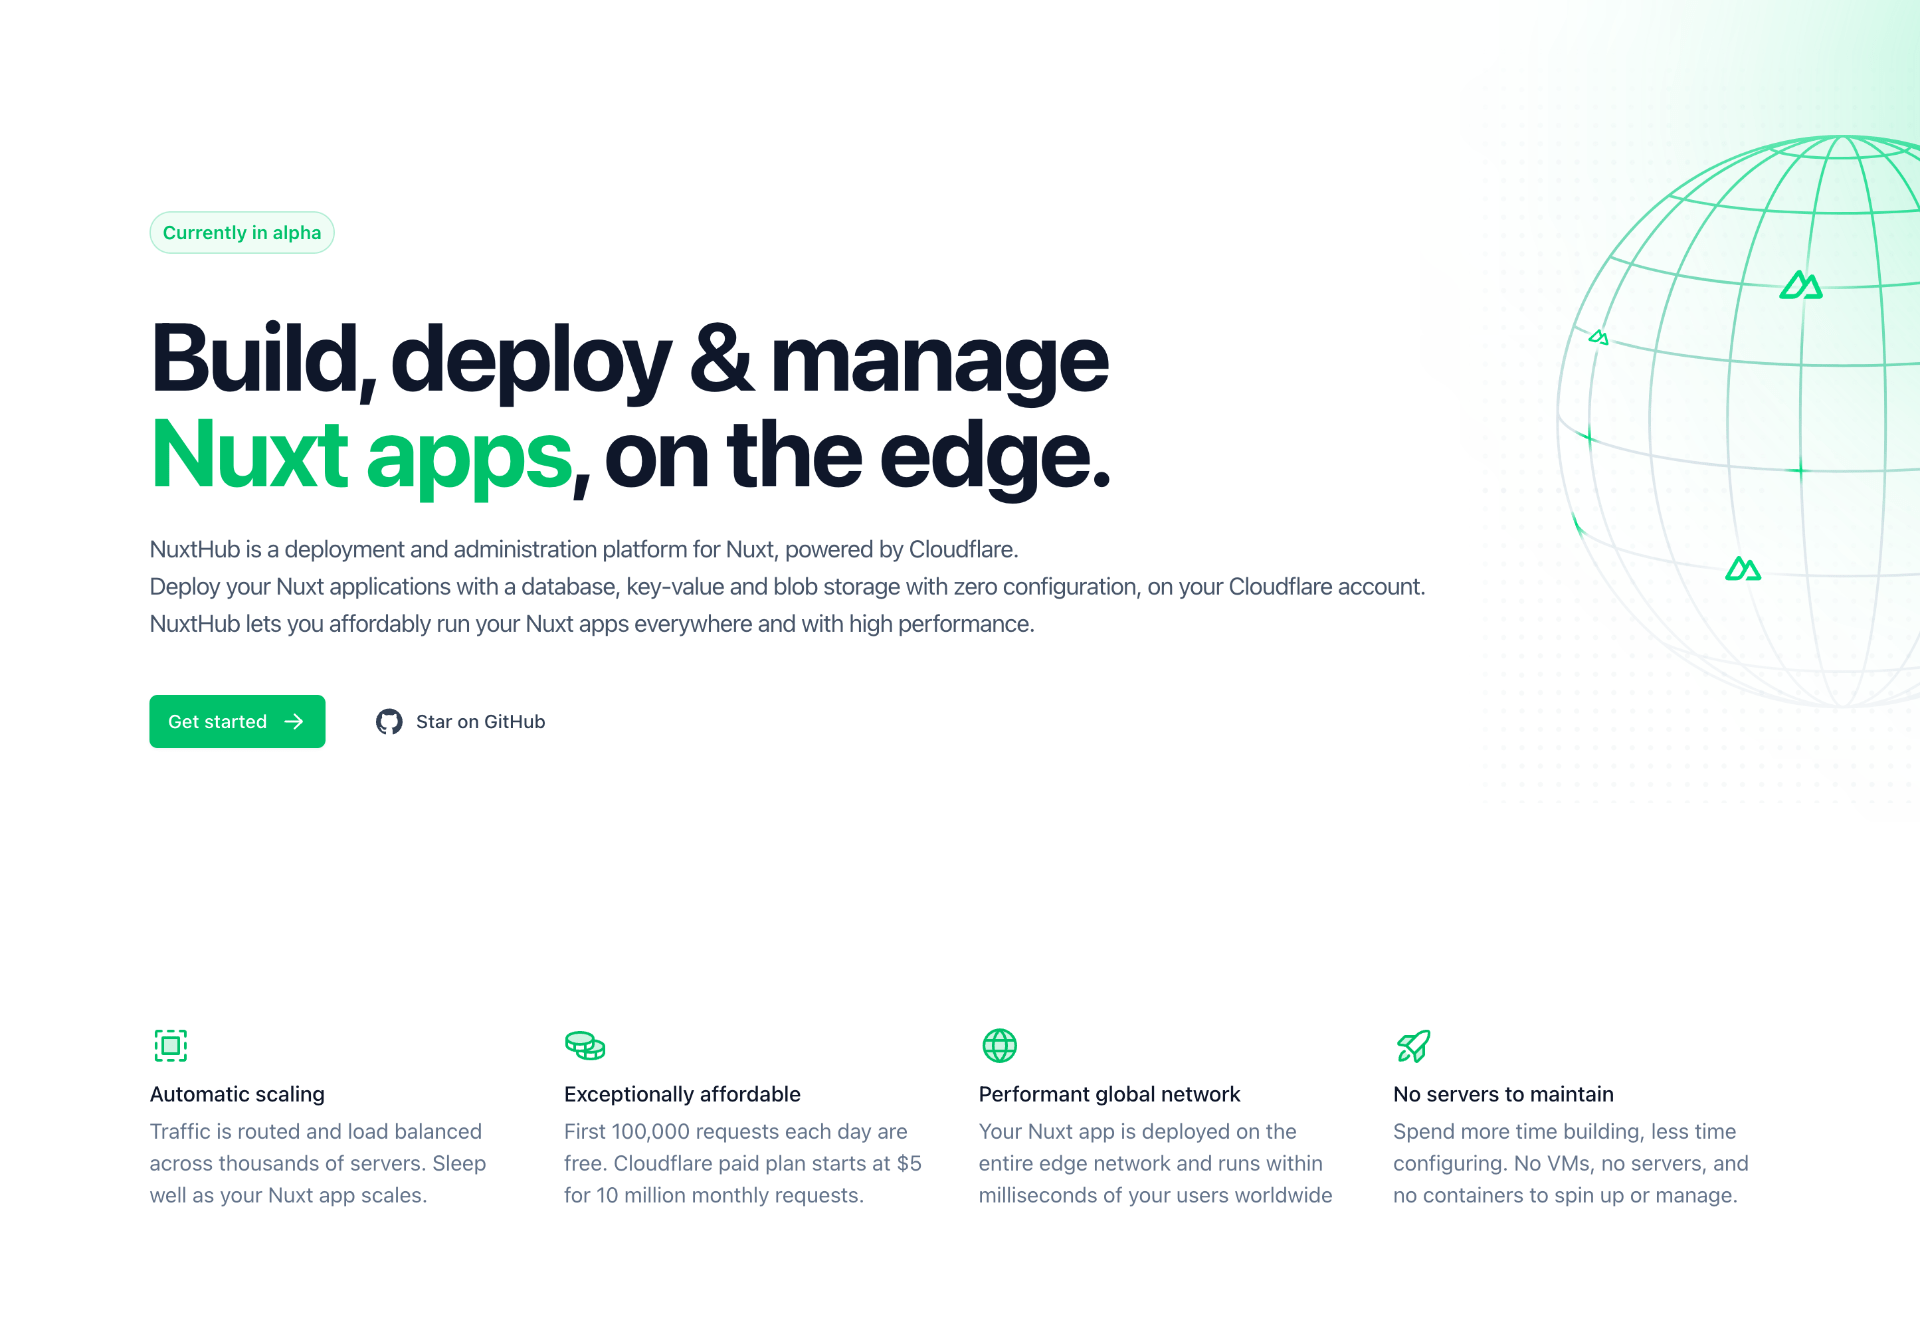
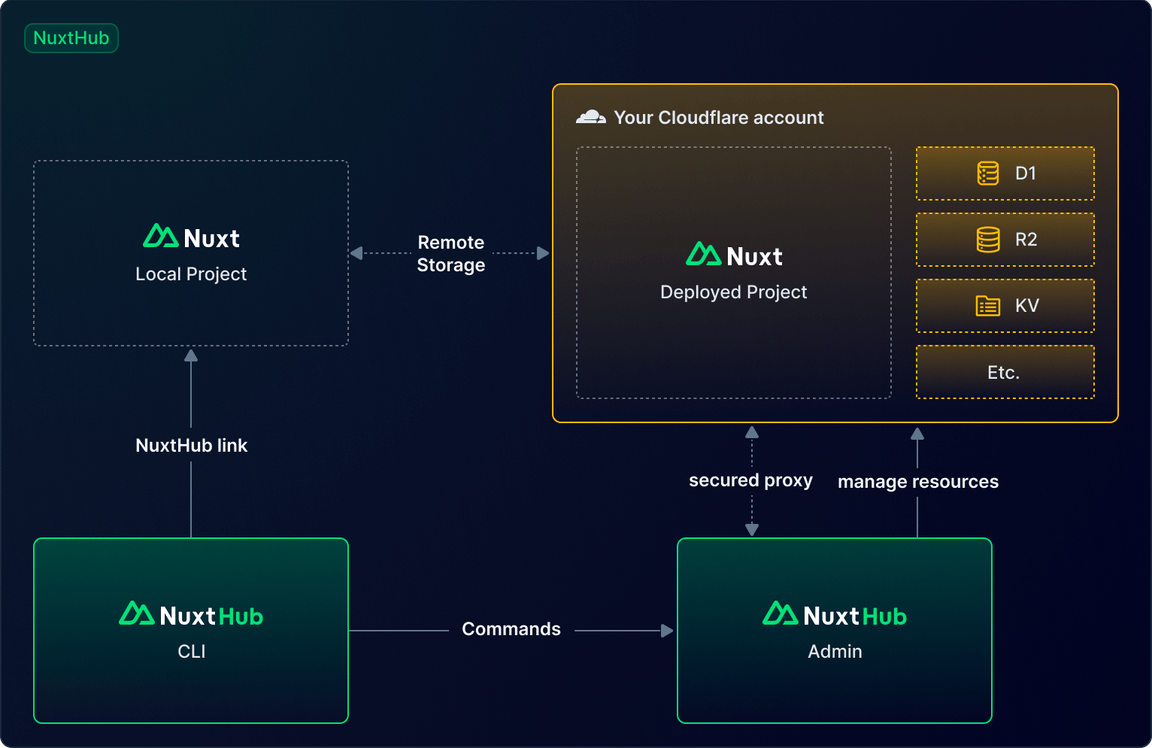
NuxtHub is a continuation of this effort. First, it's a platform to deploy Nuxt applications on Cloudflare. It's a two-click deployment. You connect your Cloudflare account because it's built on top of Cloudflare, you choose a template or a repo, you click on deploy, and that's it. Your application is live on the edge. It's feeling like magic.
NuxtHub is also a module for your Nuxt app to add data access capabilities. Locally, you will be able to play instantly with a database, a KV store, and even a blob storage. In production, you do not need to change your code, it will work the same way. This is clearly the true magic of NuxtHub, powered with workerd.
There is also a feature to allow a local dev environment to interact with the remote data. Not sure about the use case, but it's definitely interesting.
Even if the platform is still new, announced during Vue Amsterdam 2024, it's already very promising. The team is very reactive, and the platform is evolving quickly. I'm very excited to see what the future holds for NuxtHub but have some hints in documentation:
We plan to provide a complete backend experience for Nuxt apps through various @nuxthub packages.
- @nuxthub/core: Main package to provide storage features
- @nuxthub/auth: Add authentication for user management (soon)
- @nuxthub/email: Send transactional emails to your users (soon)
- @nuxthub/analytics: Understand your traffic and track events within your application and API (soon)
- @nuxthub/...: You name it!
GitHub OAuth
During the previous live stream, I added authentication, using nuxt-auth-utils to Orion, the full-stack Nuxt application. I used GitHub OAuth, and I think it's important to see how it works under the hood.
During the live, we jumped into the code, and I explained how it works. Here is a schema to help you understand the process:
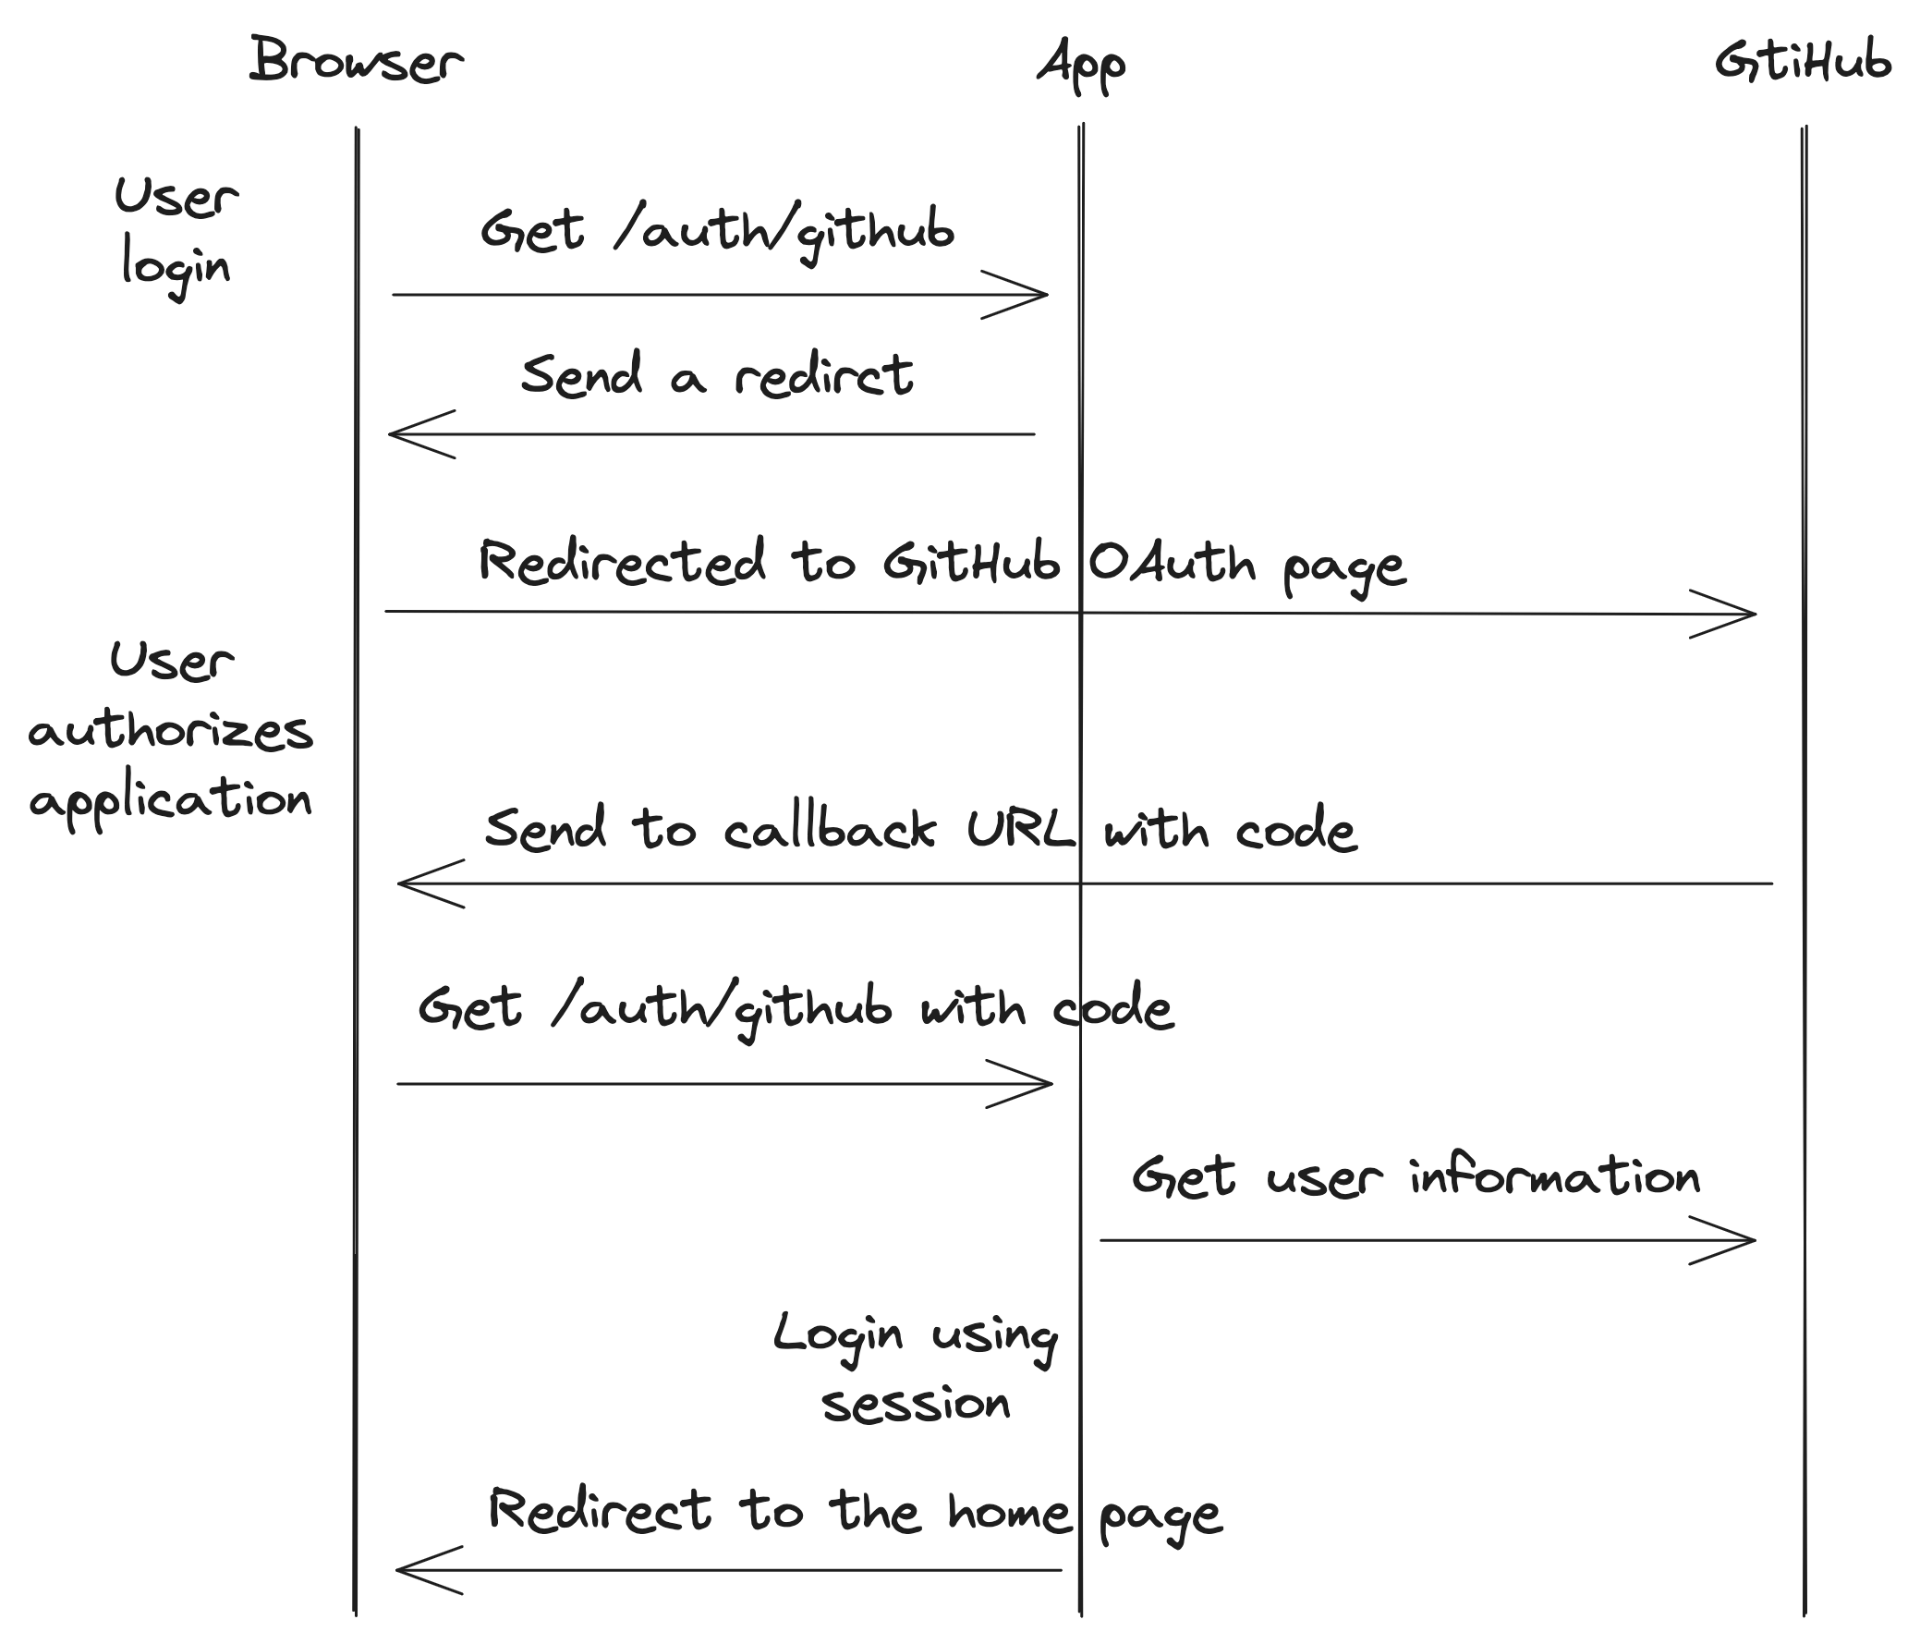
- The user clicks on the login button, which points to
/auth/github. - The server sends a redirect to the GitHub OAuth page.
- The user accepts the authorization from GitHub.
- GitHub redirects the user back to the application callback URL with a code.
- The server exchanges the code for the tokens.
- The server uses the tokens to get the user.
- The server stores the user in a session.
- The server redirects the user to the home page.
In these steps, the server is Nitro, and we do not talk about the possible errors. There are many possible errors like the user refuses the authorization, the code is invalid, the tokens are invalid, the user is not found, etc. Each error must be handled to provide a good user experience.
Code of the GitHub OAuth handler
Now, let's dive into the code of nuxt-auth-utils to see how it works.
To simplify, I removed some parts of the code that are not necessary to understand the process, and I focused on the main steps. You can find the full code in the GitHub repository.
/**
 * GitHub OAuth event handler.
 *
 * _The code is simplified for the article and doesn't work as is._
 */
export function githubEventHandler({ config, onSuccess }: OAuthConfig<OAuthGitHubConfig>) {
  return eventHandler(async (event: H3Event) => {
    config = { /** ... */}

    /**
     * Get the query from the event.
     */
    const query = getQuery(event)

    if (query.error) {
      // Handle error
      return
    }

    if (!query.code) {
      /**
       * Redirect to GitHub OAuth page if there is no code in the query.
       * If the user accepts the authorization, GitHub will redirect the user back to the application with the code.
       * The code is the one-time code to exchange for the tokens.
       */
      const redirectUrl = getRequestURL(event).href
      return sendRedirect(
        event,
        withQuery(config.authorizationURL as string, {
          client_id: config.clientId,
          redirect_uri: redirectUrl,
          scope: config.scope.join(' '),
          ...config.authorizationParams,
        }),
      )
    }

    /**
     * Use the code to get the tokens.
     */
    const tokens: any = await $fetch(
      config.tokenURL as string,
      {
        method: 'POST',
        body: {
          code: query.code,
        },
      },
    )

    const accessToken = tokens.access_token

    /**
     * Use the access token to get the user.
     */
    const user: any = await ofetch('https://api.github.com/user', {
      headers: {
        Authorization: `token ${accessToken}`,
      },
    })

    /**
     * Call the onSuccess callback with the user and the tokens.
     *
     * The OAuth is done, and the user can now be authenticated using our system.
     * With Nitro, we store the user in a session within a cookie.
     */
    return onSuccess(event, {
      user,
      tokens,
    })
  })
}As we can expect, the code is quite simple, and we easily recognize the steps we saw in the schema.
Conclusion
I didn't code during this live. I wanted to explain many important concepts to help everyone understand the context of the project Orion. I hope it was clear, and that you learned something new.
The project is open-source and available on GitHub at orion! Give it a star if you like it! ⭐
SQL Schema and First Blocks of Orion's Admin Interface

Orion is a full-stack application built with Nuxt and developed live on Twitch. You can see the replay on YouTube and the source code is open-source on GitHub.
In this third stream, I created the SQL schema for the database. I then set up Nuxt UI and Nuxt UI Pro to create the admin layout and the first form for categories. This article is a summary of the stream and the work done.
SQL Schema
What is a SQL schema and why did I create the SQL schema? These are two good questions.
A SQL schema is a way to organize the database. It is a blueprint of how the database will be structured. So it's very useful to think about it before starting to code. It does not need to be perfect, but helps to iterate on the database structure, avoiding errors, and to have a clear vision of the project. I personally think it's a must-have when starting a new project.
So, before writing any code for the project Orion, I created the SQL schema.
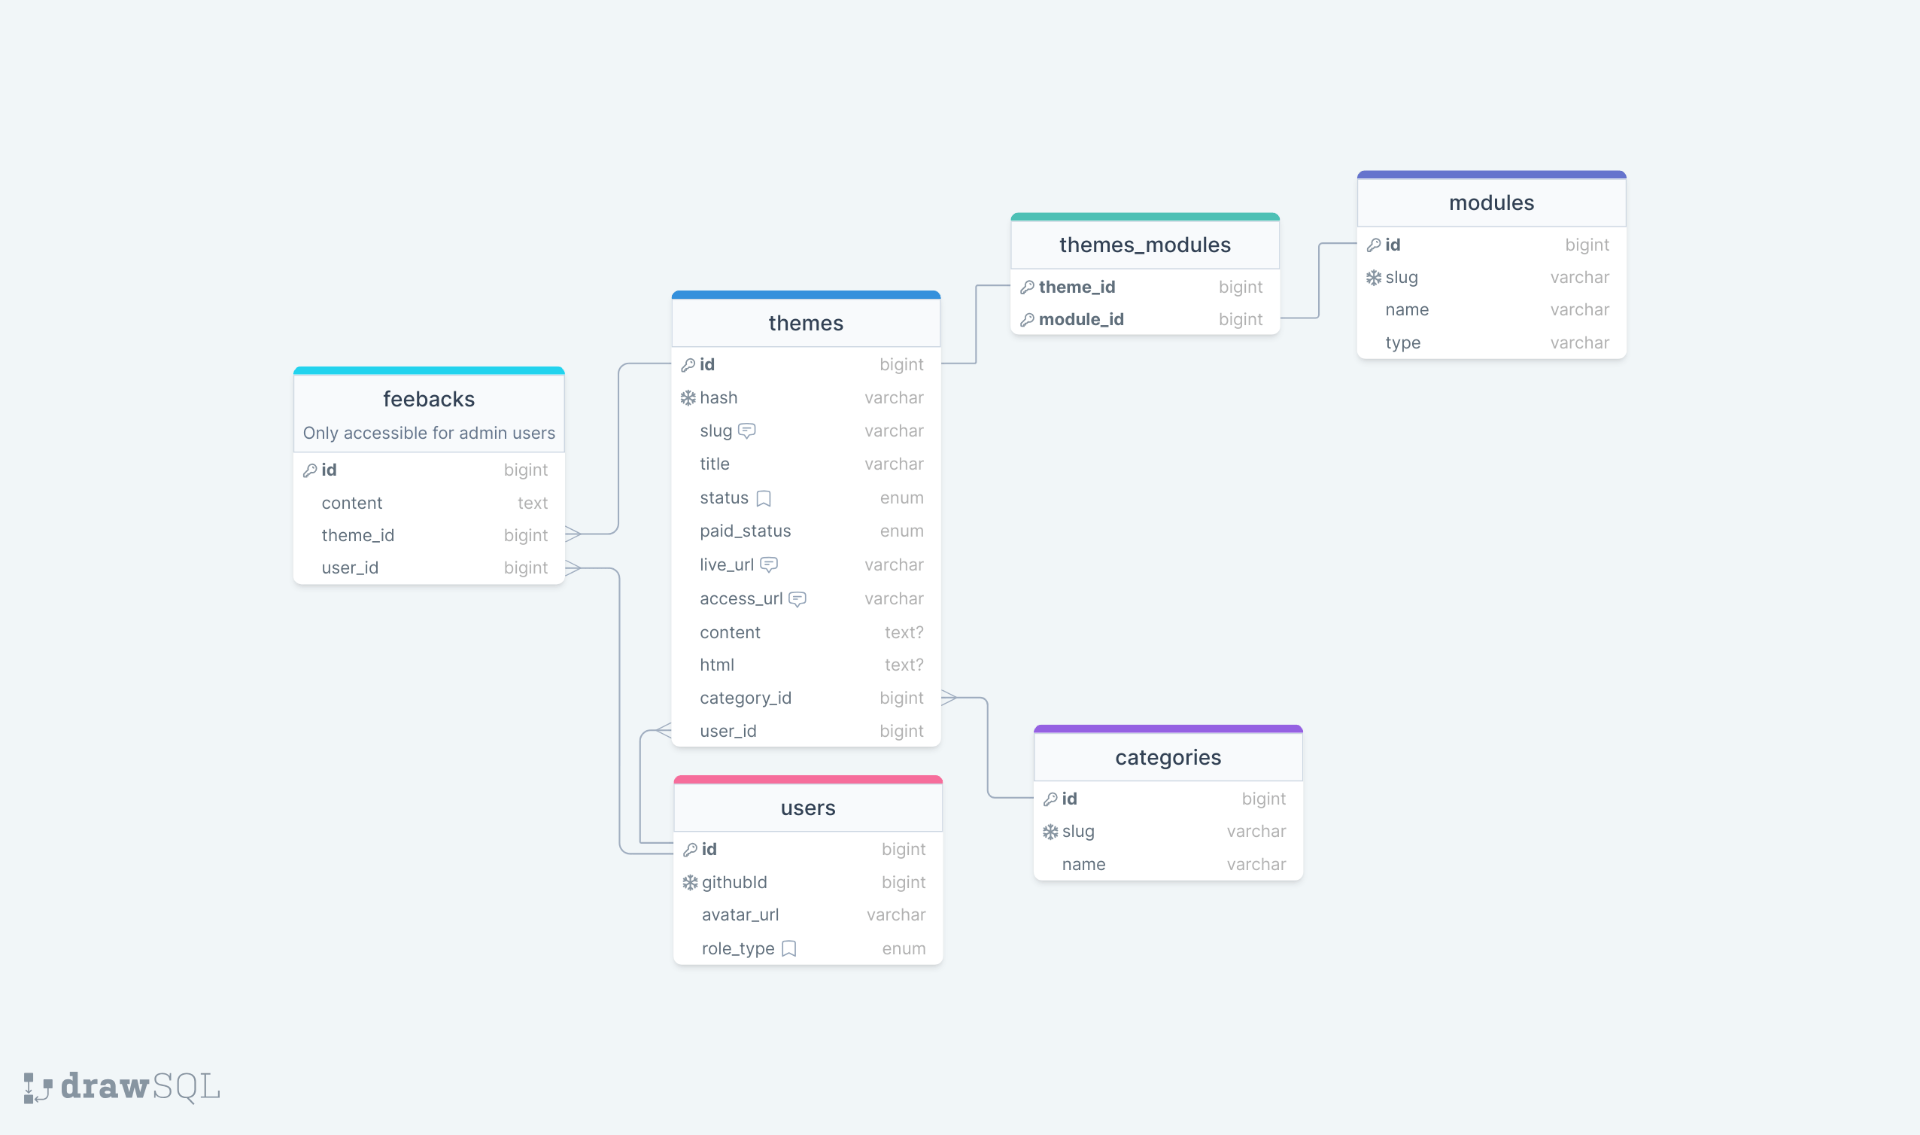
To build this schema, I used drawSQL. It's a web app to create SQL schema with a nice UI. It's very easy to use and free for small projects. I recommend it.
The database for the project Orion, the full-stack Nuxt application, is simple and common for this type of project.
- A
userstable to store the users of the application. Storing users is useful for the admin interface, to ban a user, or to give admin rights. - A
categoriestable to store the categories of the theme like blog, e-commerce, documentation, etc. It's a simple table with a name and a slug. The slug is used for the URL of the category. - A
modulestable to store the modules of the theme. The table will have a name, a slug, and a type (official, community). This will be useful to filter the themes by modules. - A
themestable to store the main content of the application. It will have a lot of columns but we will see that in another stream. - A
feedbackstable to store the feedbacks from admins about a theme. Indeed, a theme must be reviewed before being published and the feedback will be used to tell the creator what to improve.
This schema is a good start to clarify things and to know where to get started but I already know that it will evolve.
Nuxt UI and Nuxt UI Pro
Nuxt UI is a component library made by the Nuxt team. Initially, it was an internal tool for their own projects like Volta. In May 2023, they decided to open-source it and to make it available for everyone for free. Today, Nuxt UI is my go-to for building user interfaces with Nuxt because it's simple, beautiful but yet highly customizable.
Nuxt UI Pro is built on top of Nuxt UI and provides layouts related components like a page, a hero, a header and complete layouts like a dashboard, a blog, a documentation, etc. It's a paid product, but it's worth it. I'm using it for Orion, the full-stack application, because it's a time saver and it's beautiful. The better part is that it's free during development (the build process will require a key), so you can try it before buying it.
During the stream, I start by installing Nuxt UI and Nuxt UI Pro. I then create the layout for the admin interface and the page for the categories. Let's see the code.
Admin Layout
With Nuxt UI Pro, this part was very easy. There is no navbar, nor sidebar for the moment. The goal is to add features and components step by step, when needed, and to avoid to anticipate too much. Here is the code for the layout layouts/admin.vue.
<template>
  <UDashboardLayout>
    <slot />
  </UDashboardLayout>
</template>
Categories Page
Before developing the view, I create the API endpoint to get and update the categories.
Categories API
Thanks to Nitro and Drizzle (setup in the first stream), it is very easy. In the file server/api/categories/index.get.ts (the .get. is used to specify the HTTP verb), I wrote the following code:
export default defineEventHandler(async () => {
  const categories = await useDrizzle().select({
    id: tables.categories.id,
    slug: tables.categories.slug,
    name: tables.categories.name
  }).from(tables.categories)

  return categories
})
The useDrizzle utils is a wrapper around the Drizzle ORM. This code will return all the categories with only the id, slug, and name fields. It's a good practice to only return the fields you need to avoid sending too much data.
Then, I created the endpoint to create a new category, and it's the same process. I created the file server/api/categories/index.post.ts with the following code:
export default defineEventHandler(async (event) => {
  const body = await readBody(event)

  await useDrizzle().insert(tables.categories).values({
    slug: useSlugify(body.name),
    name: body.name,
  }).execute()

  return body
})
In this code, there is no security check, and every user can create a category. It's clearly not a use case for our application, but the bouncer will be added later. In the same time, I did not verify the body. It's important to validate data received from a client to avoid security issues. It will be the subject for the next stream.
Categories Content
The page for the categories is built with Nuxt UI Pro, which makes the code very simple.
<script setup lang="ts">
definePageMeta({
layout: 'admin'
})
</script>
<template>
<UDashboardPage>
<UDashboardPanel grow>
<!-- Content -->
</UDashboardPanel>
</UDashboardPage>
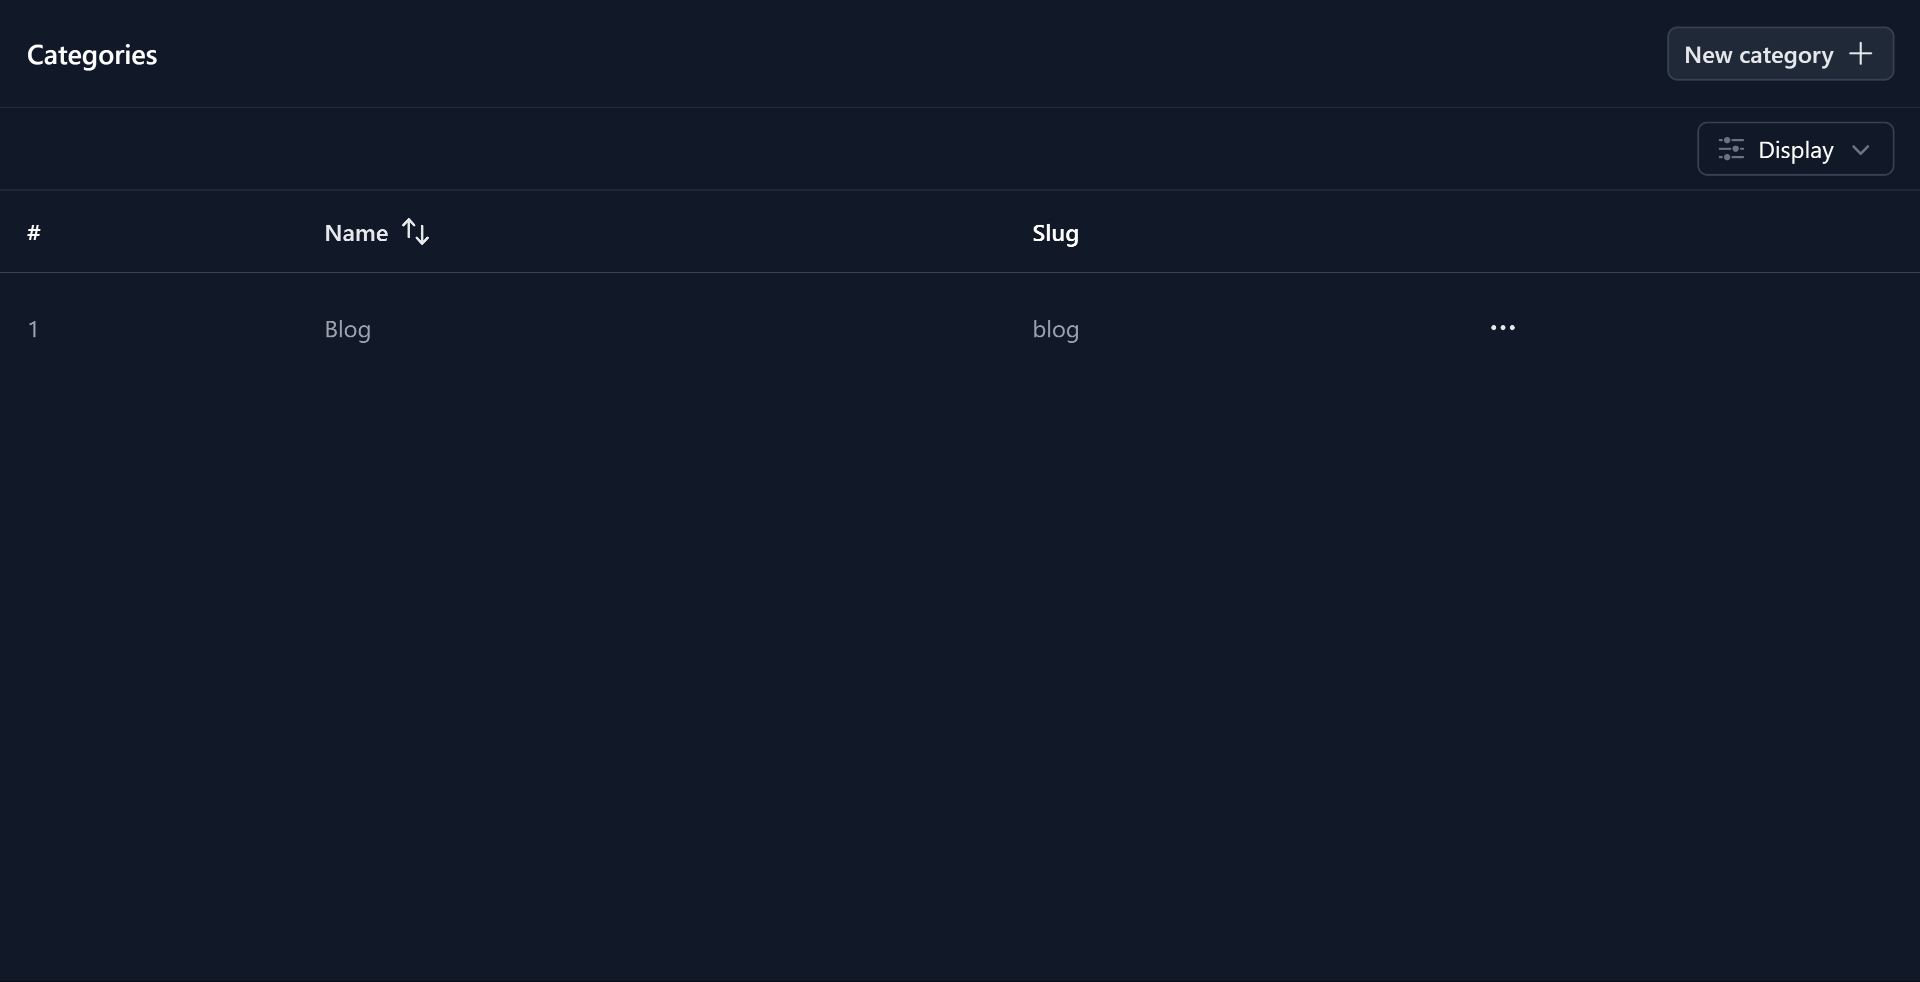
</template>Within the UDashboardPanel, we can add a header with the page title and a button to create a new category and a table to display the categories.
First, let's add the table in the UDashboardPanel:
<script setup lang="ts">
const columns = [{
  key: 'id',
  label: '#'
}, {
  key: 'name',
  label: 'Name',
  sortable: true
}, {
  key: 'slug',
  label: 'Slug',
}]

const { data: categories, pending } = await useFetch('/api/categories', {
  deep: false,
})
</script>

<template>
  <UTable :columns="columns" :rows="categories" :loading="pending" />
</template>It's hard to be simpler! Thanks Nuxt UI for the work!
Then, I add the header with the title and the button to create a new category:
<template>
  <UDashboardNavbar
    title="Categories"
  >
    <template #right>
      <UButton
        label="New category"
        trailing-icon="i-heroicons-plus"
        color="gray"
      />
    </template>
  </UDashboardNavbar>
</template>
Still very easy. The button will be used to open a modal with a form to create a new category. I started to create the form but in a very simple way:
<script lang="ts" setup>
import type { FormSubmitEvent } from '#ui/types'
import type { output } from 'zod'
import { object, string } from 'zod'

const schema = object({
  name: string({ message: 'Required' }),
})

type Schema = output<typeof schema>

const state = reactive({
  name: undefined,
})

async function onSubmit(event: FormSubmitEvent<Schema>) {
  await $fetch('/api/categories', {
    method: 'POST',
    body: event.data,
  })
}
</script>

<template>
  <UForm :schema="schema" :state="state" @submit="onSubmit">
    <UFormGroup label="Name" name="name">
      <UInput v-model="state.name" />
    </UFormGroup>

    <UButton type="submit">
      Submit
    </UButton>
  </UForm>
</template>I use the form as explained in the Nuxt UI documentation. I do not really choose Yup for the validation but it was the first proposed. We will see if it's a good choice in the future. In the onSubmit method, I just do a fetch to the API to create a new category. In the next stream, we will improve it by handling the success and the error state.
This component is put into a modal using the component UModal and listening to the click event on the button to open a modal.
A point I'm not sure about is how to handle the response of the API. Should I return the new category and put it in the table, or should I refresh the table? For the moment, I opted for the second one.
Using Nuxt UI helps me to build the admin interface quickly, without any custom components.
End of the Stream
It was definitely a good stream. The project is moving forward without a lot of difficulties and it is a pleasure to work on it. I am looking forward to the next stream to continue working on the admin interface and the forms. Nuxt UI and Nuxt UI Pro are game changers, simple code, easy to use, and I can focus on the features of the application.
The project is open-source and available on GitHub at orion! Give it a star if you like it! ⭐
Let's Continue the Admin Interface
Orion is a full-stack application built with Nuxt and developed live on Twitch. You can see the replay on YouTube and the source code is open-source on GitHub.
During the previous stream, I started creating the categories page. I implemented the API endpoints to get and create categories, and I built the UI to display the categories and the form to create a new category. In this stream, I've continued working on the admin interface by adding the edit category form and creating a new page to manage users. I've also added the bouncer to secure the access to the admin part of the application, both for the frontend and the backend. Let's see the work done in more detail.
Edit Category Form
This part was very similar to the create category form. Instead of submitting the form data to the API to create a new category, I changed the endpoint to update an existing category.
I created the form in a new component components/categories/CategoryEditForm.vue (and renamed the previous form to CategoryCreateForm.vue). I also created a new endpoint server/api/categories/[id].put.ts to update a category. This endpoint updates a category using the id in the URL and the body of the request:
export default defineEventHandler(async (event) => {
  const body = await readBody(event)

  await useDrizzle().update(tables.categories).set({
    slug: useSlugify(body.name),
    name: body.name,
  }).where(eq(tables.categories.id, params.id)).execute()

  return sendNoContent(event, 200)
})
The 200 status code could not be the best choice (204 is better with a PUT), but I'm still thinking if I should return the updated category or not.
I also tried to validate the body of the request using Yup because it was the tool used in the frontend. However, I quickly realized that it was not possible to cast a string to a number. I know myzod can do it so I tried it. I encountered an issue and instead used Zod. I moved the frontend to Zod off-stream.
Users Page
Actually, when a user logs in, related data from GitHub are stored in the database (while writing this part, I'm wondering if this is necessary because it means that a log in is a write which is more expensive than a read) and in the session. This behavior is useful to promote the user to an admin or to ban a user. But for the moment, there is no way to manage users. So, I created a new page to manage users. Like the categories page, the page will display the users in a table. However, it will not be possible to create or update a user for the moment.
In order to retrieve the users from the database, I created the API endpoint server/api/users/index.get.ts:
export default defineEventHandler(async (event) => {
  const users = await useDrizzle().select({
    id: tables.users.id,
    githubId: tables.users.githubId,
    username: tables.users.username,
    roleType: tables.users.roleType
  }).from(tables.users)

  return users
})
To show them, I use the UTable component from Nuxt UI Pro. The code is very similar to the categories page:
<script lang="ts" setup>
const columns = [{
  key: 'id',
  label: '#'
}, {
  key: 'githubId',
  label: 'GitHub ID',
}, {
  key: 'username',
  label: 'Username',
  sortable: true
}, {
  key: 'roleType',
  label: 'Role Type'
}]
const { data: users } = await useFetch('/api/users', {
  deep: false,
})
</script>

<template>
  <UDashboardPage>
    <UDashboardPanel grow>
      <UTable :columns="columns" :rows="users">
        <template #roleType-data="{ row }">
          <UBadge variant="subtle" :color="row.roleType === 'admin' ? 'amber' : 'primary'">
            {{ row.roleType }}
          </UBadge>
        </template>
      </UTable>
    </UDashboardPanel>
  </UDashboardPage>
</template>As expected, the code is very similar to the categories page.
Now we have two pages, one for categories and one for users, so I added a sidebar to navigate between them. Nothing complicated here, I just used the UDashboardSidebar component from Nuxt UI Pro and added the links to the categories and users pages:
<script lang="ts" setup>
const links = [{
  id: 'categories',
  label: 'Categories',
  icon: 'i-heroicons-tag',
  to: '/admin/categories',
  tooltip: {
    text: 'Categories',
  }
}, {
  id: 'users',
  label: 'Users',
  icon: 'i-heroicons-user-group',
  to: '/admin/users',
  tooltip: {
    text: 'Users',
  }
}]
</script>

<template>
  <UDashboardLayout>
    <UDashboardPanel>
      <UDashboardSidebar>
        <UDashboardSidebarLinks :links="links" />
      </UDashboardSidebar>
    </UDashboardPanel>

    <slot />
  </UDashboardLayout>
</template>Protecting the Admin Part
When building the administration part of an application, it's important to secure and restrict access to it, for both the frontend and the backend. This means that only authorized users can view and manipulate the data.
To restrict access to the UI part of the admin, i.e., the frontend, I used a middleware. It's a function that runs before navigating to the page and can be used to check if the user is authenticated and has the right permissions. In this case, I created a middleware middleware/admin.ts to check if the user is authenticated and has the role of an admin:
export default defineNuxtRouteMiddleware(() => {
  const { user } = useUserSession()

  const isAdmin = user.value?.roleType === 'admin'

  if (!isAdmin)
    return redirectTo('/')
})
The middleware must be used on pages that need to be protected using definePageMeta.
I get the user from the session using useUserSession and check if the user has the role of an admin, if not, I redirect the user to the home page.
The backend is way more critical than the frontend but it's not more difficult than the frontend to secure. In order to do so, I create a util named requireAdminUser in the file server/utils/session.ts:
import type { UserSessionRequired } from '#auth-utils'
import type { H3Event } from 'h3'

export async function requireAdminUser(event: H3Event): Promise<UserSessionRequired> {
  const userSession = await getUserSession(event)

  if (!userSession.user || userSession.user.roleType !== 'admin') {
    throw createError({
      statusCode: 401,
      message: 'Unauthorized',
    })
  }

  return userSession as UserSessionRequired
}
This function checks if the user is authenticated and has the role of an admin. If not, it throws an error with a 401 status code. This function is used in the API endpoints to secure them:
export default defineEventHandler(async (event) => {
  await requireAdminUser(event)

  // Code to handle the request
})
With these two functions, the frontend and the backend of the admin part are secured. Only authenticated users with the role of admin can access the admin part of the application.
Coming
This stream was really good and set important things for the future. The next stream will be about the modules and the theme creator. I really hope to be able to push in production soon. I'm really excited about it and to see the feedback from the community.
The project is open-source and available on GitHub at orion! Give it a star if you like it! ⭐
Fetch an external API for the modules
Orion is a full-stack application built with Nuxt and developed live on Twitch. You can see the replay on YouTube and the source code is open-source on GitHub.
Before going further, and implementing the modules page, I decided to change the useFetch behavior from current Categories and Users page. Actually, the useFetch composable block the client-side navigation until the data is fetched. This gives the sensation of a slow application. To avoid this, I can use the flag lazy. On server-side, this does not change anything and the page will still be served with data. On the client-side, the navigation will be instant and I will show a skeleton while the data is fetching using the pending ref.
const { data, pending } = await useFetch('/api/categories', {
  deep: false,
  lazy: true, // <= Do not block the navigation
  default: () => []
})
The pending ref is a boolean that tells if the data is fetching or not. I simply pass it to the loading props of the UTable component from Nuxt UI Pro and voilà! The user will see a loader while the data is fetching and the navigation will be instant.
Modules Page
Modules are Nuxt modules. They will be linked to the themes and will be used to filter the themes. Imagine you're looking for a theme with good SEO and precisely a sitemap, you'll be able to filter the themes by the modules they use. This is the goal of the modules feature. It will also help the user to understand how the theme is built and what are the features.
The first thing I do is adding a new page pages/admin/modules.vue. Then, I added the table to display the modules and page meta to use the admin layout and admin middleware. It's similar to the categories and users pages so I will not detail it here.
Filling the Database
The main question is: how to fill the database with modules? For the categories, I create them manually. This is okay because there are not a lot of categories and no way to get a predefined list, but for the modules, it's different. Modules are made by the core team or the community and there are a lot of them. Also, the list is not static and can change over time. So I need to find an API to fetch modules from. Fortunately, Nuxt has an API to get the modules list: api.nuxt.com/modules. This API is not documented but it's public and I can use it.
Thanks to this API, I will be able to fetch data, sanitize it to keep only the useful information, and store it in the database. I will create an endpoint, accessible only for the admin, to fetch the modules and store them in the database. A second endpoint will be available to retrieve the modules from the database. This will be useful for the frontend to display the modules.
Fetching the external API
I create an endpoint server/api/modules/fetch.post.ts (off stream, I found that calling this endpoint sync was a better idea) to fetch the modules from the external API and store them in the database.
First, I add the utility requireAdminUser to secure the endpoint. Then, I fetch the modules from the external API using the global $fetch function:
export default defineEventHandler(async (event) => {
  await requireAdminUser(event)

  const data = await $fetch('https://api.nuxt.com/modules')
})
The data returned by the API contains a lot of data that I don't need. I only need the name, repo, type, and icon of the modules. So I sanitize the data to keep only the useful information:
const modules = data.modules
  .map(({ name, type, icon, repo }) => ({ name, type, icon, repo }))
  .filter(({ type }) => type === 'official' || type === 'community')
I choose to not keep the type third party because it can be a module from anybody and I don't know the quality of them. The repo key was not planned to have it but I think it's a good idea to have it. I could use it to add a link to the GitHub repository of the module on a theme page.
Now I have my modules, I need to store them in the database, and I also need to create the table to store them. In the file server/database/schema.ts, I create the table modules:
export const modules = sqliteTable('modules', {
  id: integer('id').primaryKey({ autoIncrement: true }),
  name: text('name').notNull().unique(),
  repo: text('repo').notNull().unique(),
  type: text('type', { enum: ['official', 'community'] }).notNull(),
  icon: text('icon'),
})
Note
Do not forget to run the drizzle command to generate the SQL migration.
In the endpoint, it's now possible to insert the modules into the database:
await useDrizzle().insert(tables.modules).values(modules).execute()BUT, surprise, it does not work. I did not know, but the Cloudflare D1 has a (several) limit on the bound parameters at 100. In reality, this limit exists because they use a SQLite under the hood which has this limit for security reasons.
What is a bound parameter? It's a parameter in a SQL query that is replaced by a value when the query is executed. For example, in the query SELECT * FROM users WHERE id = ?, the ? is a bound parameter. In the case of the insert query INSERT INTO users (name, email) VALUES (?, ?), the bound parameters are the values to insert in the table. The limit is 100 bound parameters. Warning, a row is not a bound parameter, a bound parameter is a single value, meaning that if you insert a row with 10 columns, it will count as 10 bound parameters. There are 42 modules with 4 columns, so 168 bound parameters.
This is a real problem because I'll have to split the insert into multiple queries and a worker is time limited, so if it runs too long, the worker could fail.
const columnsPerModule = Object.keys(modules[0]).length
const insertPerLoop = Math.floor(100 / columnsPerModule)
const loops = Math.ceil(modules.length / insertPerLoop)

for (let loop = 0; loop < loops; loop++) {
  const values = modules.slice(loop * insertPerLoop, (loop + 1) * insertPerLoop)
  await useDrizzle().insert(tables.modules).values(values).onConflictDoNothing({ target: tables.modules.repo }).execute()
}
In order to have a dynamic insert in case I change the number of columns, I calculate the maximum number of rows I can insert in a single query. Then, I loop over the modules and insert the maximum number of rows in each query. I also use the onConflictDoNothing method to avoid inserting the same module twice if I run the endpoint multiple times.
I tried this in a production environment, and everything is working fine.
I choose to return a 204 status code when the modules are fetched. If everything is ok, I can refresh the modules list in the UI to view the new modules.
Serving the Modules
This part is exactly the same as the categories and users index endpoint. I create an endpoint server/api/modules/index.get.ts to get the modules from the database:
export default defineEventHandler(async () => {
  const modules = await useDrizzle().select({
    id: tables.modules.id,
    name: tables.modules.name,
    type: tables.modules.type,
    icon: tables.modules.icon,
  }).from(tables.modules)

  return modules
})
Nothing new here, I just select the modules from the database and return them.
Conclusion
All of this stuff gives us this result:
This stream was different from the others. First, I now have a new mic and the sound is way better than before!
Second, I encountered a problem with the D1 limit (that could result in a need to rethink the project, hopefully not) on the bound parameters. This is a good lesson for me, and I hope it will be useful for you.
Refactoring the User Management
This part was done off-stream because it was not interesting to see and I was not sure of the direction I wanted to take.
While writing a part of this article, I ask myself if storing the user's data was a good idea. Couldn't it be better? This question comes from the way I handle the authentication endpoint.
Actually, when a user logged in, I always write to the database the user's data to be sure to be up-to-date. The main concern is that a write is way more expensive than a read. To find ideas, I read the Atinux's Nuxt todo list project. In this project, it does not store the user's data. When the user logs in, it only stores the user's ID in the cookie. When the user creates a todo, it simply has to read the user's ID from the cookie to know who is the user. It's very smart and simple. I will do the same. First through.
Let's analyze if this way is possible for the Orion project. To know if it's possible, I need to answer some questions:
- Can I ban or promote a user without storing the user's data?
- Can a user create data without storing the user's data?
- Can I show user's data without storing the user's data?
For the first question, it's yes. I can imagine a system where you enter the login of a user, and when the user logs in, I will search in the database if the entry exists and get relevant data. It's not the best way but it's possible.
For the second question, it's yes. Since data are in the cookie, I can easily know who is the user and create data using this information. And that's how it works actually. I do not fetch the user for every request.
For the third question, it's no. Imagine, I want to show the template created by the user 'X'. In our SQL schema, we have a column user_id in the templates table. If I do not store the user's data, I will not be able to know who is the user 'X', associated with the user_id. I will have to store the user's data in the database. It could be possible with a non-relational database but it's not the case here. We could also imagine a system where the user is saved when he creates a template. It's possible but it will add a lot of complexity. At the end, this answer and the one from the question one just over complicate the system for no real gain.
Now we know that we have to store the users in the database, what can we improve?
- Saving the user's data only if it's necessary. For example, I could first search for the user before saving its data when the user logs in.
- Saving the user's mail. This will be useful for the feedback system.
- Saving the user's name and renaming the
usernamecolumn tologin. - Adding a
created_atand anupdated_atcolumn. - Updating data stored in the cookie.
With all of these points, I also update the UI accordingly. There is nothing difficult here; it's mainly renaming and adding fields in the schema.
export const users = sqliteTable('users', {
  id: integer('id').primaryKey({ autoIncrement: true }),
  githubId: integer('github_id').notNull().unique(),
  email: text('email').notNull().unique(),
  login: text('login').notNull().unique(),
  name: text('name'),
  avatarUrl: text('avatar_url').notNull(),
  roleType: text('role_type', { enum: ['admin', 'creator'] }).default('creator'),
  createdAt: text('created_at').notNull().$defaultFn(() => sql`(current_timestamp)`),
  updatedAt: text('updated_at').notNull().$defaultFn(() => sql`(current_timestamp)`).$onUpdateFn(() => sql`(current_timestamp)`),
})
Functions $defaultFn and $onUpdateFn are used to set the default value of the column. In the case of createdAt, the default value is the current timestamp. In the case of updatedAt, the default value is the current timestamp, and the value is updated when the row is updated. It's all automatic and handled by Drizzle.
I also update the server/routes/auth/github.ts to store the user's data only if it's necessary:
export default oauth.githubEventHandler({
  config: {
    emailRequired: true,
  },
  async onSuccess(event, result) {
    const { user: ghUser } = result

    const githubId = ghUser.id

    let user: User | undefined

    user = await useDrizzle().select().from(tables.users).where(eq(tables.users.githubId, githubId)).get()

    /**
     * If the user is not in the database or their data has changed, update the user data.
     * A write is more expensive than a read, so we only write if necessary.
     */
    if (!user || userDataChanged(user, ghUser)) {
      user = await useDrizzle().insert(tables.users).values({
        githubId,
        login: ghUser.login,
        email: ghUser.email,
        name: ghUser.name,
        avatarUrl: ghUser.avatar_url,
      }).onConflictDoUpdate({
        target: tables.users.githubId,
        set: {
          login: ghUser.login,
          email: ghUser.email,
          name: ghUser.name,
          avatarUrl: ghUser.avatar_url,
        },
      }).returning().get()
    }

    /**
     * Set only the necessary data in the session.
     */
    await setUserSession(event, {
      user: {
        id: user.id!,
        login: ghUser.login,
        email: ghUser.email,
        name: ghUser.name,
        avatarUrl: ghUser.avatar_url,
        roleType: user.roleType || 'creator',
      },
    })

    return sendRedirect(event, '/portal')
  },
})With this new way to handle the user's data, I reduce the number of writes to the database while still updating the user's data when necessary.
Creating a form for templates
Orion is a full-stack application built with Nuxt and developed live on Twitch. You can see the replay on YouTube and the source code is open-source on GitHub.
Since the beginning of the series, I've been working on the admin interface of the web application. Today, it's time to create the form to add a new template. This form will be used by the creators to add their templates or themes to the platform. As a reminder, Orion is a community-driven collection of templates for your next project, from landing pages to complete web applications.
Template Schema
Remember that things evolve and the schema is not definitive.
Since the template feature is a big one, I split it into multiple live streams. The first step is to create the simplest but working form possible and adding features over time. This explains why the schema above is not exactly the same as the one we drew in the SQL schema (no modules, no images, and no markdown, for the moment).
export const templates = sqliteTable('templates', {
  id: integer('id').primaryKey({ autoIncrement: true }),
  hash: text('hash').notNull().unique(),
  slug: text('slug').notNull(),
  title: text('title').notNull(),
  status: text('status', { enum: ['submitted', 'refused', 'validated'] }).notNull().default('submitted'),
  paidStatus: text('paid_status', { enum: ['free', 'paid'] }).notNull().default('free'),
  liveUrl: text('live_url'),
  accessUrl: text('access_url').notNull(),
  description: text('description').notNull(),
  userId: integer('user_id').notNull().references(() => users.id),
  categoryId: integer('category_id').notNull().references(() => categories.id),
})
The hash column is a small ID I'll store in the database to create URL like Notion or Dev.to: <slug>-<hash>. This is helpful to have a readable URL, for both humans and SEO, but because two templates can have the same name, or the name of a template can change, I need to have a unique ID.
For the first time, we create a relation between two tables: a one-to-many between the users table and the templates table. This relation is used to know who is the creator of the template. The userId column is a foreign key that references the id column of the users table.
The categoryId column is also a foreign key that references the id column of the categories table. This relation is used to know in which category the template is.
In order to be able to retrieve templates from a user or a category, I also need to define the relation the other way around. Thanks to Drizzle, it's pretty easy.
export const usersRelations = relations(users, ({ many }) => ({
  templates: many(templates),
}))

export const categoriesRelations = relations(categories, ({ many }) => ({
  templates: many(templates),
}))
Template Form
During this phase, I create the form on the UI, exactly like I did for the categories. I define the state, the schema, and the action on submit!
Now that a user is able to fill a form, I need an endpoint to save the data in the database. I create the endpoint server/api/templates/index.post.ts to save the template in the database:
import { number, object, string, enum as zEnum } from 'zod'

export default defineEventHandler(async (event) => {
  const { user } = await requireUserSession(event)

  const body = await readValidatedBody(event, object({
    title: string(),
    paidStatus: zEnum(['free', 'paid']),
    categoryId: number(),
    liveUrl: string().optional(),
    accessUrl: string(),
    description: string().max(1000),
  }).parse)

  await useDrizzle().insert(tables.templates).values({
    hash: useHash(),
    slug: useSlugify(body.title),
    title: body.title,
    categoryId: body.categoryId,
    paidStatus: body.paidStatus,
    liveUrl: body.liveUrl,
    accessUrl: body.accessUrl,
    description: body.description,
    userId: user.id,
  }).execute()

  return sendNoContent(event, 201)
})Pretty similar to the endpoint to create a new category. One difference is the usage of the util requireUserSession to ensure that the request is from an authenticated user and to get the user's data. I use the data to fill the userId column in the templates table. Of course, I validate the data received from the client using Zod.
The useHash util is a little wrapper around the package nanoid.
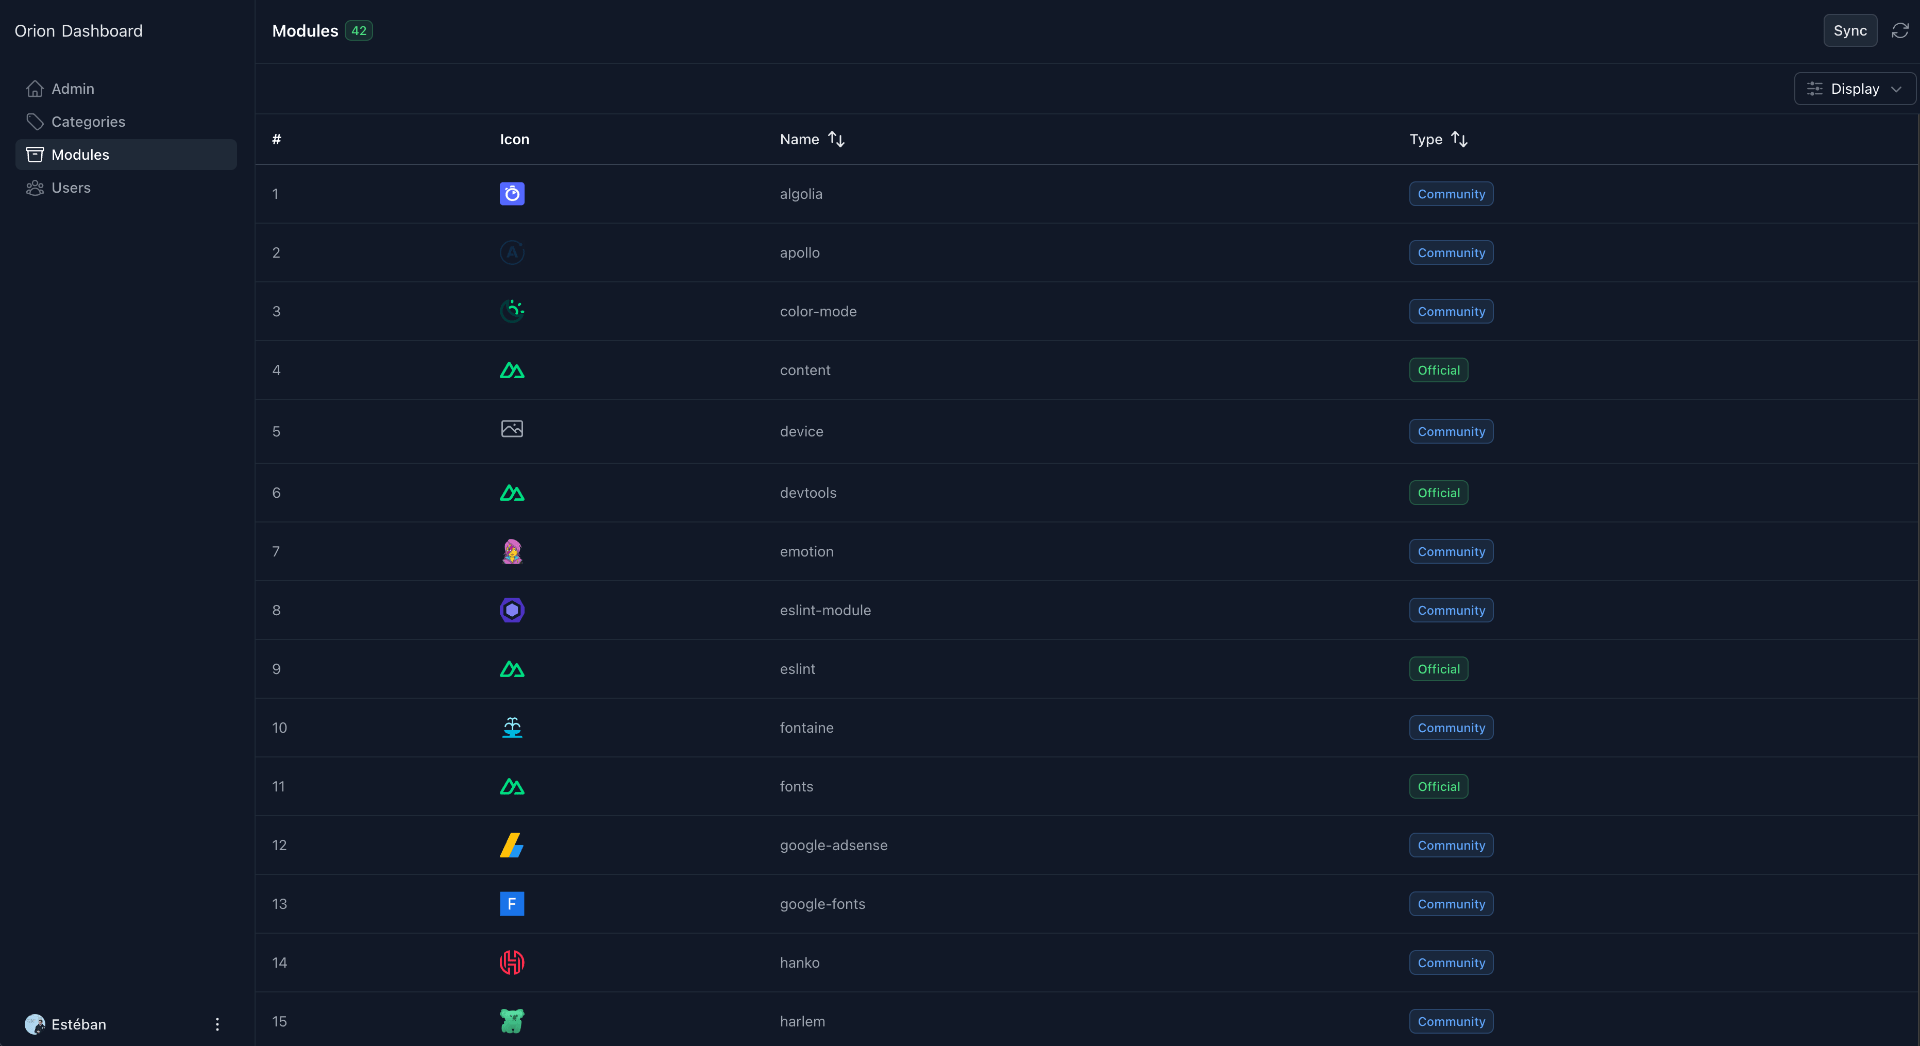
Templates in Admin Interface
During this part, I encountered an important bug. Read carefully the next part, it could save you a lot of time if you also plan to use Drizzle on Cloudflare.
Users are able to create templates, that's nice. In order to monitor and approve them, I need to create a page in the admin interface to manage the templates. This page will display the templates in a table and allow the admin to approve or refuse them. I only implement the view, not the action. The task is simple, it's like any other page in the admin interface. If only I knew...
First, let's create the endpoint to get the templates from the database. I create the endpoint server/api/templates/index.get.ts:
export default defineEventHandler(async () => {
  const templates = await useDrizzle()
    .select()
    .from(tables.templates)
    .leftJoin(tables.users, eq(tables.templates.userId, tables.users.id))
    .leftJoin(tables.categories, eq(tables.templates.categoryId, tables.categories.id))

  return templates
})
This endpoint gets all the templates from the database and populates them using a join and the relation we define earlier in the schema.
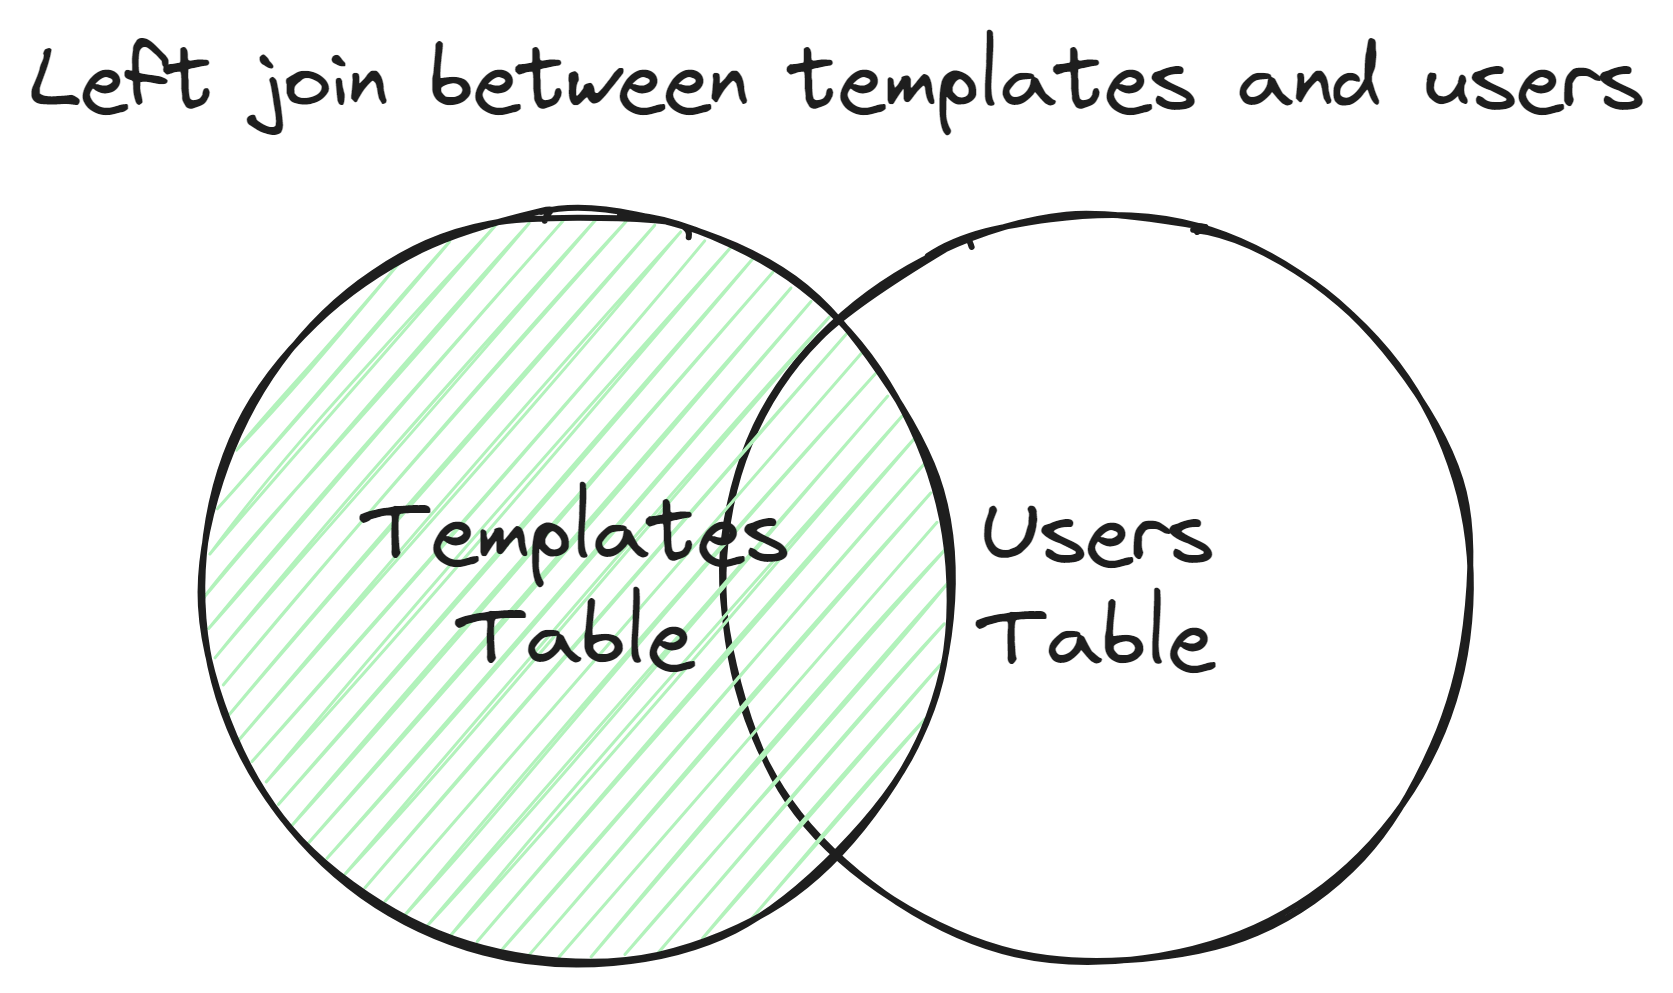
A join is a SQL operation that combines rows from two or more tables based on a related column between them. In this case, I join the templates table with the users table and the categories table. The leftJoin method is used to keep all the rows from the templates table, even if there is no match in the users or categories table.
Now that I have the data, I can display it on the UI. I use the UTable component from Nuxt UI Pro to display the templates in a table:
<script lang="ts" setup>
const columns = [{
  key: 'id',
  label: '#',
}, {
  key: 'title',
  label: 'Title',
  sortable: true,
}, {
  key: 'status',
  label: 'Status',
  sortable: true,
}, {
  key: 'paidStatus',
  label: 'Paid Status',
  sortable: true,
}, {
  key: 'liveUrl',
  label: 'Live URL',
}, {
  key: 'accessUrl',
  label: 'Access URL',
}, {
  key: 'description',
  label: 'Description',
}, {
  key: 'category',
  label: 'Category',
}, {
  key: 'createdBy',
  label: 'Created By',
}]

const { data: templates, refresh, pending } = await useFetch('/api/templates', {
  deep: false,
  lazy: true,
  default: () => [],
})
</script>

<template>
  <UTable
    :columns="columns"
    :rows="templates"
    :loading="pending"
  >
    <template #liveUrl-data="{ row }">
      <UButton
        v-if="row.liveUrl"
        variant="link"
        target="_blank"
        :to="row.liveUrl"
        class="flex flex-row items-center gap-1"
      >
        <span>{{ row.liveUrl }}</span>

        <span class="i-heroicons-arrow-top-right-on-square-16-solid inline-block h-4 w-4" />
      </UButton>
      <span v-else> - </span>
    </template>
    <template #accessUrl-data="{ row }">
      <UButton
        variant="link"
        target="_blank"
        :to="row.accessUrl"
        class="flex flex-row items-center gap-1"
      >
        <span>{{ row.accessUrl }}</span>

        <span class="i-heroicons-arrow-top-right-on-square-16-solid inline-block h-4 w-4" />
      </UButton>
    </template>
    <template #paidStatus-data="{ row }">
      <template v-if="row.paidStatus === 'free'">
        <UBadge
          color="green"
          variant="subtle"
        >
          Free
        </UBadge>
      </template>
      <template v-else-if="row.paidStatus === 'paid'">
        <UBadge
          color="yellow"
          variant="subtle"
        >
          Paid
        </UBadge>
      </template>
    </template>
    <template #createdBy-data="{ row }">
      <div class="flex flex-row items-center gap-2">
        <img
          :src="row.user.avatarUrl"
          alt="avatar"
          class="h-6 w-6 rounded-full"
        >
        <span>{{ row.user.name ?? row.user.login }}</span>
      </div>
    </template>
    <template #category-data="{ row }">
      {{ row.category.name }}
    </template>
  </UTable>
</template>But it does not work. Using a lot of Adonis, I was familiar to having an object like this:
{
  "id": 1,
  "title": "My template",
  "status": "submitted",
  "liveUrl": "https://example.com",
  "user": {
    "id": 1,
    "name": "John Doe",
    "avatarUrl": "https://example.com/avatar.jpg"
  },
  "category": {
    "id": 1,
    "name": "Landing Page"
  }
}
But I received an object like this:
{
  "template": {
    "id": 1,
    "title": "My template",
    "status": "submitted",
    "liveUrl": "https://example.com"
  },
  "user": {
  },
  "category": {
  }
}
and what a surprise it was to see that the keys and the values were exchanged between them. Hard to explain but see the example.
{
  "template": {
    "id": "My template",
    "status": "https://example.com"
  },
  "user": {
    "id": "John Doe",
    "login": "https://avatars.github.com/u/1"
  }
}
Very hard to play with data now! The ID should be a number and the login should definitely not be a URL.
After a long research, I found two issues: https://github.com/cloudflare/workers-sdk/issues/3160 and https://github.com/drizzle-team/drizzle-orm/issues/555 explaining why it does not work. When two tables have the same column name, Drizzle and Cloudflare are unable to resolve them correctly and mix the data. The solution is to explicitly select the columns and rename similar columns.
const templates = await useDrizzle().select({
  id: tables.templates.id,
  title: tables.templates.title,
  description: tables.templates.description,
  status: tables.templates.status,
  paidStatus: tables.templates.paidStatus,
  liveUrl: tables.templates.liveUrl,
  accessUrl: tables.templates.accessUrl,
  user: {
    name: tables.users.name,
    login: tables.users.login,
    avatarUrl: tables.users.avatarUrl,
  },
  category: {
    name: sql<string>`${tables.categories.name}`.as('c_name'),
  },
}).from(tables.templates).leftJoin(tables.users, eq(tables.templates.userId, tables.users.id)).leftJoin(tables.categories, eq(tables.templates.categoryId, tables.categories.id))
sql<string>'${tables.categories.name}'.as('c_name') is the important code. I rename the column name to c_name to avoid the conflict. I also use this syntax to format the object with the key user and category. Now, everything works as expected.
Conclusion
Working on the client side, and not only on the admin part, makes the project even more concrete. There is still a lot of work on the template form like the markdown or the image, but it's a pretty good start.
Really enjoy this project and I hope you too.
Continuing the Template Form
Orion is a full-stack application built with Nuxt and developed live on Twitch. You can see the replay on YouTube and the source code is open-source on GitHub.
This stream was short so I try to make interesting stuff. I mainly do three things:
- Create the show template page
- Handle markdown on the server-side for the template description
- Add a markdown editor for the template description
Let's see how it goes. During the stream, it goes well but since, I completely rewrite the markdown editor part.
Show Template Page
This item was more about the usage of the URL that the design of the page. Indeed, the URL will work like Notion or Dev.to: /<slug>-<hash> where the slug is the name of the template and the hash is a unique identifier. The slug is used for SEO and the hash is used to get the template. The slug is not unique and can change over time. The hash is unique and serves to get the template.
In the page, we first start by getting the params from the route:
const route = useRoute()
const slug = route.params.slug // <slug>-<hash>
The variable slug contains both the template slug and hash. We know the hash is exactly 12 characters long so we can split the slug to get the slug and the hash:
slug.slice(-12)Finally, we can make a request to the backend to retrieve the template. All of this gives us this code:
<script lang="ts" setup>
const route = useRoute()
const hash = computed(() => {
  return (route.params.slug as string).slice(-12)
})
const { data: template } = await useFetch(`/api/templates/${hash.value}`, {
  deep: false,
})
</script>

<template>
  <article
    v-if="template"
  >
    {{ template }}
  </article>
</template>
The server part is not that complicated since we only get the hash from the router param and search for the template using a where clause:
import { object, string } from 'zod'

export default defineEventHandler(async (event) => {
  const params = await getValidatedRouterParams(event, object({
    hash: string().length(12),
  }).parse)

  const { hash } = params

  const template = await useDrizzle().select().from(tables.templates).where(eq(tables.templates.hash, hash))

  return template
})
Later we will need to join the user's data and the category's data to have a complete template.
Server-Side Markdown
The idea of receiving markdown from the client is to easily sanitize it to avoid HTML injection.
Imagine if the client send this HTML code:
<p> Hello World!</p>
<script> console.log('hacked') </script>
If the server stores this content in the database and then display it using the directive v-html, every user that will see the page will execute the page. That's a real security issue.
By receiving markdown from the client, I can easily transform it using markdown-it and store the sanitized HTML in the database. The sanitized HTML is HTML that does not contain any script or dangerous tag.
So to do this, I need to install markdown-it and update the endpoint to create a template server/api/templates/index.post.ts. I also add a new column descriptionHTML to the schema to store the sanitized HTML. Storing the HTML avoids to do it every time we render the page.
await useDrizzle().insert(tables.templates).values({
  hash: useHash(),
  slug: useSlugify(body.title),
  title: body.title,
  categoryId: body.categoryId,
  paidStatus: body.paidStatus,
  liveUrl: body.liveUrl,
  accessUrl: body.accessUrl,
  description: body.description,
  descriptionHTML: useMarkdown(body.description),
  userId: user.id,
}).execute()
The useMarkdown function is a simple function that uses markdown-it to transform the markdown to HTML.
Markdown Editor
This part is highly experimental and could change in the future. This is a first implementation.
While writing this part, I made some more research and everything will change. I think it's still interesting to see the process.
Before starting, I need to make a choice. Which markdown editor should I use? Remember that we've just implemented a server endpoint to handle markdown. I have many options:
- SimpleMDE
- EasyMDE
- TinyMDE
- Editor.js
- Quill
- Trix
- CKEditor
- TinyMCE
That's a lot of options. But, what are my needs? I need a dead simple editor that can return markdown. Sounds easy, right?
Editor.js, CKEditor and TinyMCE are advanced editors so I will not use them. SimpleMDE is a good option but way too old. It has not received any updates since 6 years. SimpleMDE and TinyMDE are forks of SimpleMDE. EasyMDE is powerful, simple and returns markdown. It's a good option. TinyMDE does not have enough customization options. Trix and Quill are not markdown editors. They are rich text editors so they do not output markdown. I will go with EasyMDE. For the moment.
So, we can now install the package and use it. The usage is a little tricky. Since a client only package, we cannot execute, nor import, it on the server. To use it, we will dynamically import it in a onMounted hook. onBeforeMount is even better!
onMounted(async () => {
  const EasyMDE = await import('easymde').then(m => m.default)
  const easymde = new EasyMDE()
})
And it works? Yes but I think we completely forgot to import the style!
I think we forgot to add the style for EasyMDE. Thanks to Vite and its CSS loader, we can import the CSS file directly in our script.
<script lang="ts" setup>
import 'easymde/dist/easymde.min.css'
</script>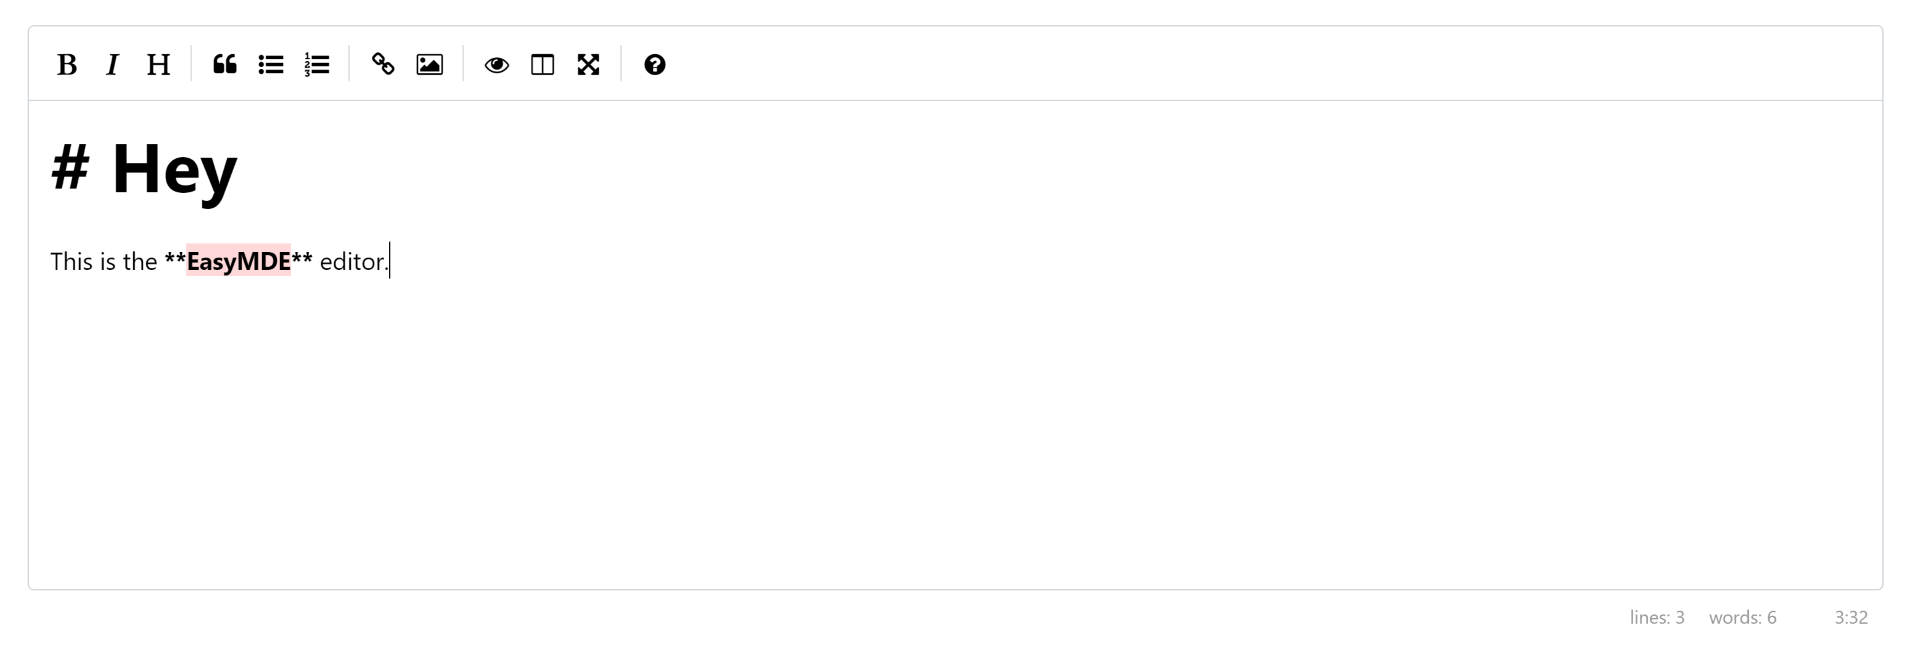
Ok, it's not perfect and I will have some work to do, on both styles and icons. But it's a good start. The only part that I do not like is the markdown symbol. I would prefer to not have them because it's not user-friendly (anyone could have to create a template).
But anyway, it's a good start and I can now easily listen to the editor changes and update the description.
<script lang="ts" setup>
const description = ref<string>('')
onMounted(async () => {
  const EasyMDE = await import('easymde').then(m => m.default)
  const easymde = new EasyMDE()
  easyMDE.codemirror.on('change', () => {
    description.value = easyMDE.value()
  })
})
</script>
Now, I can send the description to the server and it will be transformed to HTML!
What's Next for the Form?
The form is far from done but it's progressing well. I will add the support for the images and the modules in the next stream.
The Orion project is nearly ready for an alpha release and I'm excited to see how the community will use it and discover the content they will share.
Replacing the Markdown Editor
This part was done off-stream because I was not satisfied with the EasyMDE editor but I did not know what to do.
After thinking about it, I realized that using Markdown, for a simple description and that can be used by non-technical users, is not the best idea. Furthermore, the EasyMDE editor uses CodeMirror which is slow and way too heavy for a simple editor.
Now we know that the EasyMDE editor is not the best solution for our needs, we need to find a new one. We need a simple Rich Text Editor and there are two main options: Quill and Trix. In that case, Quill seems to be simpler so I will go with it. I will not detail the installation of Quill, it's pretty simple.
Because Quill is a rich text editor, it does not output markdown but HTML. So I need to update the endpoint to store the HTML instead of the markdown. I also need to update the schema to remove the description column and add a descriptionHTML column.
Updating the Endpoint
Why do I need to update the endpoint? Quill returns HTML that is already sanitized so I could directly store it in the database. Yes but no. We are building an API and it's impossible to trust the client, even our own client. Anyone can change the HTML or use an HTTP client to send a request to the server with malicious HTML. So I need to sanitize the HTML on the server.
For example, here's some malicious HTML:
<p> Hello World! </p>
<script> console.log('hacked') </script>
If you store this HTML in the database and display it using the directive v-html, every user that will see the page will execute the script. That's a real security issue. We can't use because Vue will escape the HTML so sanitizing our content is the only solution.
I will use the sanitize-html package to sanitize the HTML. After sanitizing using this package, the HTML will be:
<p> Hello World! </p>That's perfect!
await useDrizzle().insert(tables.templates).values({
  description: body.description ? sanitizeHtml(body.description) : null,
})
The sanitizeHtml function is the default export of the sanitize-html package. Easy right?
Updating the Schema
Now, I need to update the schema to remove the descriptionHTML column since the description is now HTML by default. It's important to know that if the user needs to edit his template, the HTML will be used by the Quill editor.
export const templates = sqliteTable('templates', {
  description: text('description'),
  descriptionHTML: text('description_html'),
})
Updating the UI
The usage of Quill is not that different from EasyMDE. I lazy load the Quill package, create a new instance of it, and listen for the changes. I do not forget to import the CSS file.
<script lang="ts" setup>
import 'quill/dist/quill.snow.css'

onBeforeMount(async () => {
  const Quill = await import('quill').then(m => m.default)
  quill.value = new Quill('#editor', {
    theme: 'snow',
  })
  quill.value?.on('text-change', (_, __, source) => {
    state.description = quill.value?.root.innerHTML ?? ''
  })
})
</script>

<template>
  <div id="editor" />
</template>
Of course, I need to add some custom styles to the editor to make it more native into the design.
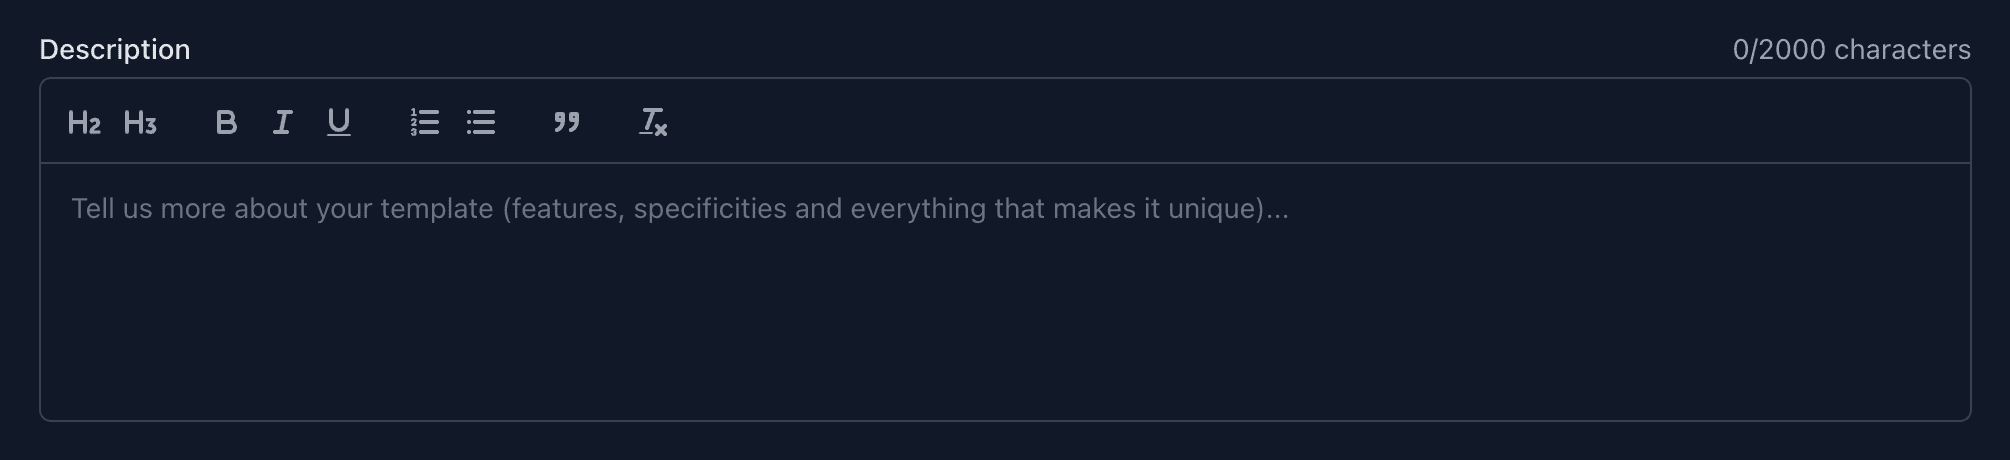
A last thing. I use this in a Nuxt UI form. In this form, every item is validated against the schema. This allows me to display an error message if the description is empty or too long. The problem is that it's not integrated in the Quill editor, it does not trigger any validation. Thanks to the Nuxt UI form API, I can easily validate the Quill editor content on every change.
<script lang="ts" setup>
const form = ref()

onBeforeMount(async () => {
  quill.value?.on('text-change', (_, __, source) => {
    state.description = quill.value?.root.innerHTML ?? ''
    form.value.validate('description', { silent: true })
  })
})
</script>

<template>
  <UFormGroup
    label="Description"
    name="description"
    :hint="`${state.description?.length || 0}/2000 characters`"
  >
    <div id="editor" />
  </UFormGroup>
</template>Now, the Quill editor is fully integrated into the form and an error message will be displayed if the description is empty or too long.
Conclusion
I'm really happy with this change. Since years, I was wondering how to install and use a rich text editor and now I know. You can use markdown for technical users, parse it on the server, and store HTML to simplify a get, or use a rich text editor for non-technical users and sanitize the HTML on the server. It's a good lesson for me and I hope it will be useful for you.
Adding Modules to the Template Form
Orion is a full-stack application built with Nuxt and developed live on Twitch. You can see the replay on YouTube and the source code is open-source on GitHub.
During this live stream, I added the ability to add modules to a template in the form. This feature is important because it will allow users to filter templates by modules.
I chose to do it in a separate stream because it's a many-to-many relation and a little bit more complex than the other parts. I was expecting to do it in 1 hour, but it took me 2 hours with the help of the chat. Indeed, I was stuck on the SQL query to retrieve a template populated with its modules, and the Drizzle documentation was not clear about it.
Let's deep dive into the code and let's understand how the Drizzle ORM relations concept works.
Schema
The creator can add multiple modules to a template. At the same time, a module can be used by multiple templates. The relation is a many-to-many relation. To handle this, I need to create a new table, called a pivot table, to store the relation between the templates and the modules. It acts as a link between the two tables to connect them. We use a pivot table instead of an array of modules in the template because it's more efficient and it's the SQL way to do it.
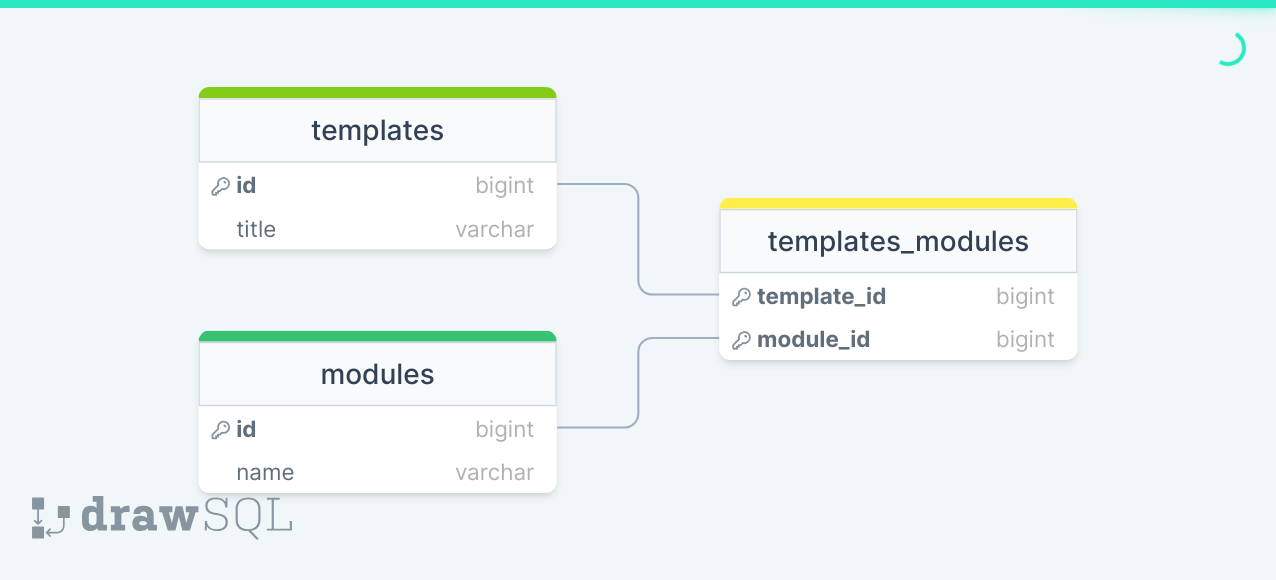
The schema is simplified to only show the relation between the templates and the modules. From the templates table, you can retrieve all the modules associated and inversely thanks to the templates_modules table.
export const templates = sqliteTable('templates', {
  id: integer('id').primaryKey({ autoIncrement: true }),
  title: text('title').notNull(),
})

export const modules = sqliteTable('modules', {
  id: integer('id').primaryKey({ autoIncrement: true }),
  name: text('name').notNull().unique(),
})

export const modulesToTemplates = sqliteTable('modulesToTemplates', {
  moduleId: integer('module_id').notNull().references(() => modules.id),
  templateId: integer('template_id').notNull().references(() => templates.id),
})
Modules Form
In this part, I will add the modules to the form, from the client side to the server side.
Adding Modules to the Template
In the UI, handling the modules is pretty simple. I fetch the modules from the server and display them in a USelectMenu with a multiple prop.
<script lang="ts" setup>
const { data: modules } = await useFetch('/api/modules', {
  deep: false,
  default: () => [],
})
</script>

<template>
  <USelectMenu
    :options="modules"
    multiple
    value-attribute="id"
    option-attribute="name"
  />
</template>
Validating the Modules
In the validator, I add a new field moduleIds that verifies that the modules are an array of integers.
import { array, number, object, string } from 'zod'

export const createTemplateValidator = object({
  title: string({ message: 'Required' }),
  moduleIds: array(number()).max(6, { message: 'Max 6 modules' }).optional(),
})
I arbitrarily set the maximum number of modules to 6. It's a number that I think is enough for a template.
Saving the Modules
Finally, I update the endpoint to save the template and related modules. I first save the template and then save the modules in the pivot table.
import { createTemplateValidator } from '~/utils/validators'

export default defineEventHandler(async (event) => {
  const { user } = await requireUserSession(event)

  const body = await readValidatedBody(event, createTemplateValidator.parse)

  const [template] = await useDrizzle().insert(tables.templates).values({
    title: body.title,
  }).returning({
    id: tables.templates.id,
  })

  if (body.moduleIds)
    await useDrizzle().insert(tables.modulesToTemplates).values(body.moduleIds.map(id => ({ moduleId: id, templateId: template.id }))).execute()

  return sendNoContent(event, 201)
})
I have to admit that I'm not very confident with this part. I will need to check if there is a better way to do it (using a transaction or a built-in Drizzle feature).
Populating the Template with Modules
This is where the hard times begin.
Initially, I had a custom SQL query that joined the templates table, the users table, and the categories table. You can learn more about this in the previous part.
To link the modules table, I tried to add a join with the modulesToTemplates table and then the modules table. The issue I encounter is how to group the modules by template to produce an array of modules for each template.
Something like:
{
  "id": 1,
  "title": "My template",
  "modules": [
    { "id": 1, "name": "Module 1" },
    { "id": 2, "name": "Module 2" }
  ]
}
I found the SQLite function group_concat that can be used to concatenate the modules. I was a little disappointed to have to do this manually because Drizzle presents itself as an ORM. I was expecting to have a way to do this easily.
BUT, the Twitch chat came to the rescue and suggested me to use the with key from the findMany method. I tried, and it did not really work. Cloudflare was complaining about a missing relation. I was a little bit lost.
I end up by carefully reading the documentation about the many-to-many relation page, and I understood that I need to explicitly define every relation between every table. In other words, I have to tell Drizzle how to join the tables. A template has many modules by using the modulesToTemplates table. A module has many templates by using the modulesToTemplates table. This is the way to define the many-to-many relation.
// A template has a many-to-many relation
export const templatesRelations = relations(templates, ({ one, many }) => ({
  // Linked to the pivot table and not directly to the modules table
  modules: many(modulesToTemplates),
}))

// The pivot table has 2 relations
export const modulesToTemplatesRelations = relations(modulesToTemplates, ({ one }) => ({
  module: one(modules, {
    fields: [modulesToTemplates.moduleId],
    references: [modules.id],
  }),
  template: one(templates, {
    fields: [modulesToTemplates.templateId],
    references: [templates.id],
  }),
}))

// A module has a many-to-many relation
export const modulesRelations = relations(modules, ({ one, many }) => ({
  // Linked to the pivot table and not directly to the templates table
  templates: many(modulesToTemplates),
}))This part is super important. In an ORM like Lucid, the usage of a pivot table is transparent. With Drizzle, you have to define relation between every table. It's a little bit more verbose, but it's also more explicit.
Finally, I can update the endpoint to retrieve the templates with their modules:
export default defineEventHandler(async () => {
  const templates = await useDrizzle().query.templates.findMany({
    with: {
      category: true,
      creator: true,
      modules: {
        with: {
          module: true
        },
      },
    },
  })

  return templates
})
The usage of the with, once everything is correctly defined, makes things so much easier; I really love it.
Conclusion
In my mind, this part was easy, and in 30 minutes, it was done. I already did a similar thing using Lucid from Adonis. In reality, it was not really hard, but finding the right part of the Drizzle documentation and then understanding it was way more difficult than expected. This is largely because Drizzle does not abstract SQL but acts as a little wrapper, and everything must be explicit.
I'm happy to have done it, I learned a lot, and a huge thanks to the chat for helping me.

Thanks for reading! My name is Estéban, and I love to write about web development and the human journey around it.
I've been coding for several years now, and I'm still learning new things every day. I enjoy sharing my knowledge with others, as I would have appreciated having access to such clear and complete resources when I first started learning programming.
If you have any questions or want to chat, feel free to comment below or reach out to me on Bluesky, X, and LinkedIn.
I hope you enjoyed this article and learned something new. Please consider sharing it with your friends or on social media, and feel free to leave a comment or a reaction below, it would mean a lot to me! If you'd like to support my work, you can sponsor me on GitHub!
Discussions
Add a Comment
You need to be logged in to access this feature.