Erase CLS by Automatically Optimizing Images with Vite
I love Vite, not only because it's fast, but also because of its amazing plugin system.
At its core, a Vite plugin lets you edit, on the fly, any file that is imported, whether it exists or not, in your project.
Once you understand that, everything becomes possible. Everything as a Vite plugin!
For years now, I've been building content-first websites where the content is written in Markdown. I also love using images to illustrate my content.
However, images are tricky. To improve performance, you want to lazy‑load them, but lazy loading inevitably causes Cumulative Layout Shift (CLS) if you don't reserve space. To reserve space, the browser needs to know the image dimensions beforehand. But you don't always want the same dimensions everywhere, so for each image, you need its dimensions for the browser to reserve the right amount of space.
Beyond that, images can quickly become large, and hosting them in your repository isn't ideal. So you might want to transfer them to a dedicated bucket. This means they will be served from a different domain, which, combined with lazy loading, even with the correct dimensions, will leave a blank space until they are fully loaded.
This is a solvable problem, but it requires a lot of manual work. I hate manual and repetitive work that can be automated!
Note
This article is dedicated to HTML content. Another article covers how to handle Markdown content using Markdown Exit.
Vite to the Rescue
The first question that comes to mind is: How do you know whether a Vite plugin is the right tool for the job?
This is an important question. I could just give you the solution, but you won't be able to apply a similar approach to your own problems. Sadly, most tutorials miss this step.
Let's analyze the problem by looking at its inputs and outputs.
The input is probably a raw HTML snippet like this one:
<div>
  <img src="/path/to/image.jpg" alt="An image">
</div>
The output should be an optimized HTML snippet like this one:
<div>
  <img
    src="https://cdn.example.com/path/to/image-optimized.jpg"
    alt="An image"
    width="600"
    height="400"
    loading="lazy"
    style="background-image: url('data:image/svg+xml;base64,...'); background-size: cover;"
  >
</div>
Vite is built around a pipeline that processes files as they're imported. This means we can hook into the pipeline, detect when the code contains an image, and transform it accordingly.
Our use case fits perfectly with Vite's capabilities. Vite plugins can have side effects on the imported files. They unlock really powerful use cases like automatic image compression, resizing, ...
Note
This article assumes images are available locally. Handling remote images won't be covered here, but I'll give a few hints at the end of the article.
Building the Plugin
What's the plan? It's great to have an idea of what we want to achieve, but how do we get there?
We need to hook into Vite's pipeline and look for Vue templates. Then, we need to find all <img> tags, extract their src attributes, load the images, get their dimensions, generate the blurred placeholder, and finally replace the original <img> tags with optimized ones.
Note
I'm using Vue for all my projects, but the same approach can be applied to any frontend framework supported by Vite.
Sounds easier than it is, especially when you don't know where to start and which tool to use.
To handle all the image processing, I use unpic. It's a fantastic set of primitives to handle everything related to images. To manipulate code and generate source maps, I use MagicString.
That's all we need!
Now, we can create a Vite plugin that does exactly what we want.
Note
You can use a Vite + Vue project as a starting point. The source code of the final plugin is available on GitHub.
In the vite.config.ts file of our project, let's first create a plugin:
import vue from '@vitejs/plugin-vue'
import { defineConfig } from 'vite'

export default defineConfig({
  plugins: [
    vue(),
    (() => {
      return {
        name: 'unpic',
      }
    })()
  ],
})
At a minimum, a Vite plugin must have a name. Our plugin is an IIFE (Immediately Invoked Function Expression). This allows us to have a context to store state without relying on global variables.
Then, we need to hook into the right part of the pipeline. There are a lot of hooks available, but in practice, the most useful one is transform. This hook is called for each file that is imported in the project. It receives the file's code and its id (path). We only want to process Vue files, so we can filter by file extension.
(() => {
  return {
    name: 'unpic',
    async transform(code, id) {
      if (!id.endsWith('.vue'))
        return

      // Some magic will happen here

      return {
        code,
        map: null,
      }
    }
  }
})()
But we can make it even more performant. Calling our plugin on every file is unnecessary, especially with Rolldown, where the communication between Rust and JavaScript incurs a small overhead. To avoid that, we can use some filters to only process files that match certain criteria. In our case, we only want to process Vue files.
(() => {
  const imgTagRegex = /<img\s[^>]*src=["']([^"']+)["'][^>]*>/g

  return {
    name: 'unpic',
    enforce: 'pre',
    transform: {
      filter: {
        id: /\.vue$/,
        code: imgTagRegex,
      },
      async handler(code) {},
    }
  }
})()
This filter ensures that our plugin only runs on Vue files that contain at least one <img> tag. So much better!
One last thing before we can start the magic: we need to make sure the plugin runs before the Vue plugin. Vue transforms Vue files into JavaScript files, and Single‑File Component (SFC) files are much simpler to process. To do so, we have two options:
- Place our plugin before the Vue plugin in the
pluginsarray. - Use the
enforce: 'pre'option in our plugin definition.
(() => {
  return {
    name: 'unpic',
    enforce: 'pre',
    transform: {
      // ...
    }
  }
})()
Now, we can start processing the Vue files to enhance the <img> tags.
Transforming the Code
Within the transform hook, the following needs to be done:
- Parse the code to find all
<img>tags. - For each
<img>tag, extract thesrcattribute. - Read the file from the filesystem.
- Process the image with
unpicto get its dimensions and a blurred placeholder. - Generate and replace the original
<img>tag with the optimized<img>tag with all the necessary attributes.
Before we start, we need to install the dependencies:
pnpm install -D @unpic/pixels @unpic/placeholder blurhash magic-stringLet's implement this step by step.
- Parse the code to find all
<img>tags.
// eslint-disable-next-line prefer-const
let match = imgTagRegex.exec(code) // We reuse the regex defined earlier- For each
<img>tag, extract thesrcattribute.
do {
  const srcValue = match[1]

  match = imgTagRegex.exec(code)
} while (match !== null)- Read the file from the filesystem.
import { readFile } from 'node:fs/promises'
import { join } from 'node:path'

const img = await readFile(join(resolvedConfig.publicDir, srcValue))- Process the image with
unpicto get its dimensions and a blurred placeholder.
import { getPixels } from '@unpic/pixels'
import { blurhashToDataUri } from '@unpic/placeholder'
import { encode } from 'blurhash'

const data = await getPixels(img)
const blurhash = encode(Uint8ClampedArray.from(data.data), data.width, data.height, 4, 4)- Generate and replace the original
<img>tag with the optimized<img>tag with all the necessary attributes.
import { blurhashToDataUri } from '@unpic/placeholder'

const newImgTag = match[0].replace(
  /<img(\s+)/,
  `<img$1width="${data.width}" height="${data.height}" style="background-size: cover; background-image: url(${blurhashToDataUri(blurhash)});" loading="lazy" `
)
After implementing all these steps, our final plugin looks like this:
(() => {
  let resolvedConfig: ResolvedConfig

  const imgTagRegex = /<img\s[^>]*src=["']([^"']+)["'][^>]*>/g

  return {
    name: 'unpic',
    enforce: 'pre',
    transform: {
      filter: {
        id: /\.vue$/,
        code: /<img\s[^>]*src=["']([^"']+)["'][^>]*>/g,
      },
      async handler(code, id) {
        const s = new MagicString(code)

        let match = imgTagRegex.exec(code)

        do {
          const srcValue = match![1]

          const img = await readFile(join(resolvedConfig.publicDir, srcValue))
          const data = await getPixels(img)
          const blurhash = encode(Uint8ClampedArray.from(data.data), data.width, data.height, 4, 4)

          const imgTagStart = match!.index
          const imgTagEnd = imgTagStart + match![0].length

          const newImgTag = match![0].replace(
            /<img(\s+)/,
            `<img$1width="${data.width}" height="${data.height}" style="background-size: cover; background-image: url(${blurhashToDataUri(blurhash)});" loading="lazy" `
          )

          s.overwrite(imgTagStart, imgTagEnd, newImgTag)

          match = imgTagRegex.exec(code)
        } while (match !== null)

        return {
          code: s.toString(),
          map: s.generateMap({ hires: true })
        }
      }
    },
    configResolved(config) {
      resolvedConfig = config
    }
  }
})()Note
The configResolved hook is used to get the resolved Vite configuration, which we need to access the publicDir where the images are stored.
The complete source code is also available on Barbapapazes/vite-vue-unpic.
With this plugin, we now provide a better user experience without adding any manual work to our content creation process.
When the page loads, the image space is already reserved thanks to the width and height attributes, and a blurred placeholder is displayed using the background-image style until the full image is loaded. This effectively eliminates CLS issues related to lazy‑loaded images and improves the overall user experience by providing a visual cue while the image is loading.
Observing the Pipeline
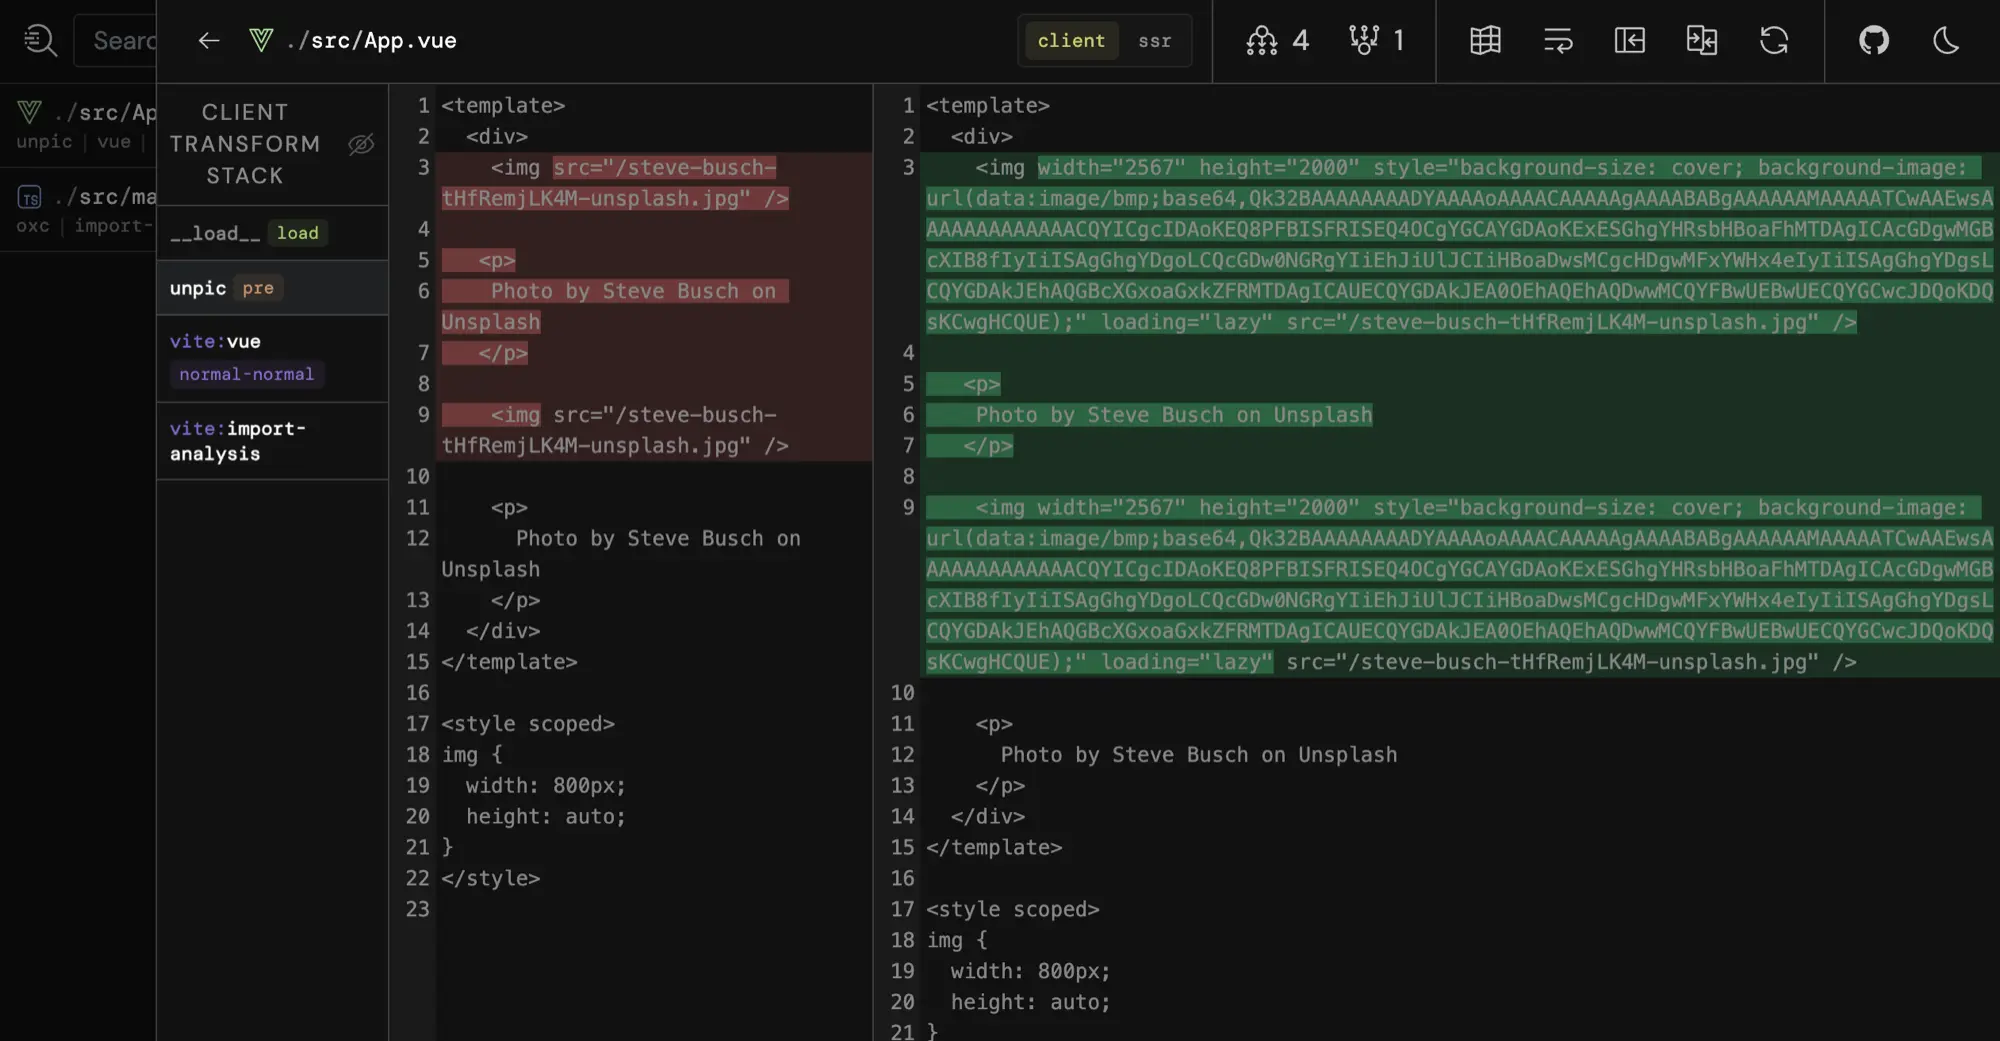
We can observe how our plugin interacts with the Vite pipeline using vite-plugin-inspect.
pnpm add -D vite-plugin-inspectThen, add it to the vite.config.ts file:
import { defineConfig } from 'vite'
import inspect from 'vite-plugin-inspect'

export default defineConfig({
  plugins: [
    inspect()

    // ...
  ]
})
Then, run the development server:
pnpm devAnd open the inspection panel at http://localhost:5173/__inspect/.
You can see all the files being processed by Vite. By clicking on App.vue, you can see how our plugin transformed the code step by step.
Going Further
Through this relatively simple yet useful example, I hope you learned about the power of Vite plugins.
Once you understand the mindset and the basics, you can automate nearly everything within your project. Since I learned how to create Vite plugins, I use them all the time to solve problems I didn't even know were solvable in another way.
To learn more about plugins, I highly recommend reading the source code of popular Vite plugins like vite-plugin-vue or unplugin-icons and those from VitePress. vite-plugin-inspect really helps to understand how plugins interact with each other and modify the code.
Also, this is a straightforward example. If you have a lot of images, you might want to add caching and parallel processing to speed up the build time. You could also handle remote images by downloading them before processing them.
Speaking of remote images, instead of reading the filesystem, you could fetch the images from your bucket, process them, and prefix the src attribute with your CDN URL. This avoids having to commit images to your repository and keeps the CDN URL in a single place.
I'm considering creating a small talk about Vite plugins. They are underappreciated and underdocumented. Please let me know if you would be interested!

Thanks for reading! My name is Estéban, and I love to write about web development and the human journey around it.
I've been coding for several years now, and I'm still learning new things every day. I enjoy sharing my knowledge with others, as I would have appreciated having access to such clear and complete resources when I first started learning programming.
If you have any questions or want to chat, feel free to comment below or reach out to me on Bluesky, X, and LinkedIn.
I hope you enjoyed this article and learned something new. Please consider sharing it with your friends or on social media, and feel free to leave a comment or a reaction below, it would mean a lot to me! If you'd like to support my work, you can sponsor me on GitHub!
Discussions
Add a Comment
You need to be logged in to access this feature.